Global Research Nexus Field Guide
The complete guide

Global Research Nexus, explained in plain English.

This guide walks through every part of Global Research Nexus (GRN) — what it does, what each screen means, and how it fits into the real work of getting a piece of research published. No technical background needed.

It's built for practising clinicians, nurses, and dissertation or PhD researchers who are doing research alongside everything else they do. Screenshots throughout are real — from GRN's own demo on the web, and from version 2.3.0 of the phone app — so what you see here is what you'll see when you open GRN yourself.
· Getting started

Welcome to Global Research Nexus

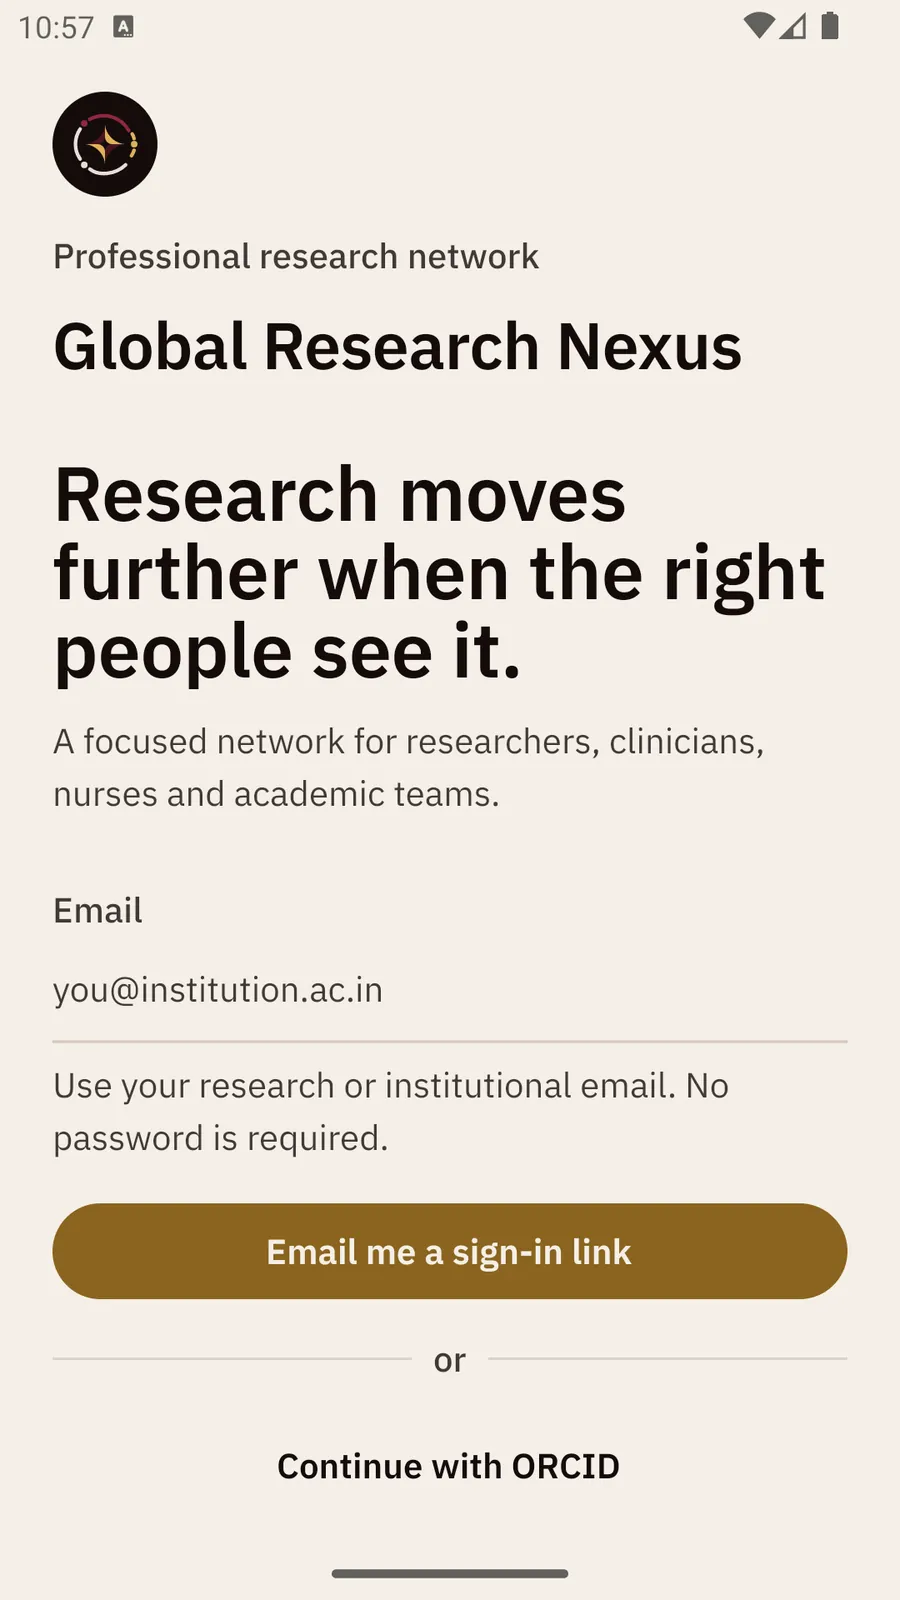
GRN's sign-in screen, reading: Research moves further when the right people see it.

Global Research Nexus is a guide for researchers, not just a search engine. It walks you from having a research question to submitting a finished paper — and it keeps a record of what happened afterward, so the next person at your institution starts a step ahead of you.

It's built first for clinicians, nurses, and dissertation or PhD researchers doing research on top of a full clinical or academic workload. You don't need to already know what an ISSN is, or what "indexed" means — this guide explains every term the first time it comes up, and there's a full glossary at the end.

This guide covers both places you can work: the web workspace (Part One, a bigger screen for the heavier writing) and the phone app (Part Two, for reading, reacting, and posting). One account, either device.

· Getting started

Signing up

You don't need a password, and you don't need a special work email. Type any working email address — a Gmail address is completely fine — and GRN sends you a sign-in link. Click it, and you're in. If you already have an ORCID (a free researcher ID number, explained in the glossary), you can use that instead, and it marks you verified straight away.

Everyone gets a free tier immediately: shaping a research question, a capped amount of free literature search, and a personal library that holds up to 50 saved references. Nothing is hidden behind a paywall on day one. This same account works on the web and on your phone — see whichever part of this guide matches where you are.

· Getting started

Getting verified — what it unlocks, and how without an institution email

GRN has three levels of access, and it's worth understanding all three up front because the names in the app can otherwise be confusing:

Signed in. Anyone can do this with any email. You can frame questions, search the free literature, and keep a small personal library.

Verified. You've proven you're a real, practising researcher. This unlocks posting, joining circles, showing up when other people search for researchers, and sending or receiving messages. Verification protects everyone on the platform from spam and fake accounts — it isn't a paywall.

Full workspace. This is Studio — drafting, journal matching, readiness checks, and specialist review. You get it if your institution is a partner, you have a subscription, or you're a flagged trusted tester.

There are four ways to get verified, and at least one of them works for almost everyone: connecting your ORCID, entering your medical or nursing council registration number, verifying an institution email address, or — if you don't have any of those, for example a student or a nurse at a hospital without an institution email — uploading a document (like a staff ID or admission letter) for a person to review by hand. Verification never costs money. Being verified and having the paid full workspace are two completely separate things.
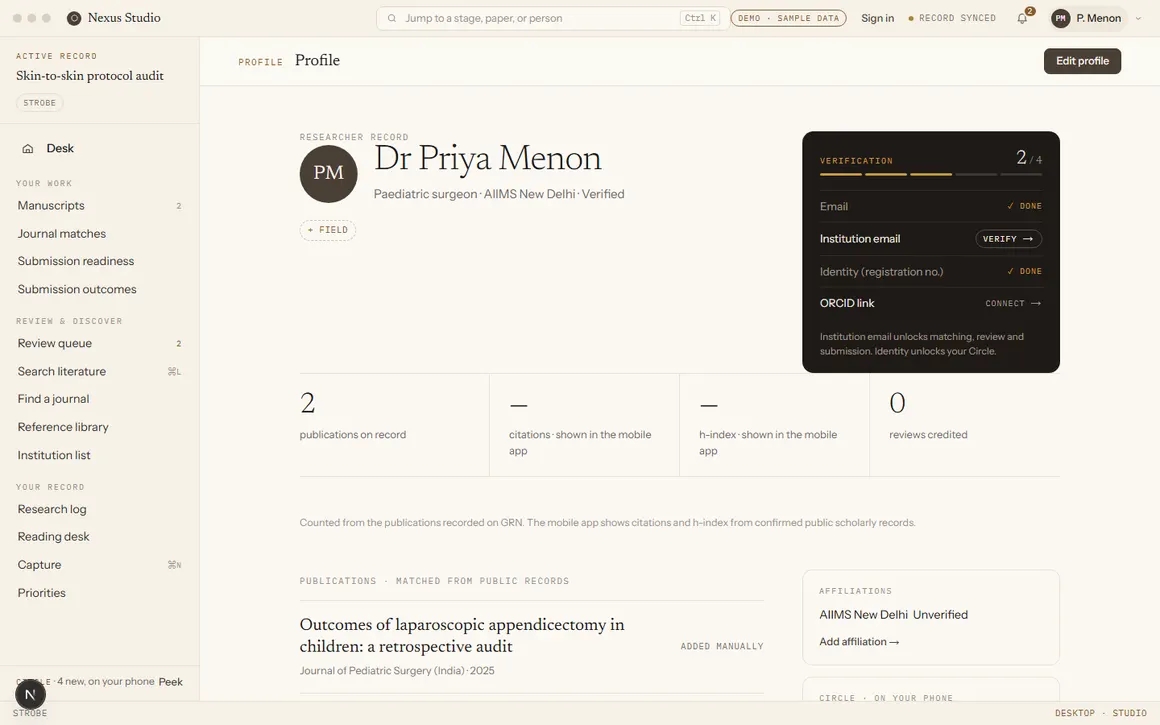
Profile screen showing a verification ladder at 2 of 4 steps complete: email done, institution email pending, identity done, ORCID not yet connected.
Your Profile shows exactly where you are on the ladder — here, 2 of 4 steps are done, and it says in plain words what each remaining step unlocks.
Part One · Web workspace

The bigger screen: framing, searching, drafting, and submitting.

Everything below runs at nexus.app in a browser — the deeper, heavier workspace built for the writing and the trust-checking that benefit from a proper keyboard and a wide screen.

Part One 1.1 Your home view

The Desk

Once you're signed in on the web, you land on the Desk — your home screen. It greets you by name, tells you the two or three things that actually need your attention today, and lists your records underneath. Everything else in the web workspace is one click away from here.
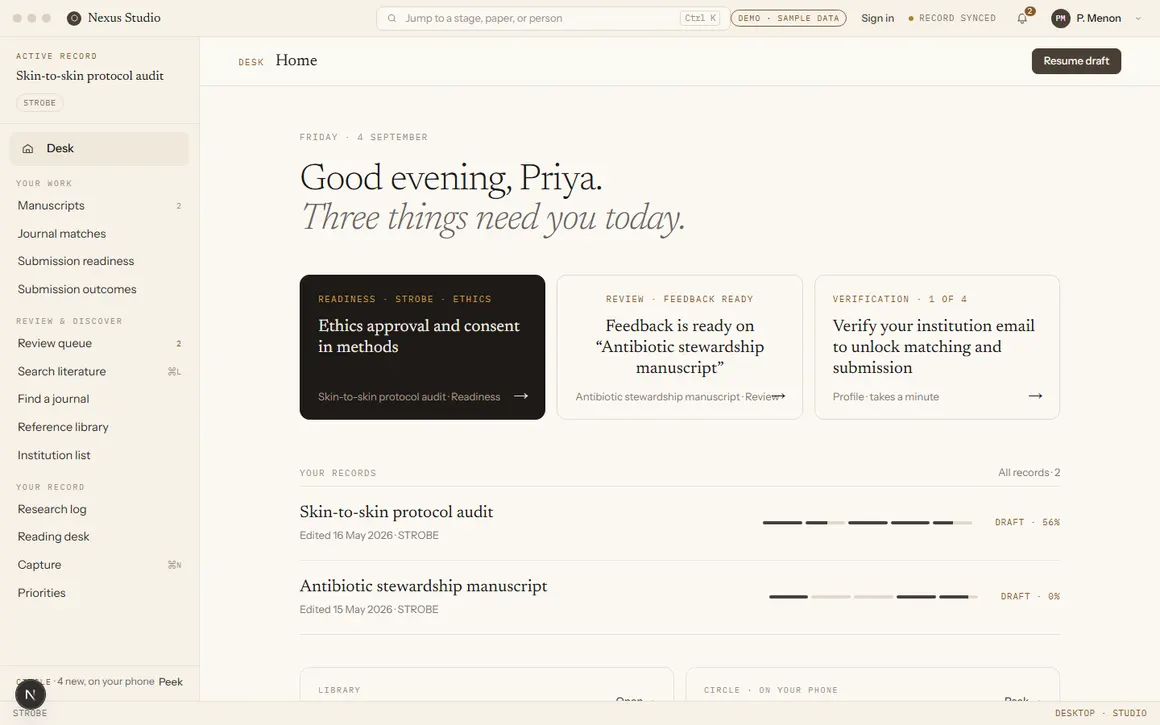
The Desk home screen, reading: Good evening, Priya. Three things need you today.
The Desk. "Three things need you today" is never a generic greeting — it's the actual work waiting on your account.
Part One 1.2

Turning a fuzzy idea into a real research question

Most research starts as a hunch, not a proper question — "something about kangaroo care and premature babies," not a sentence you could hand to a journal editor. GRN's question builder turns the hunch into a structured question by asking a few guiding prompts, choosing the shape that matches your kind of study (a treatment comparison needs a different shape of question than a survey or an interview study, for example).

You don't need to know the names of these different "shapes" — the tool picks the right one for you based on what you describe. What you get out is a properly framed question you can hand straight to a supervisor, an ethics committee, or the search tool next.
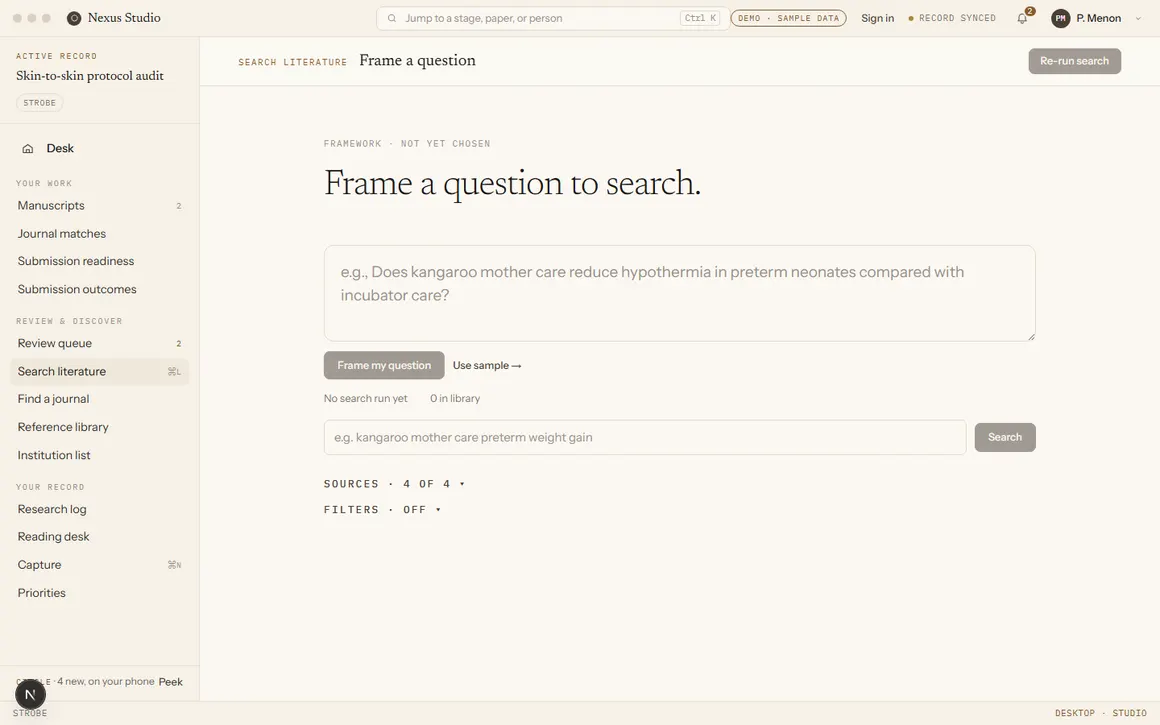
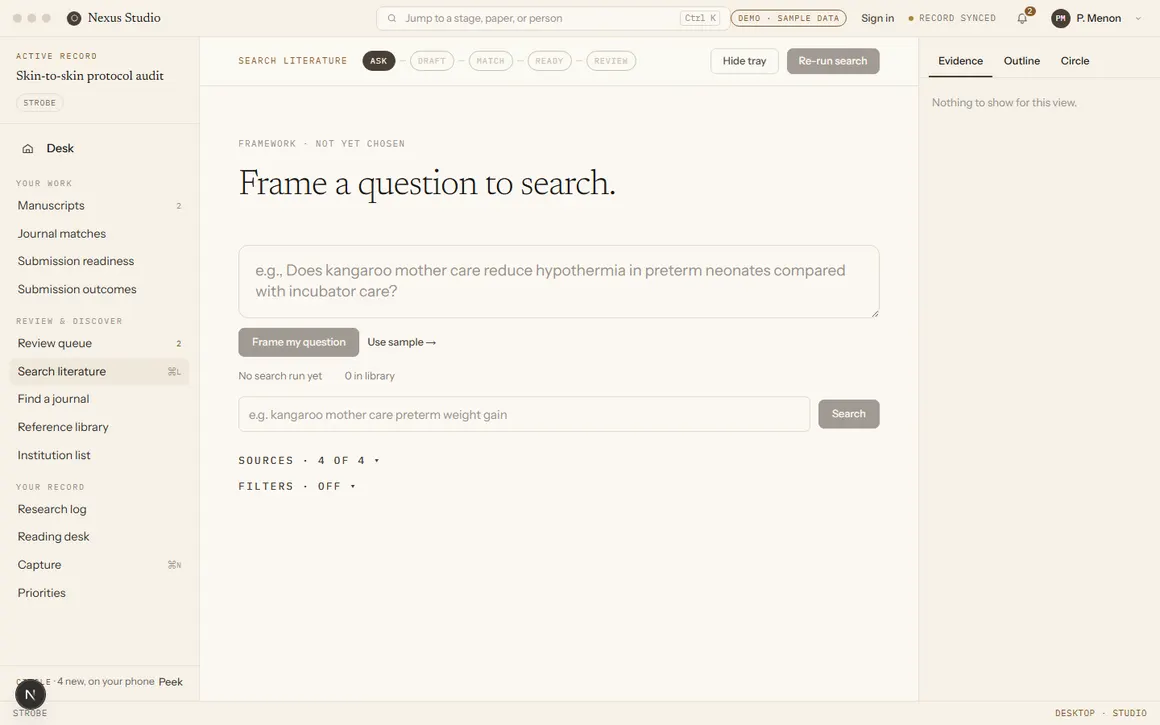
The question builder, reading: Frame a question to search, with an example prompt about kangaroo mother care.
Describe your idea in plain words; GRN turns it into a properly structured research question.
Part One 1.4 The part that protects your career

Making sure a journal is real, honest, and counts for your career

This is the single most important thing GRN does, and it's worth reading slowly. Most tools that help you "find a journal" only check whether the journal covers your topic. That's the easy part. The two questions that actually protect your career are harder, and GRN checks both of them for you:

Is this journal legitimate? Some journals exist only to take a fee from you and publish almost anything, with no real checking of the work at all — these are called predatory journals, and publishing in one can genuinely damage your career. GRN checks whether a journal is listed in trusted databases (like MEDLINE or Scopus), whether its ID numbers are real, and what it actually charges.

Does it count where you are? A journal being globally well-known doesn't automatically mean it satisfies your own country's rules. Many countries — India included — have their own official list of approved journals that universities and regulators require. A journal can be perfectly reputable worldwide and still not count for a promotion or a degree requirement at your institution. GRN checks against your institution's own list, not just global reputation.

Your institution keeps its own reviewed list — journals it has already checked and either recommends or flags to avoid. This is separate from a general search of every journal that exists, and it's the list your colleagues and department already trust.
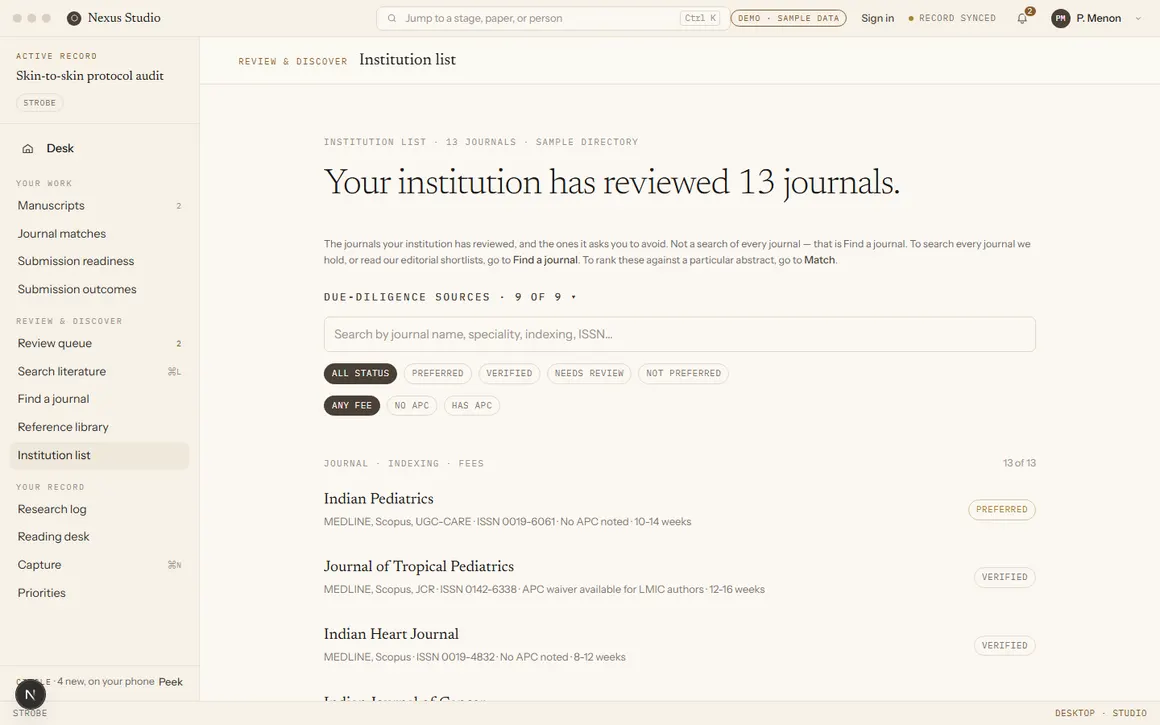
Institution list screen, reading: Your institution has reviewed 13 journals, with a table of journals showing indexing, fees, and a Preferred or Verified status tag for each.
Institution list — journals your own institution has already checked, each tagged PREFERRED, VERIFIED, or flagged to avoid, with real ISSNs, indexing, and fee information.
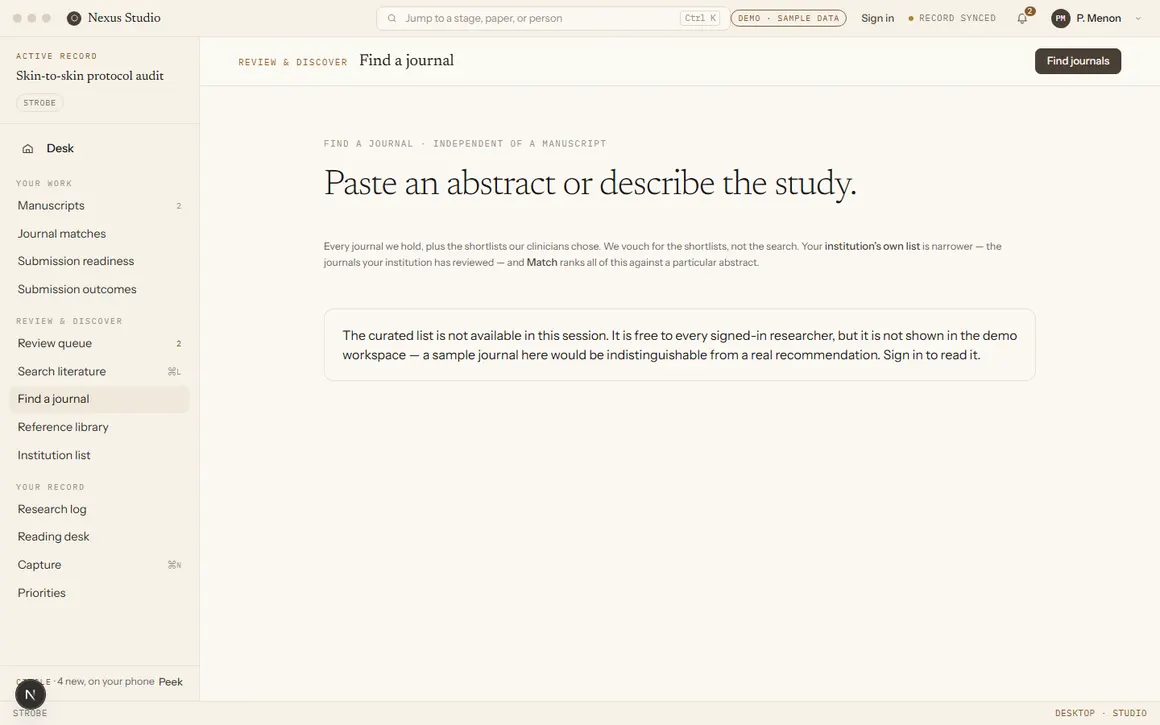
Check a journal screen, with a box to look up a journal by its name, ISSN or publisher, and a Check this journal button on each result.
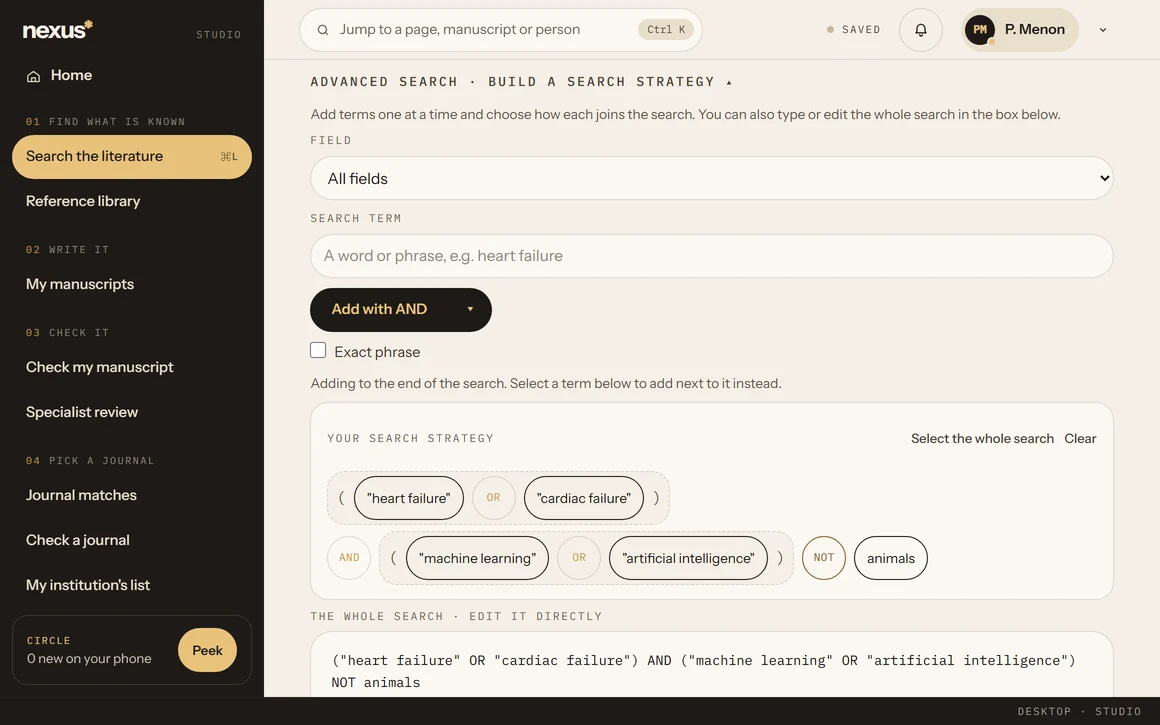
Check a journal looks up one journal you already have in mind, across every journal GRN holds, and checks it — whether it is indexed, what it costs, and whether the registries recognise it. The editorial shortlists show once you're signed in.
Part One 1.5 Studio

Matching your manuscript to the right journal

Journal matches answers a different question from Check a journal: not "is this one journal safe?" but "which journals fit my paper?". You paste your actual abstract (or a draft summary), and GRN ranks journals specifically against it — pulling from your institution's list, editorial shortlists, and the wider directory, and saying clearly which of those three a given result came from.

If you're not ready to paste a full abstract yet, there's a guided mode: answer four simple questions instead — what you studied, who it was about, where it was done, and how you studied it — and GRN writes an honest, plain-English study description from your answers to match against. This is built for a first-timer who freezes up at a blank "paste your abstract" box.
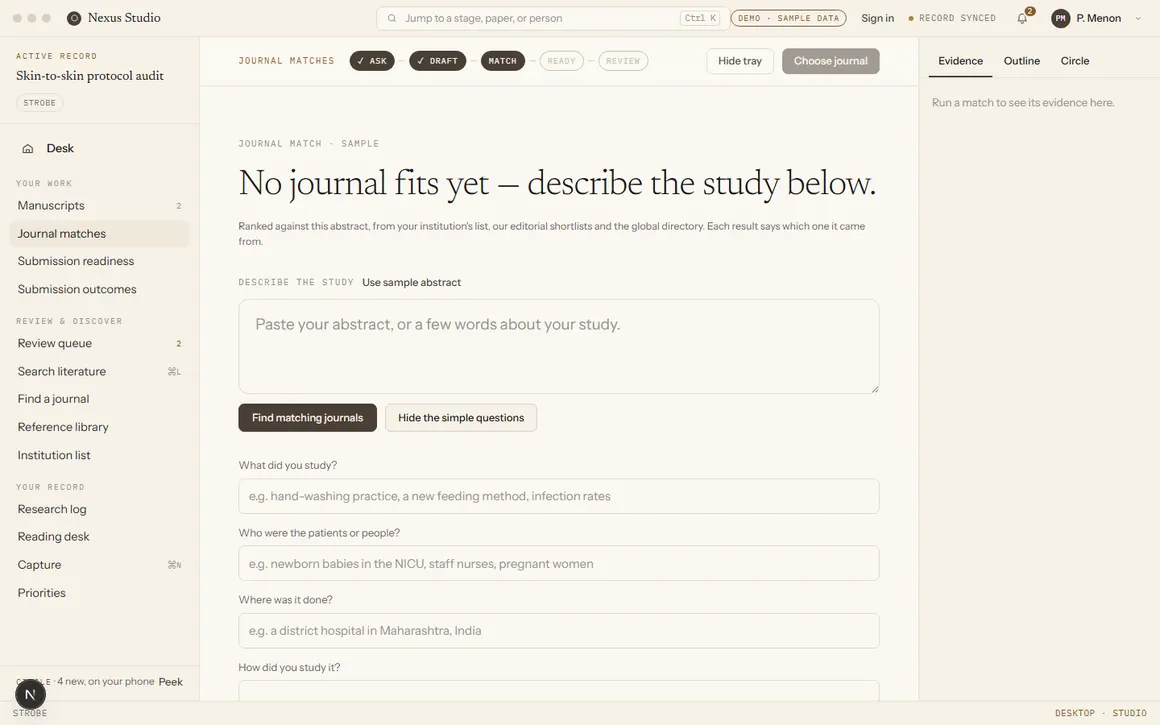
Journal match screen in guided mode, showing four simple questions: what did you study, who were the patients, where was it done, how did you study it.
Journal matches, in guided mode — four plain questions stand in for a technical abstract.
Part One 1.6 Studio

Drafting, revising, and submitting your paper in Studio

Studio is where the actual writing happens: one manuscript, one place, over however many weeks or months it takes. Your work saves automatically to your account — not to one computer — so you can pick up a draft on your laptop tonight and finish a paragraph on a different machine tomorrow. Version history is kept, and if a reviewer leaves feedback, it comes back to the same record rather than a separate email thread you have to track by hand.

The Manuscripts list is the plain overview: every record you have, each shown with a simple progress bar for where it's up to — drafting, matched to a journal, ready for submission, or in review.
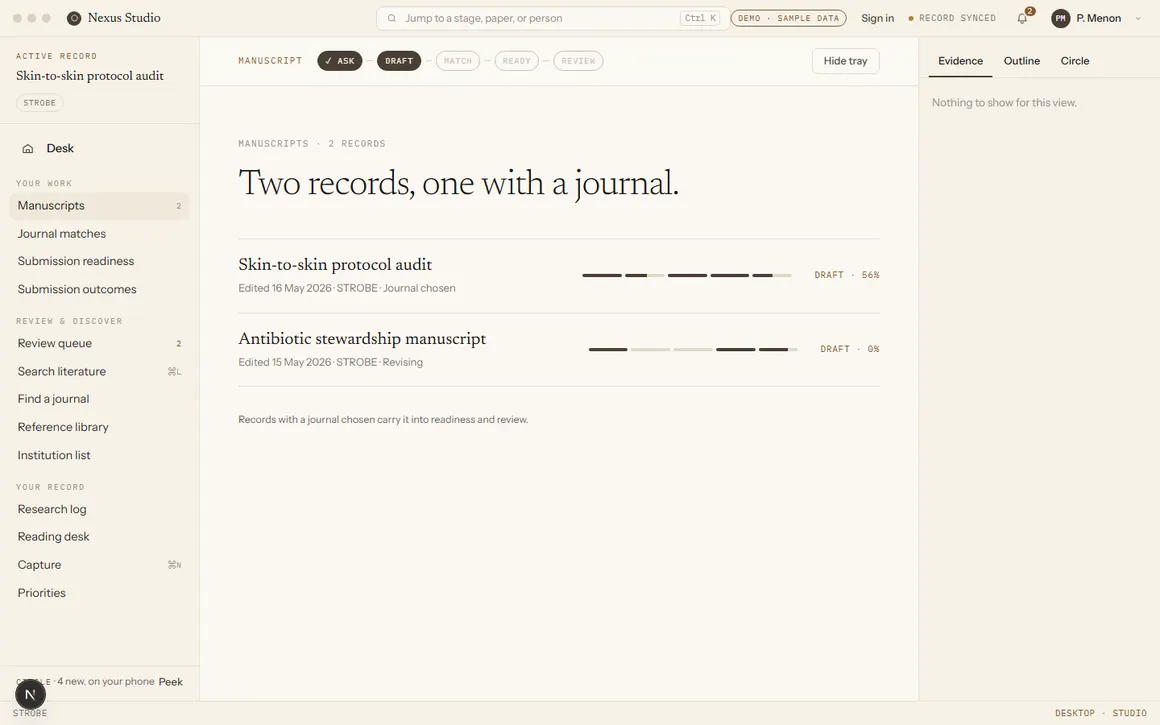
Manuscripts list showing two records: Skin-to-skin protocol audit at 56 percent draft with a journal chosen, and Antibiotic stewardship manuscript at 0 percent, revising.
Manuscripts — every record you're working on, and how far along each one is.
Part One 1.7 Studio

Checking you're ready before you submit

Before you submit, Check my manuscript runs your text against the reporting checklist your kind of study requires — an observational study and a randomised trial need to report different things, and journals increasingly ask for these checklists by name. It lives on your manuscript's own Checks page, alongside a language and consistency check, a reviewer's read and a reference check, so nothing you run is scored against a pasted stand-in — always your actual draft.
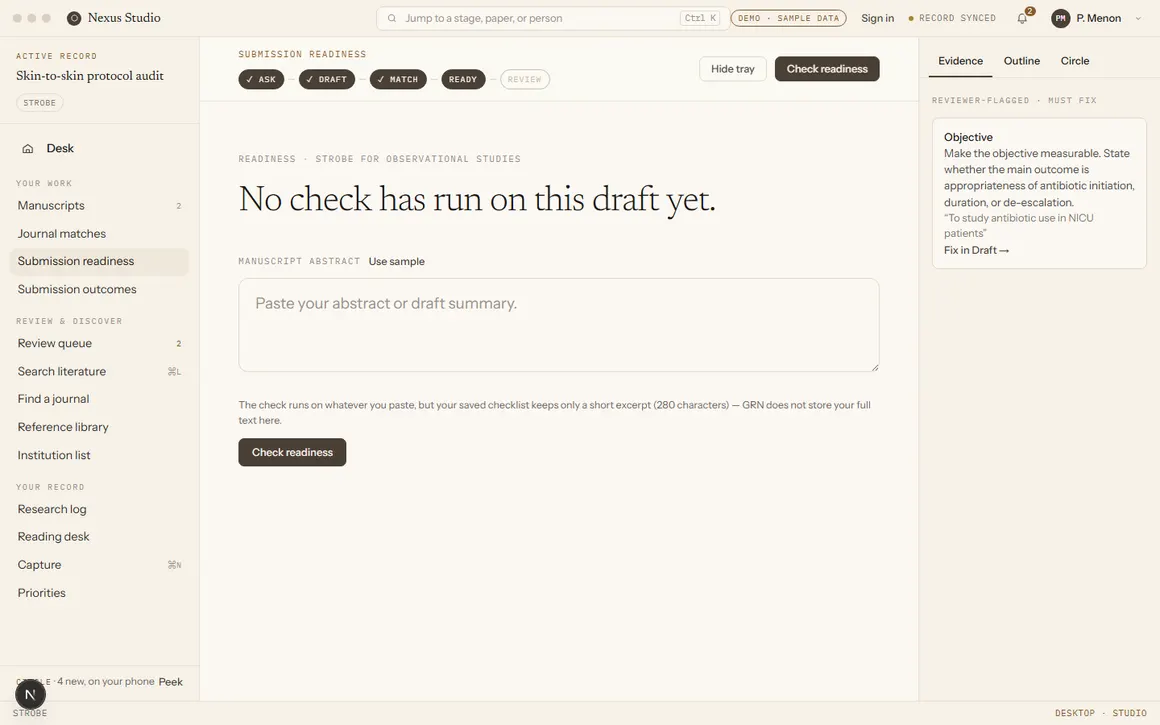
The Checks page showing a reporting checklist row with items found in the manuscript's own text.
Every check on your manuscript, in one ordered list, on its own Checks page.
Part One 1.8 Studio

Tracking what happens after you submit

Once a manuscript goes to a journal, Submission outcomes keeps a record of what happened — accepted, rejected, or still waiting — instead of that information living only in your inbox. Over time, this record also becomes part of your institution's shared memory: the next researcher choosing between two journals can see, in outline, how submissions like theirs have actually gone.
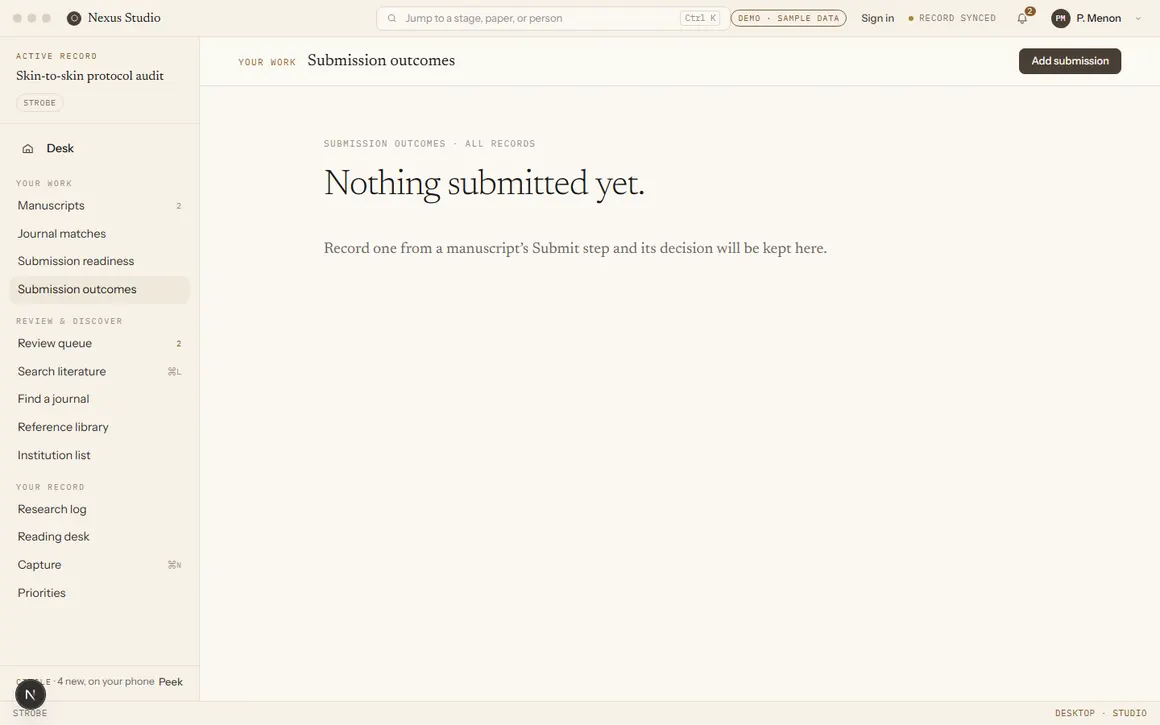
Submission outcomes screen, currently empty, reading: Nothing submitted yet. Record one from a manuscript's Submit step and its decision will be kept here.
Shown here before any submission has been recorded — once you submit, the decision is kept here automatically.
Part One 1.9 Studio

Reviewing other researchers' papers

Once you're verified in your specialty, you can claim peer reviews — other researchers' manuscripts that need a second pair of expert eyes before they go further. Claiming a review means writing structured, specific feedback rather than a vague comment, and your feedback is credited to your own record. This is part of verified/full-workspace access, not something every signed-in visitor can do — it protects the quality of the feedback researchers actually receive.
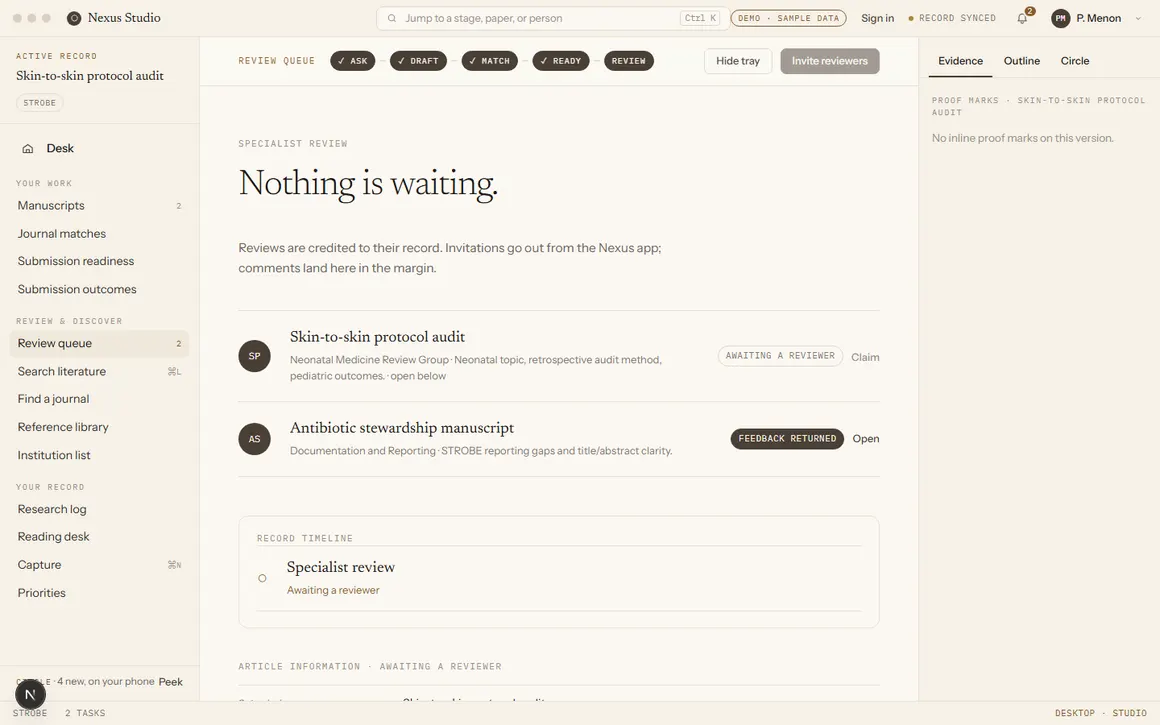
Review queue screen showing two manuscripts: one awaiting a reviewer with a Claim link, one with feedback returned.
Review queue — manuscripts waiting for a specialist reviewer, and ones where feedback has already come back.
Part One 1.10 Your record

Capturing ideas and keeping a research log on the go

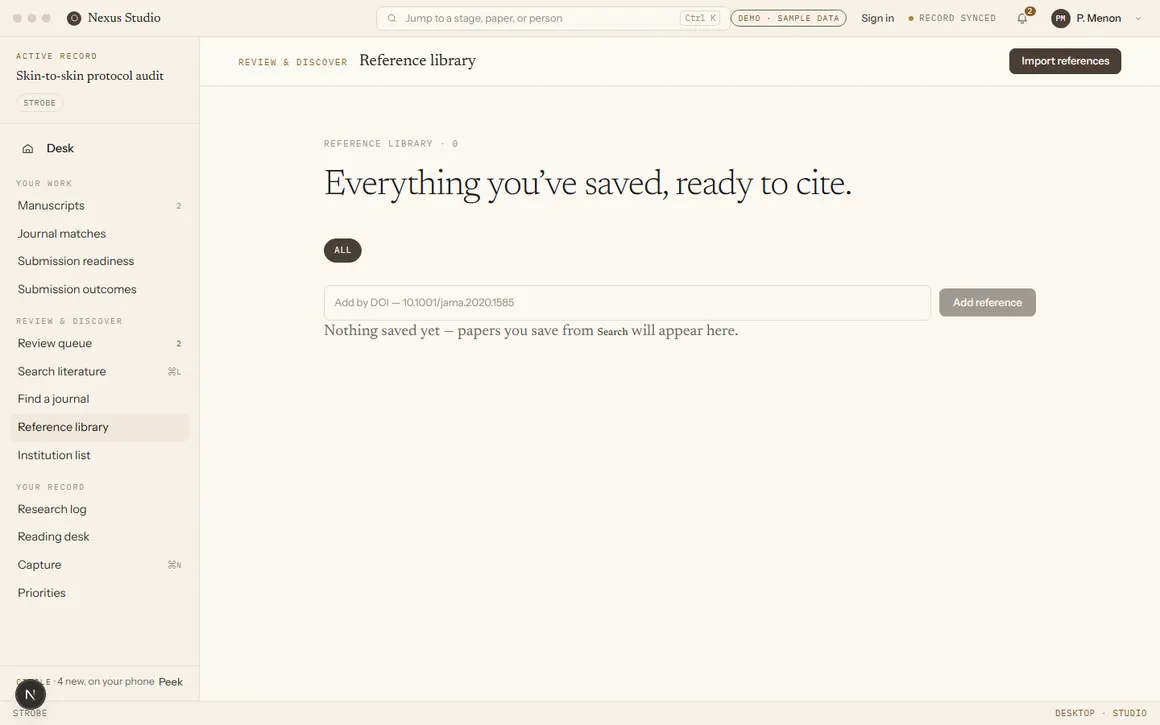
Good research ideas rarely arrive at a desk. Capture is a single quick box for a DOI, a stray thought, or a number you don't want to forget — paste it in from wherever you are, and it lands in your record to sort out properly later. It's the same box whether you're on your phone between patients or at a computer at the end of the day.

Everything you capture, plus anything you note manually, builds a dated research log over time — a record you can point to later for a CPD portfolio or simply to remember what you were thinking three months ago. Reading Desk works the same way for passages you highlight while reading a paper inside a manuscript — they're kept, grouped by paper, so you can find a quote again without re-reading the whole thing.
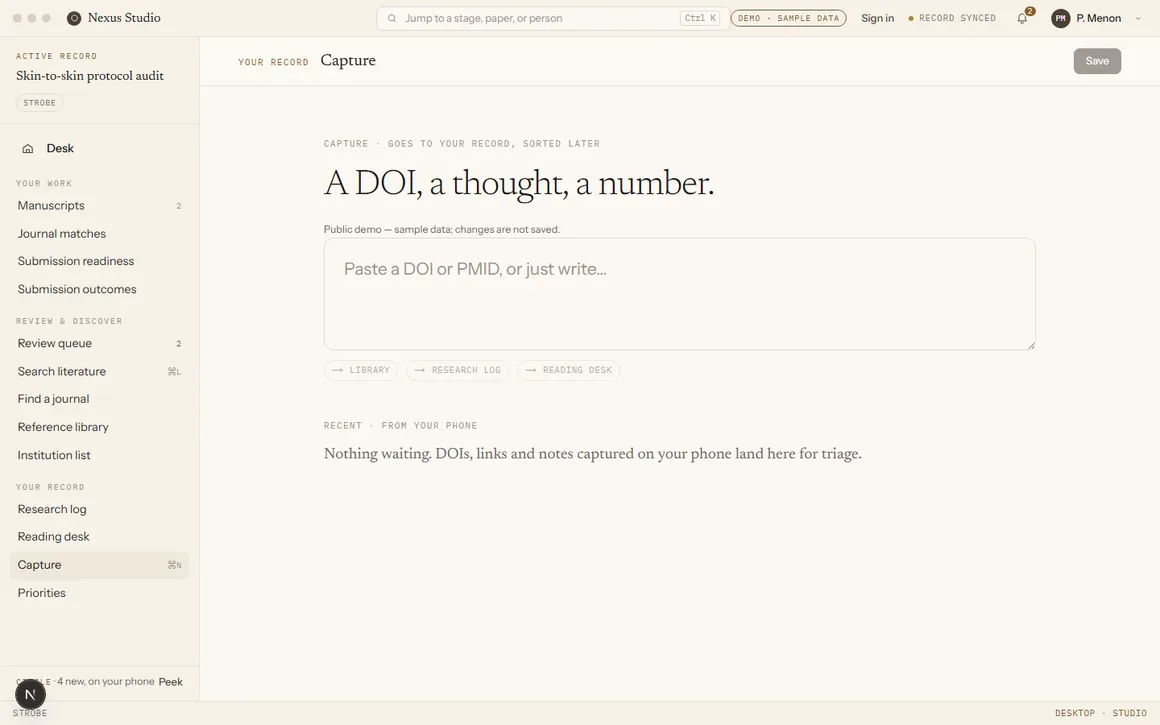
Capture screen, reading: A DOI, a thought, a number, with a quick-entry text box.
Capture — one box for anything you don't want to lose before you forget it.
Part One 1.11

Community, on the desk

The Feed is updates from the people, groups, and journals you follow — a colleague's feedback on your draft, a call for papers in your specialty, your institution adding a new journal to its reviewed list. On the web it's read-only: you can see everything, but you reply from the phone app (Part Two covers posting and replying in full).

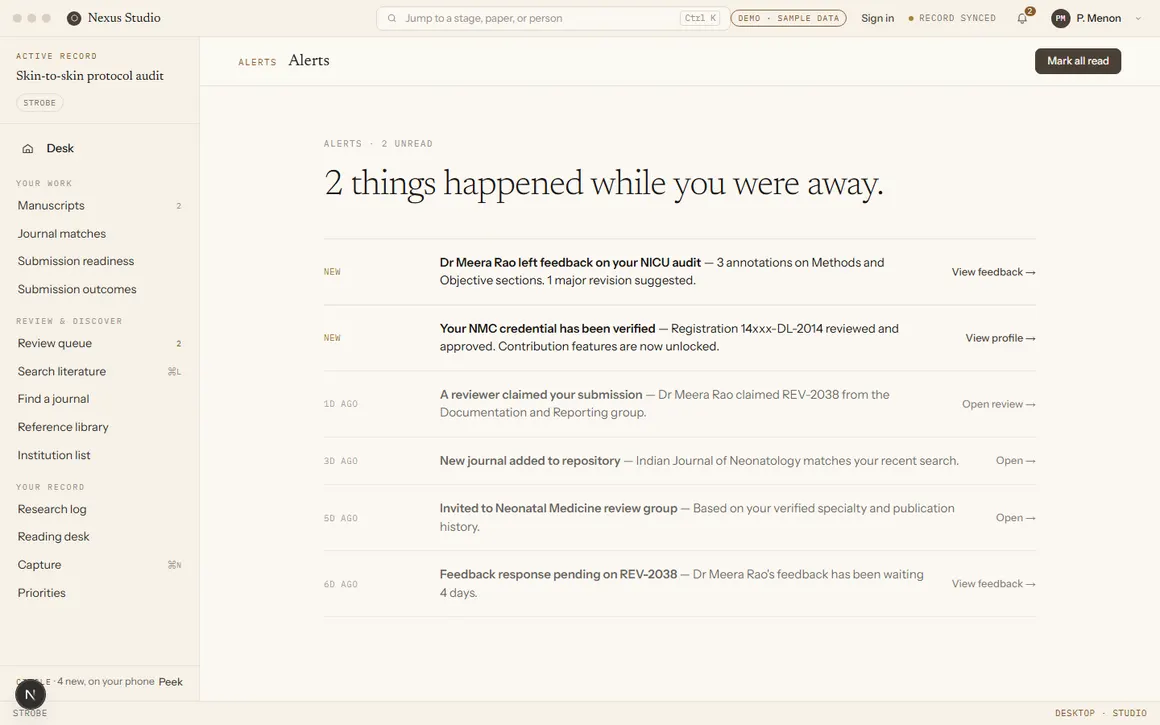
Alerts is where all of this actually reaches you: a reviewer claiming your submission, a credential getting verified, someone replying to your feedback. It's a single list, newest first, so you never have to go hunting through every screen to see what changed while you were away.
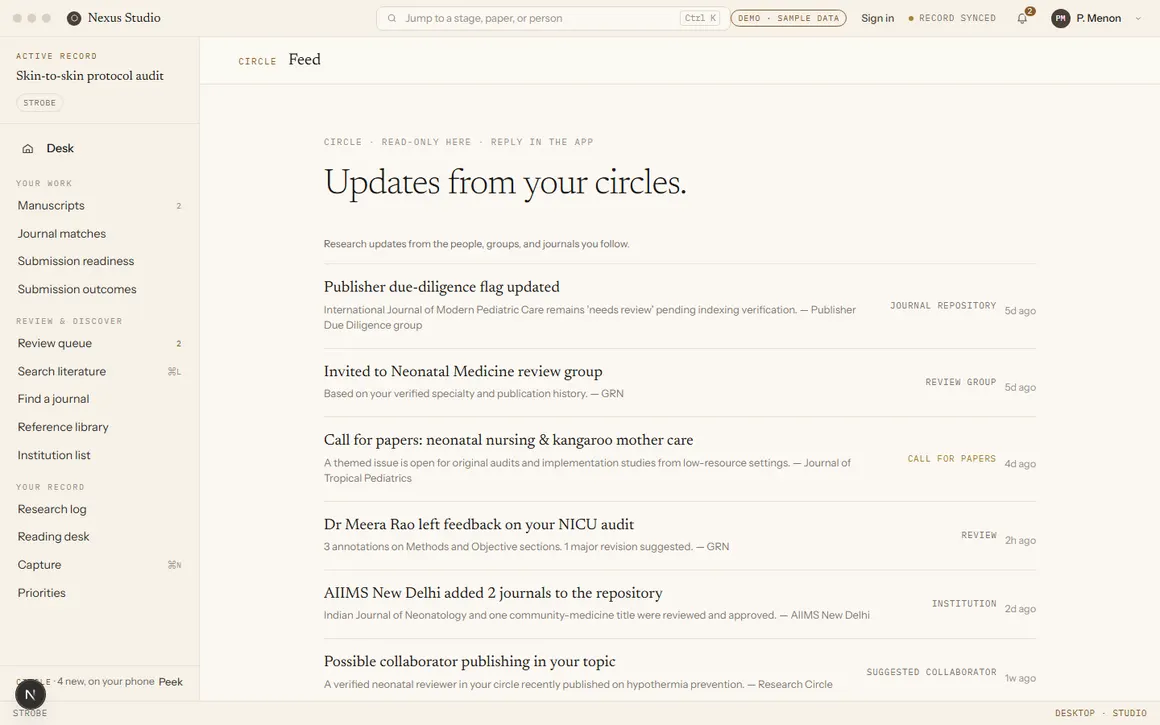
Community feed screen, reading: Updates from your circles, with items about a due-diligence flag, a review group invitation, and a call for papers.
Feed — read-only here on the desk; you reply from the app.
Alerts screen, reading: 2 things happened while you were away, listing feedback and a verified credential.
Alerts — everything that needs your attention, in one list.
Part One 1.12

Funding calls and priorities worth your time

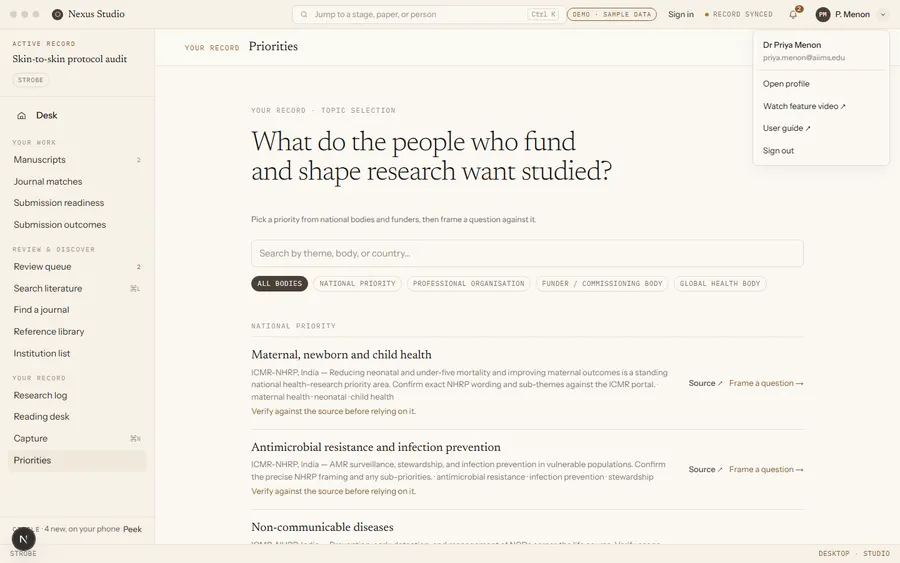
Priorities lists what national bodies, funders, and professional organisations are actually asking to be researched right now — genuinely useful if you're choosing between a few possible questions, since a topic aligned with a stated national priority is usually easier to justify and fund. Each one links straight into the question builder from earlier, so you can go from "what does my country want studied" to a properly framed question in one step.
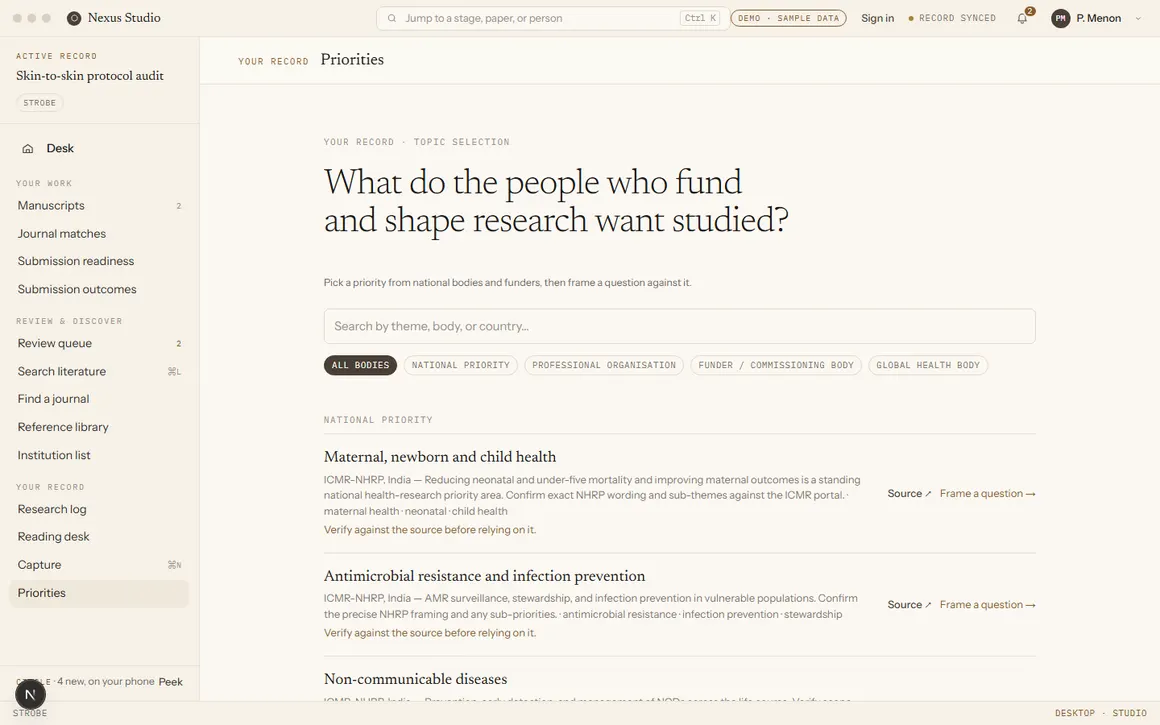
Priorities screen, reading: What do the people who fund and shape research want studied, listing national priorities like maternal, newborn and child health.
Priorities — real national and funder priorities, each with a direct path into framing a question.

Funding calls and Events themselves — deadlines, forums, RSVPs — live on the phone app; see Part Two.

Part One 1.13 Your record

Your profile — your professional record

Your Profile is what other researchers see when they look you up: your role and institution, your verification status, your publications matched from public records, and any recognition peers have given your work. Everything shown is built from real data — GRN doesn't invent figures to make a profile look fuller than it is, so a stat reading "—" simply means there's genuinely nothing there yet.

On the phone app, the You tab has the same identity plus editing, sharing and account settings — see Part Two.

Part One 1.14 Reading comfort

Making the text bigger or smaller

The text in GRN is larger and calmer than it used to be, so it is easier to read for a long time. If you want it bigger or smaller still, you can change it in three places.

Profile, then Display. You will see four buttons, each with the letter A. The bigger the A, the bigger the text. Press the one you want.

The account menu. Open the menu under your name, top right. Press A− for smaller text or A+ for bigger text. The size you are on is shown between them.

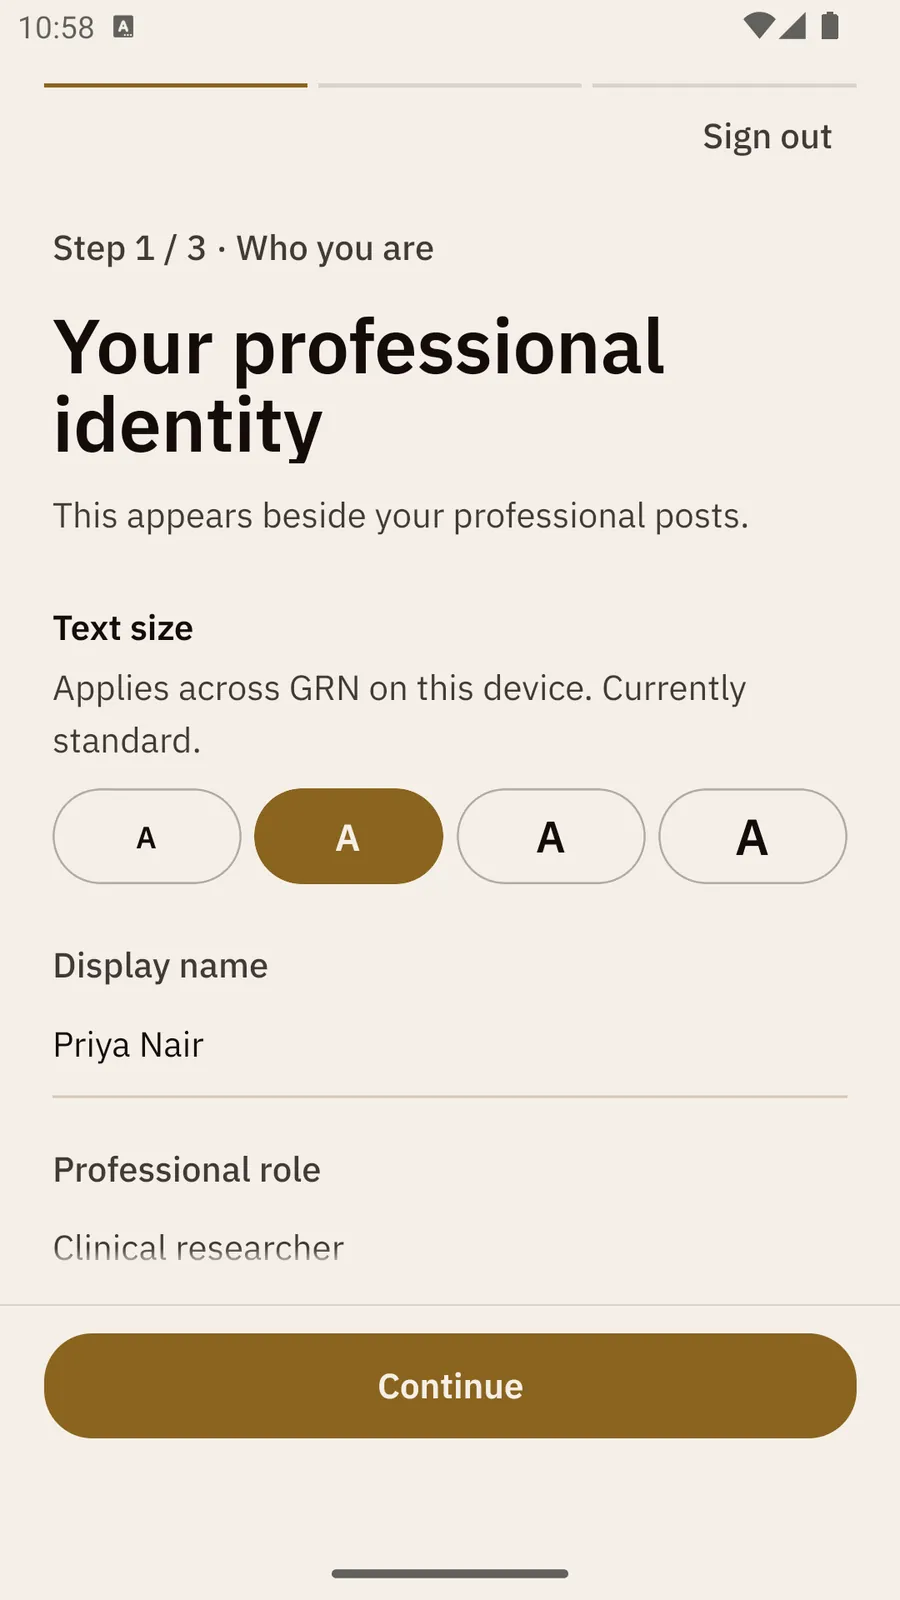
Your first sign-in. The first step of the welcome setup has the same four buttons, so you can set it before you start.

There are four sizes: Small, Standard, Large and Extra large. Standard is where everyone starts. The page changes as soon as you press a button.
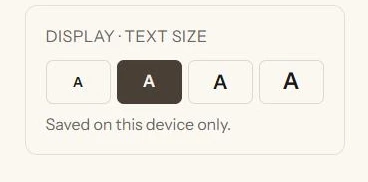
The Display card on the Profile page, with four A buttons from small to large; the Standard button is selected.
Profile, Display: each A is drawn at the size it gives you.

Your choice is saved on this device only. On another computer or browser, the text starts at Standard until you pick a size there too.

The phone app has the same four sizes, under You, then Display — see 2.11. The public GRN home page, before you sign in, keeps one fixed size.

Bridge

Crossing over: linking your phone

One account, both places. Pairing a new device doesn't create a second identity — it just gives that device a way in.

Bridge

One account, every device

Putting GRN on a new computer doesn't need you to type your email again. Open the new computer's browser to the link page — it shows a short one-time code. On your phone, where you're already signed in, open You, press Link a browser under Linked devices, and type that code. The new computer signs in immediately, no email round-trip required. The same screen on your phone also lists every browser currently linked, so you can sign one out that you no longer use — covered again in Part Two's Profile section.
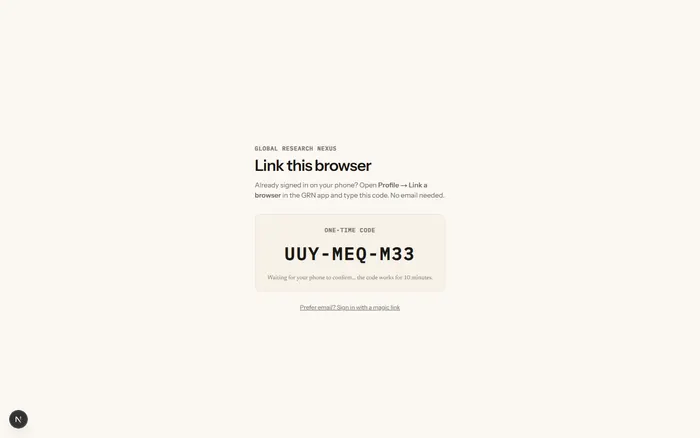
Link this browser screen showing a one-time code, AWL-757-UEU, waiting for phone confirmation.
The code a new browser shows, waiting for your phone to confirm it.
Part Two · Mobile app

Your phone: reading, reacting, posting, and staying current.

The app is where most of GRN happens day to day. Five tabs run along the bottom: Home, Discover, Circles, Messages and You. This part is a set of short “how do I…” tasks, each with numbered steps and the words you will see on the screen. Every screen shown is from version 2.3.0, with sample data.

Part Two 2.1

Getting started on your phone

How do I install the app?

Search for Global Research Nexus in Google Play or the App Store, and install it. It appears as GRN on your home screen.

How do I sign in?

  1. Open the app. Under Email, type the email address you use for work or research.
  2. Tap Email me a sign-in link. The app says “Check your email on this device.”
  3. Switch to your email app yourself. GRN waits; it is not stuck.
  4. Open the email from GRN on the same phone and tap the link. A browser may flash open for a second, then GRN opens, signed in.

There is no password. Each link works once. If it has been used or has expired, the app says so; go back and ask for a new link.

Can I sign in with ORCID?

Yes. Tap Continue with ORCID and sign in to ORCID. It also marks you verified straight away.

Pick one way and keep to it. Signing in with ORCID and signing in with email create two separate accounts.
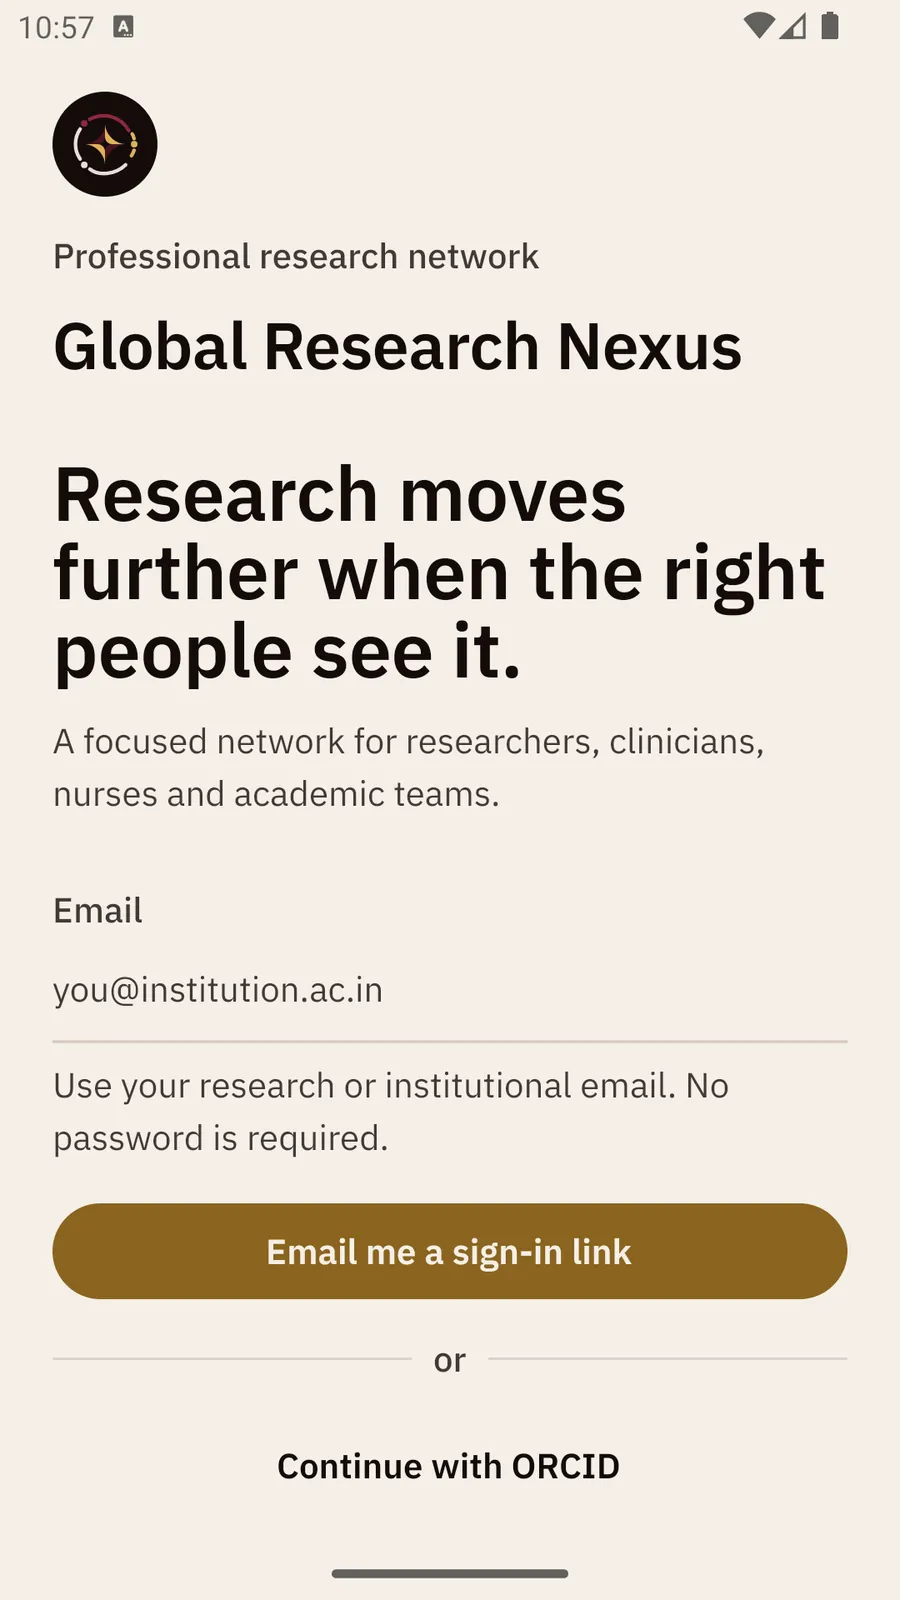
The phone sign-in screen: Global Research Nexus, the line Research moves further when the right people see it, an email box, an Email me a sign-in link button and Continue with ORCID.
The sign-in screen.
Step 1 of 3 of the setup, Your professional identity, with a Text size row of four A buttons (Standard selected), a Display name box and a Continue button.
Setup step 1, with the Text size row.

What is the welcome tour?

The first time you open the app, a short tour of three pages explains what GRN does on your phone and at your desk. Tap Next to move on and Get started at the end, or Skip. You can see it again from You → What you can do here.

How do I set up my profile?

After the tour, three short steps set up your profile. The line at the top shows where you are, for example “Step 1 / 3 · Who you are”.

  1. Your professional identity. Type your Display name (this one is required). Add your Professional role and Affiliation if you like. The Text size row lets you make the text bigger or smaller before you start. Tap Continue.
  2. What do you work on? Add your Research interests and Specialties and methods, separated by commas. Both are optional. Tap Continue.
  3. Start with trusted sources. Tap Follow on people you'd like to hear from. If someone gave you an invite code, tap Have an invite code?, type it and tap Apply. Tap Enter Nexus.

You can't skip these steps, but only the display name is required. Sign out at the top takes you back to the sign-in screen.

Part Two 2.2 Home tab

Home

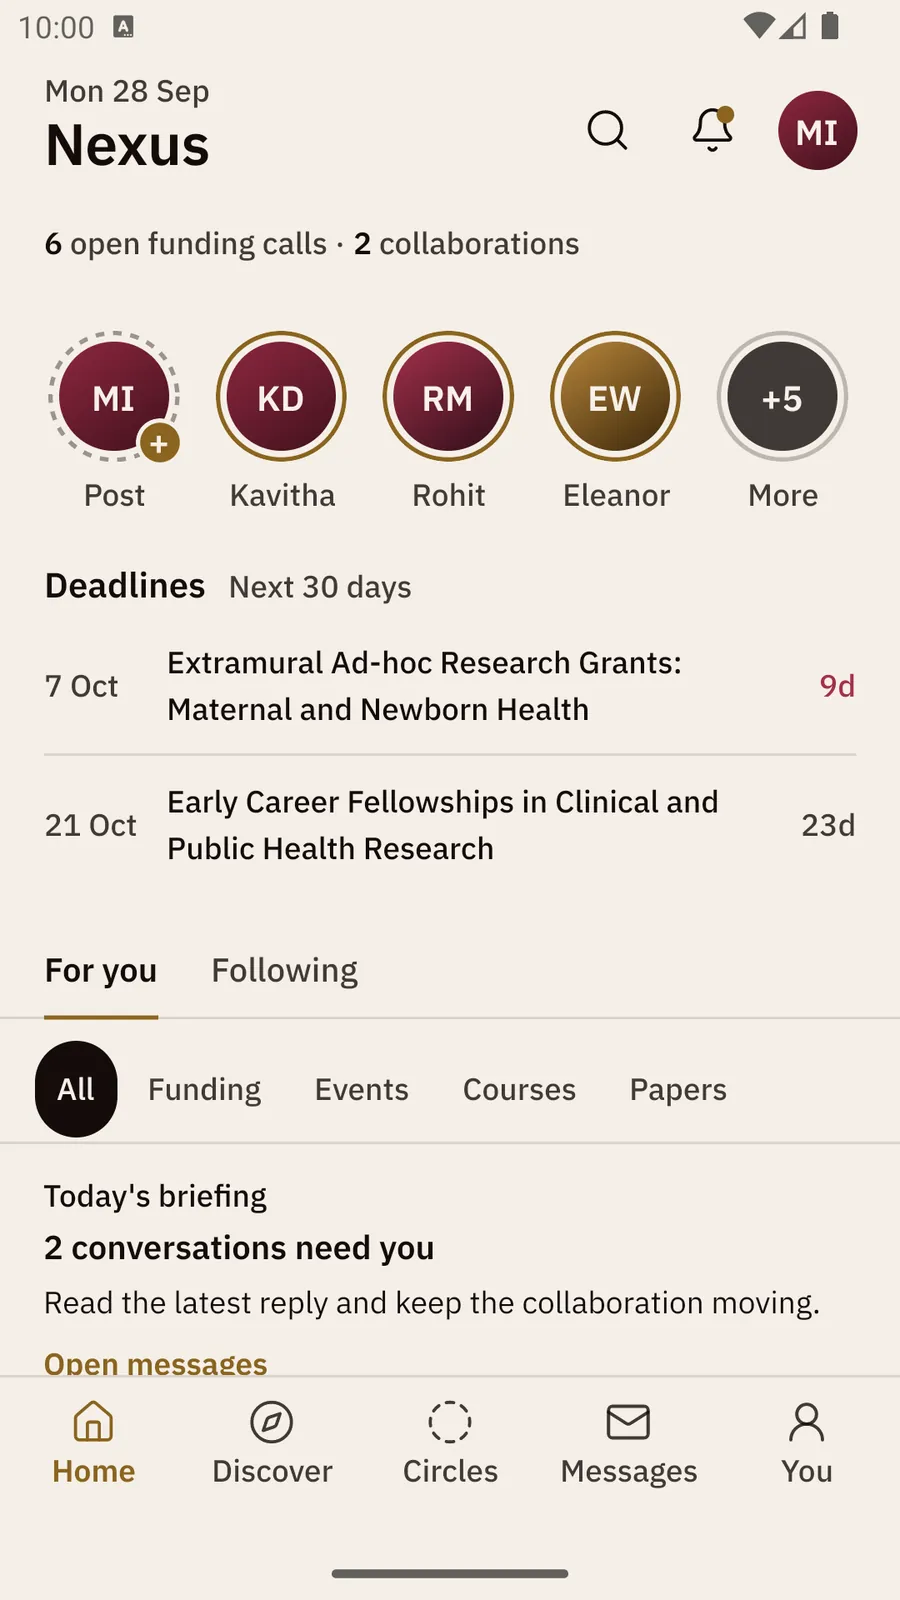
Home is what the app opens to. At the top are today's date and Nexus, with Search, the Notifications bell (a gold dot means something is unread) and your picture.

What is the line under the date?

One quiet line counts what is open for you, for example “6 open funding calls · 2 collaborations”. Tap the funding part to open the Funding radar. Tap the collaborations part to show only collaboration calls in the feed; tap Show all to see everything again. A part with nothing in it is left out.

How do I view stories?

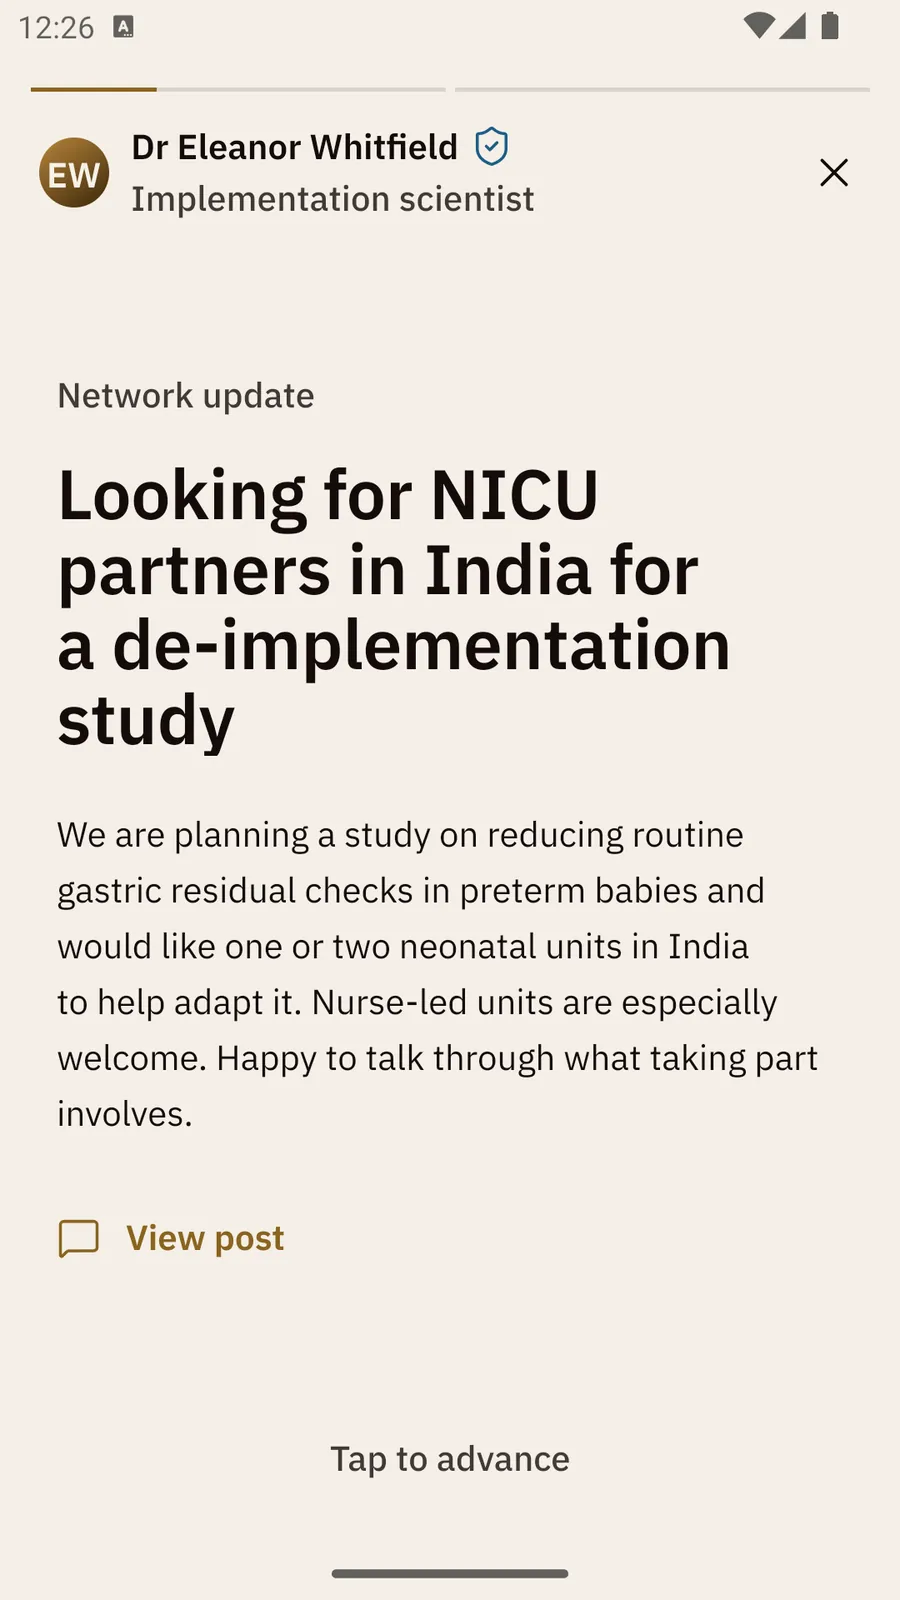
  1. Tap a round picture in the row of stories. A gold ring means there is something you haven't seen.
  2. Tap the right side to go forward, the left side to go back. Press and hold to pause.
  3. Use View post, Source, Save or Add to calendar if they appear. Tap ✕ at the top right to finish.

Stories come from the people and institutions you follow. More shows the rest of the row. You can't post a story of your own: your own circle, marked Post, opens the create sheet instead (see “Posting”).
What are Deadlines and Today's briefing?

  • Deadlines lists funding calls that close in the Next 30 days, with the days left on the right. The number turns red at 15 days or fewer. Tap a row to open the call.
  • Today's briefing shows the one thing that needs you most, with a link such as Open messages, Review requests, Open funding or Open events.

How do I choose what the feed shows?

  • For you shows posts chosen for you. Following shows only the people you follow.
  • The pills narrow the feed: All, Funding, Events, Courses and Papers. Collaboration posts show under All.
  • Pull down to refresh. The feed covers the last 30 days; at the end it says “You're all caught up”.
The Home tab: the date and Nexus, the line 6 open funding calls · 2 collaborations, a row of story circles, two deadlines in the next 30 days, the For you and Following tabs, the filters All, Funding, Events, Courses and Papers, and Today's briefing.
Home: the counts line, stories, deadlines, the briefing and the feed.
A story from Dr Eleanor Whitfield about a NICU study, with View post, a close ✕ at the top right, and Tap to advance at the bottom.
A story, open.
Part Two 2.3

Posting

You need to be verified to post or share a paper (see “Getting verified”). Until then the app says “Posting unlocks after your researcher identity is verified.” and offers Verify in Profile. Capture works for everyone.

How do I write a post?

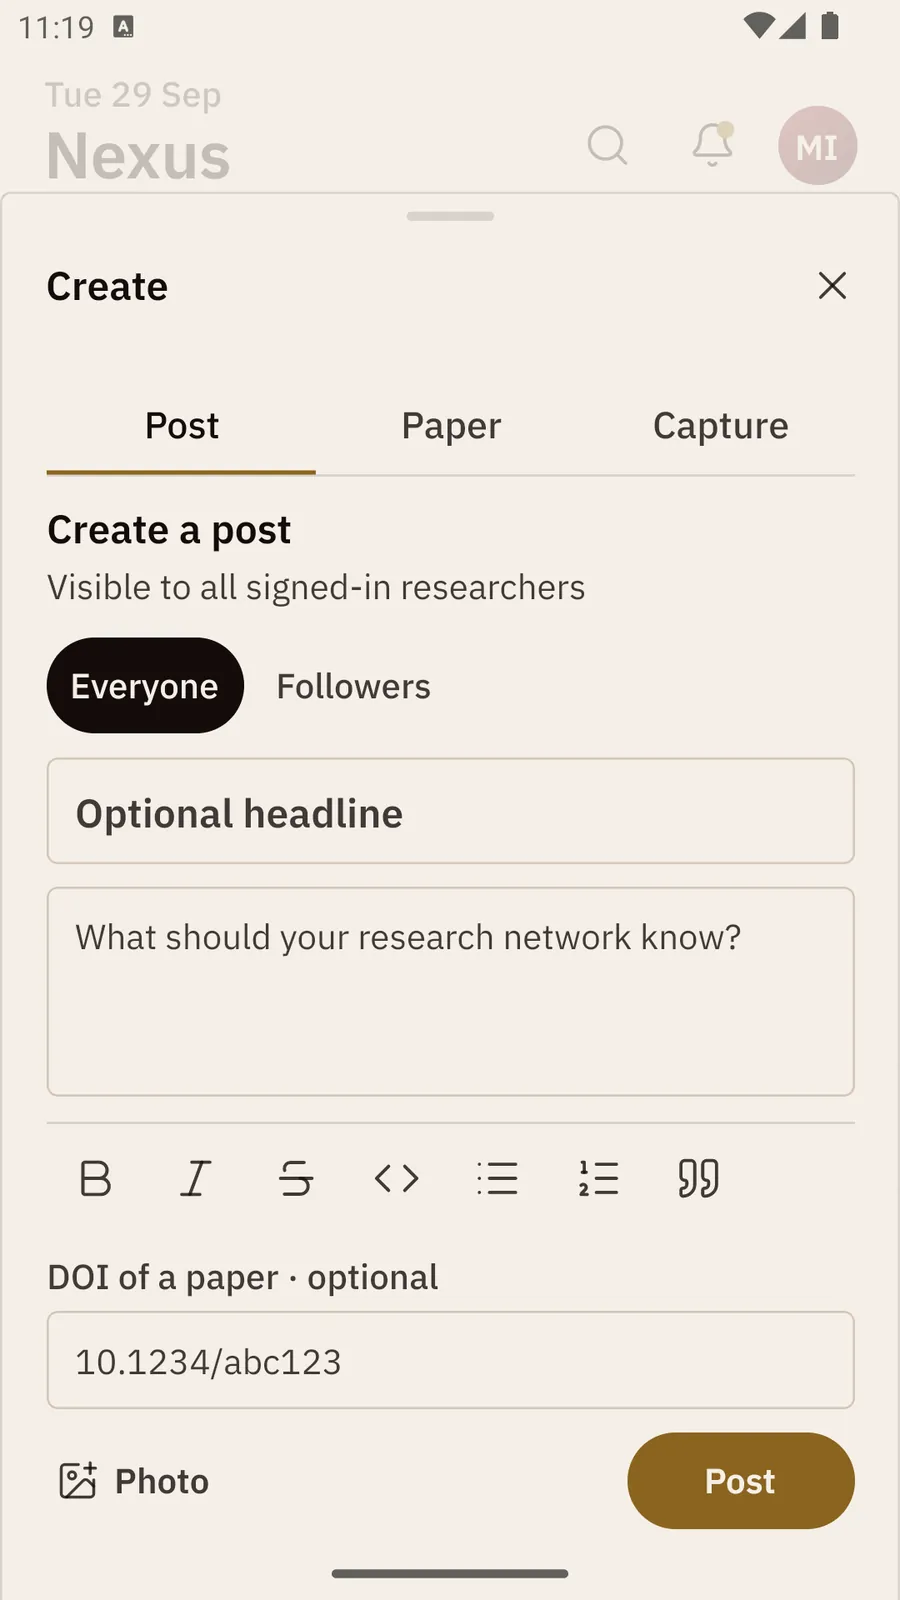
  1. On Home, tap your own circle, marked Post, at the start of the stories. The create sheet opens on Post.
  2. Choose who can see it: Everyone (all signed-in researchers) or Followers (your followers and active circle members).
  3. Add an Optional headline, then write your post in the box that asks “What should your research network know?”
  4. To point to a paper, type its DOI under DOI of a paper · optional. To add a picture, tap Photo.
  5. Tap Post. You will see “Post published to your network.”

The first time, you are asked to agree to the community rules: tick I agree to the Terms of Use. and I agree to the Community Guidelines., then tap Accept and continue. Keep it professional, and never post anything that could identify a patient.

How do I share a paper, poster or slides?

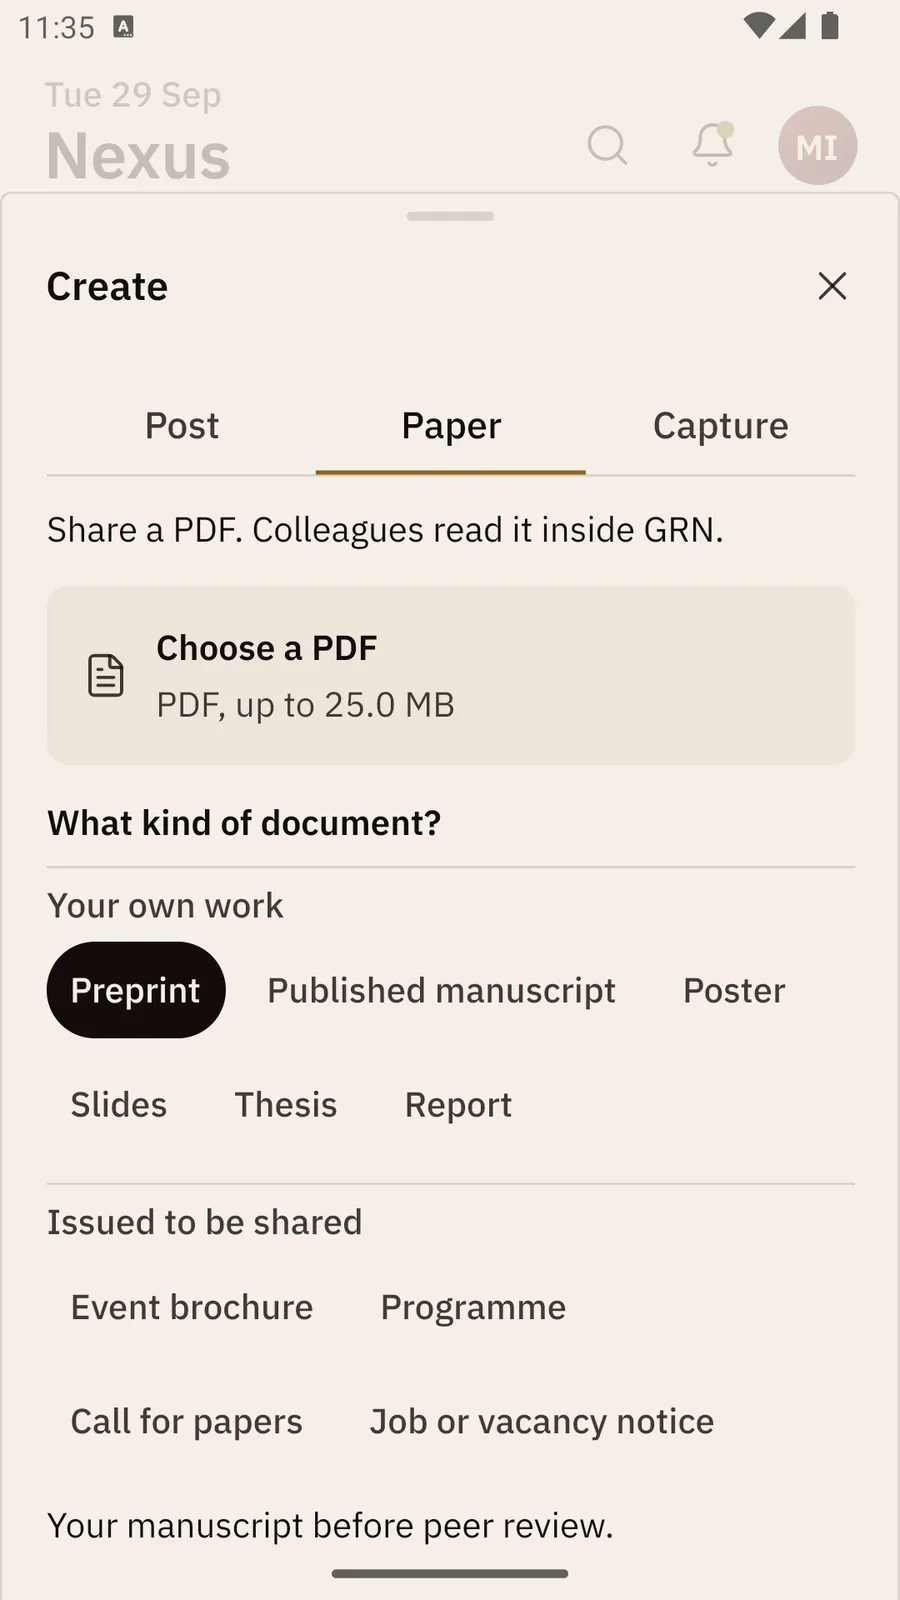
  1. Open the create sheet and choose Paper.
  2. Tap Choose a PDF.
  3. Under What kind of document?, pick one. Your own work is Preprint, Published manuscript, Poster, Slides, Thesis or Report. Issued to be shared is Event brochure, Programme, Call for papers or Job or vacancy notice.
  4. Add a Title and a Research area. A summary and a DOI are optional.
  5. Under Your right to share this, confirm you may share it.
  6. Tap Share document. Colleagues can read it inside GRN.

The button tells you what is still missing, for example Add a title, until everything is filled in.
How do I edit or delete my post?

  1. Tap ⋯ on your post (the sheet is titled Your post), or open the post.
  2. Tap Edit post, change the text, and tap Save. The post shows that it was edited.
  3. Or tap Delete post, then Delete post again to confirm. Reactions and comments go with it, and an attached paper is removed from your library too.
The Create sheet on Post: Everyone and Followers, an Optional headline box, the post box with formatting buttons, DOI of a paper, Photo and the Post button.
The create sheet on Post.
The Create sheet on Paper: Choose a PDF (up to 25 MB), then What kind of document? with the Your own work and Issued to be shared kinds.
Sharing a PDF.
Part Two 2.4

Reacting, commenting and the ⋯ menu

Each post has one row of actions: its reaction, Like (the heart), Comment (the speech bubble) and Share (the arrow). A number shows beside an action only when it is above zero.

How do I react to a post?

  • The reaction word depends on the post: Congratulate on publications and milestones, Interested on collaboration calls, and Useful on everything else.
  • Tap it to react. Press and hold to choose one of the three words instead.
  • Tap the heart to like a post. Both turn gold when they are on.

How do I comment?

  1. Tap the post, or its speech bubble, to open it.
  2. Tap + Comment at the bottom, or the box that says Add a considered comment.
  3. Write your comment and tap Send.

Comments sit at one level: every comment is on the post itself, not a reply to another comment. On the open post you also see Bookmark (it saves the post to Saved posts) and who reacted.

What is in the ⋯ menu?

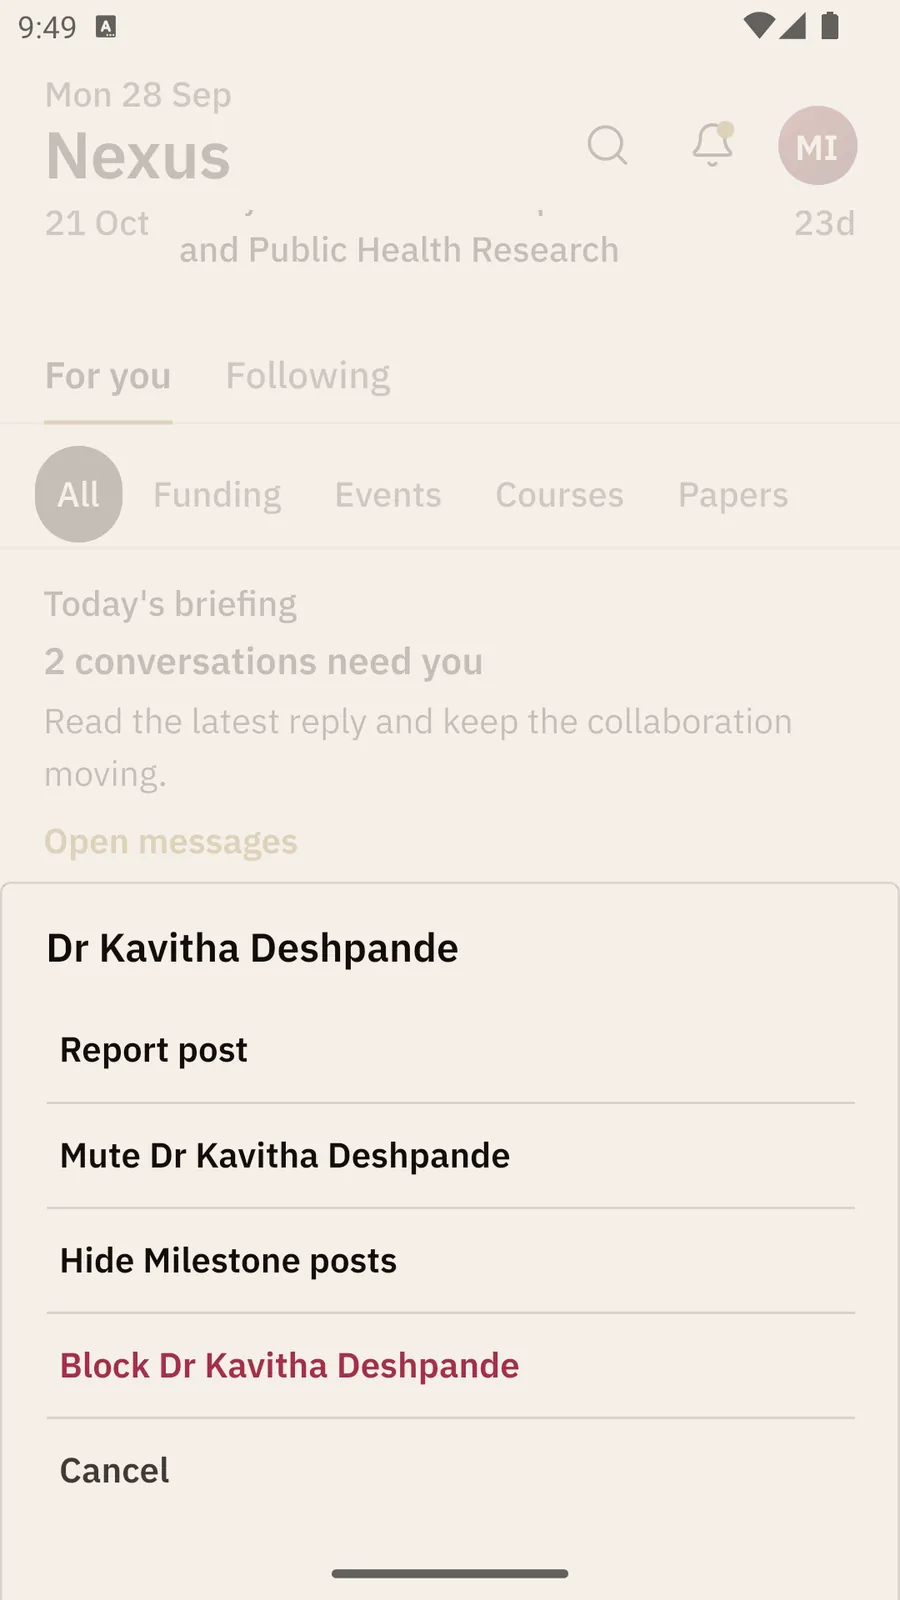
Tap ⋯ at the top right of a post. On someone else's post the menu shows, in order:

  • Reply on a collaboration call — it opens a collaboration request (see “Asking someone to work with you”). On a funding call the first item is Track this call instead.
  • Report post, Mute the person, Hide that kind of post, and Block the person (see “Staying safe”).
  • Cancel.

On your own post the menu has Edit post and Delete post. To share a post, use the arrow in the action row.
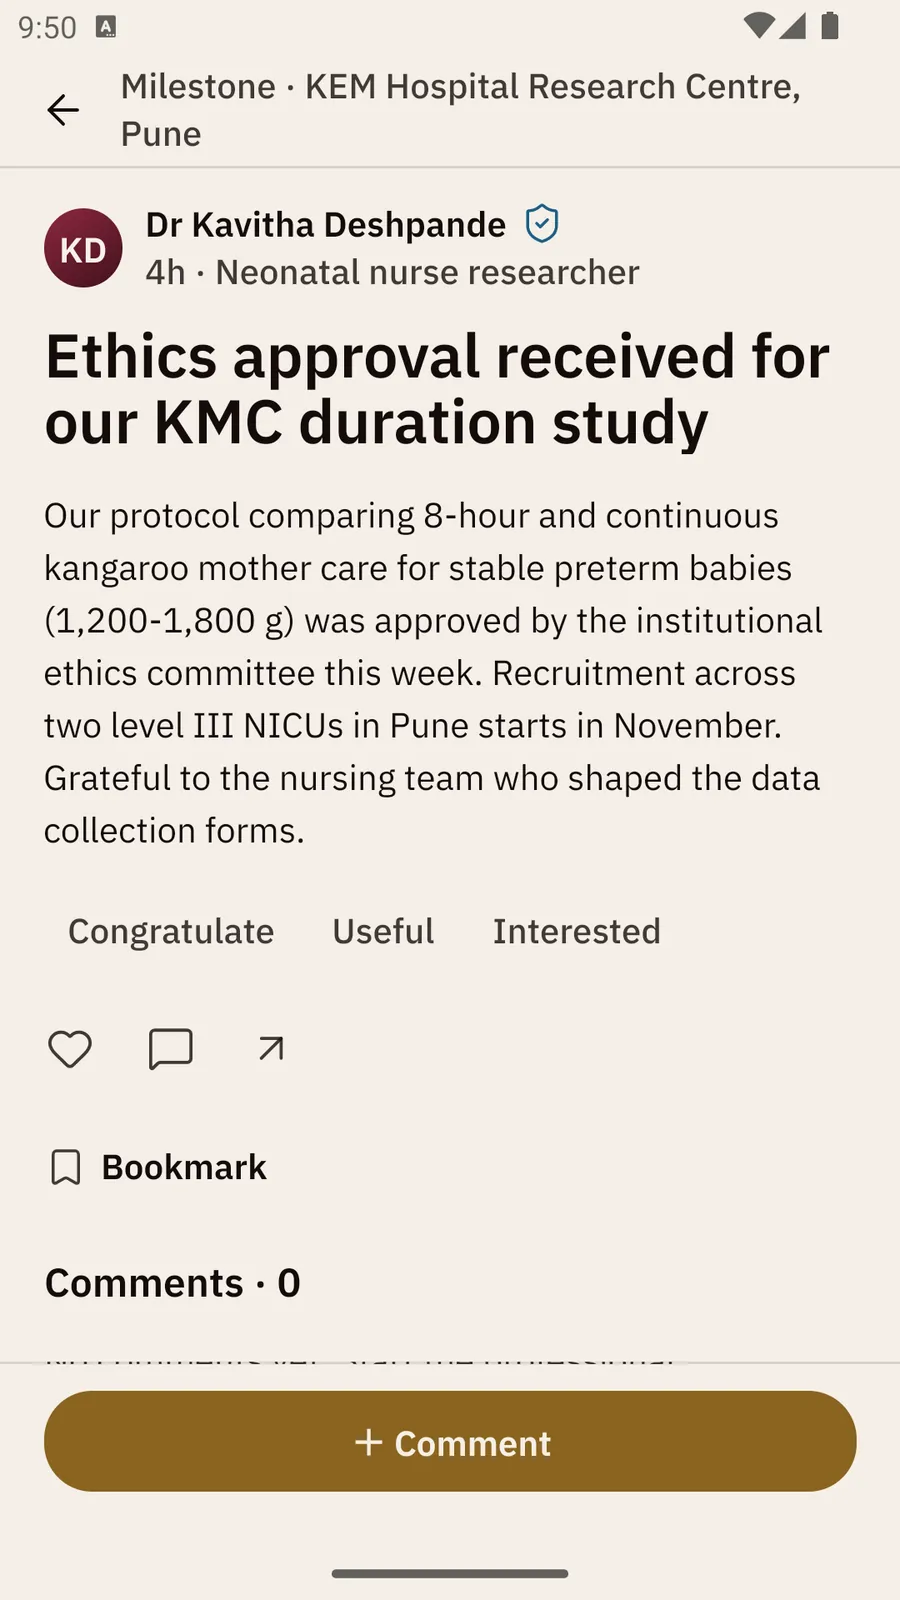
An open milestone post from Dr Kavitha Deshpande about ethics approval for a kangaroo mother care study, with Congratulate, Useful and Interested, Like, Comment and Share, Bookmark, Comments · 0, and a Comment button.
An open post.
The ⋯ menu of a milestone post, open as a sheet at the bottom of Home, listing Report post, Mute, Hide Milestone posts, Block and Cancel.
A post's ⋯ menu.
Part Two 2.5 Working together

Asking someone to work with you

A collaboration request is a short, private message with a stated reason. It is how you reach someone you don't share a circle with. Your email is shared only if they accept.

How do I send a collaboration request?

  1. Find a collaboration call in the feed. Tap ⋯ at the top right of the post, then Reply. (On the open post, tap + Reply.)
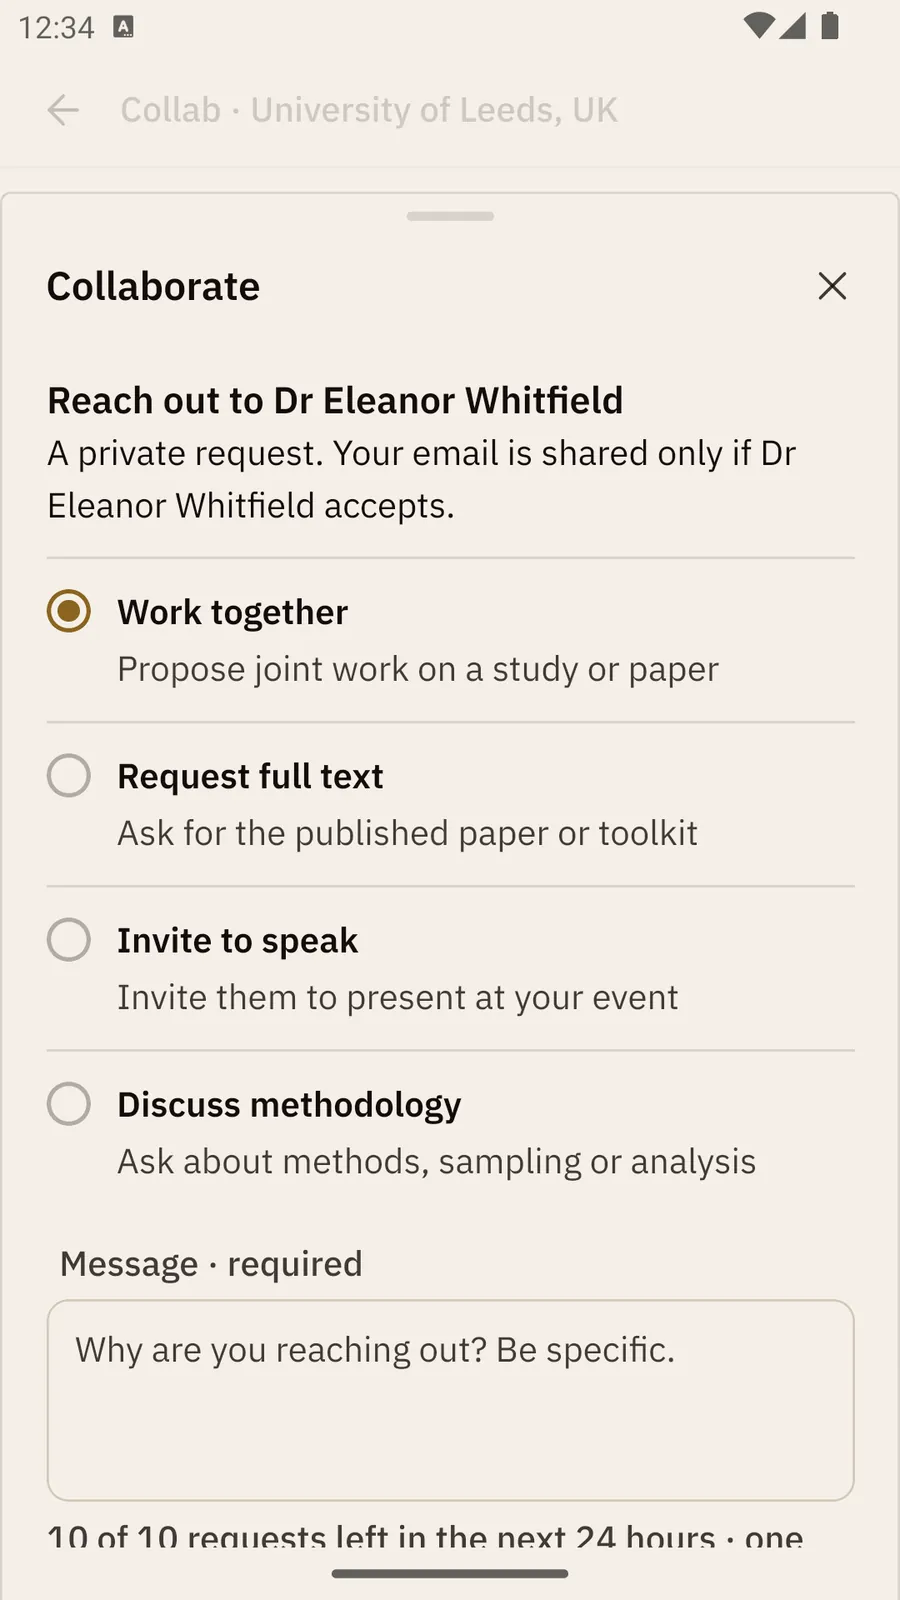
  2. The Collaborate sheet opens: “Reach out to …”. Choose a reason: Work together, Request full text, Invite to speak or Discuss methodology.
  3. Write your message under Message · required. Say why you are reaching out and be specific. You have up to 2,000 characters.
  4. Tap Send request. You will see “Request sent. Your email is shared only if … accepts.”
  • You can send one request per person for each reason. A reason you have already used shows Sent.
  • You can have up to 10 requests waiting in any 24 hours. The line under the message box shows how many you have left. Once a request is accepted or declined, its slot is free again.

How do I answer a request?

  1. Open You → Requests & collaborations, or tap the request at the top of Messages or in Notifications.
  2. On the Received tab, read the request and its reason.
  3. Tap Accept to share contact details, or Decline.

Later (in Messages) only hides the request for now. It stays waiting in Requests until you answer.
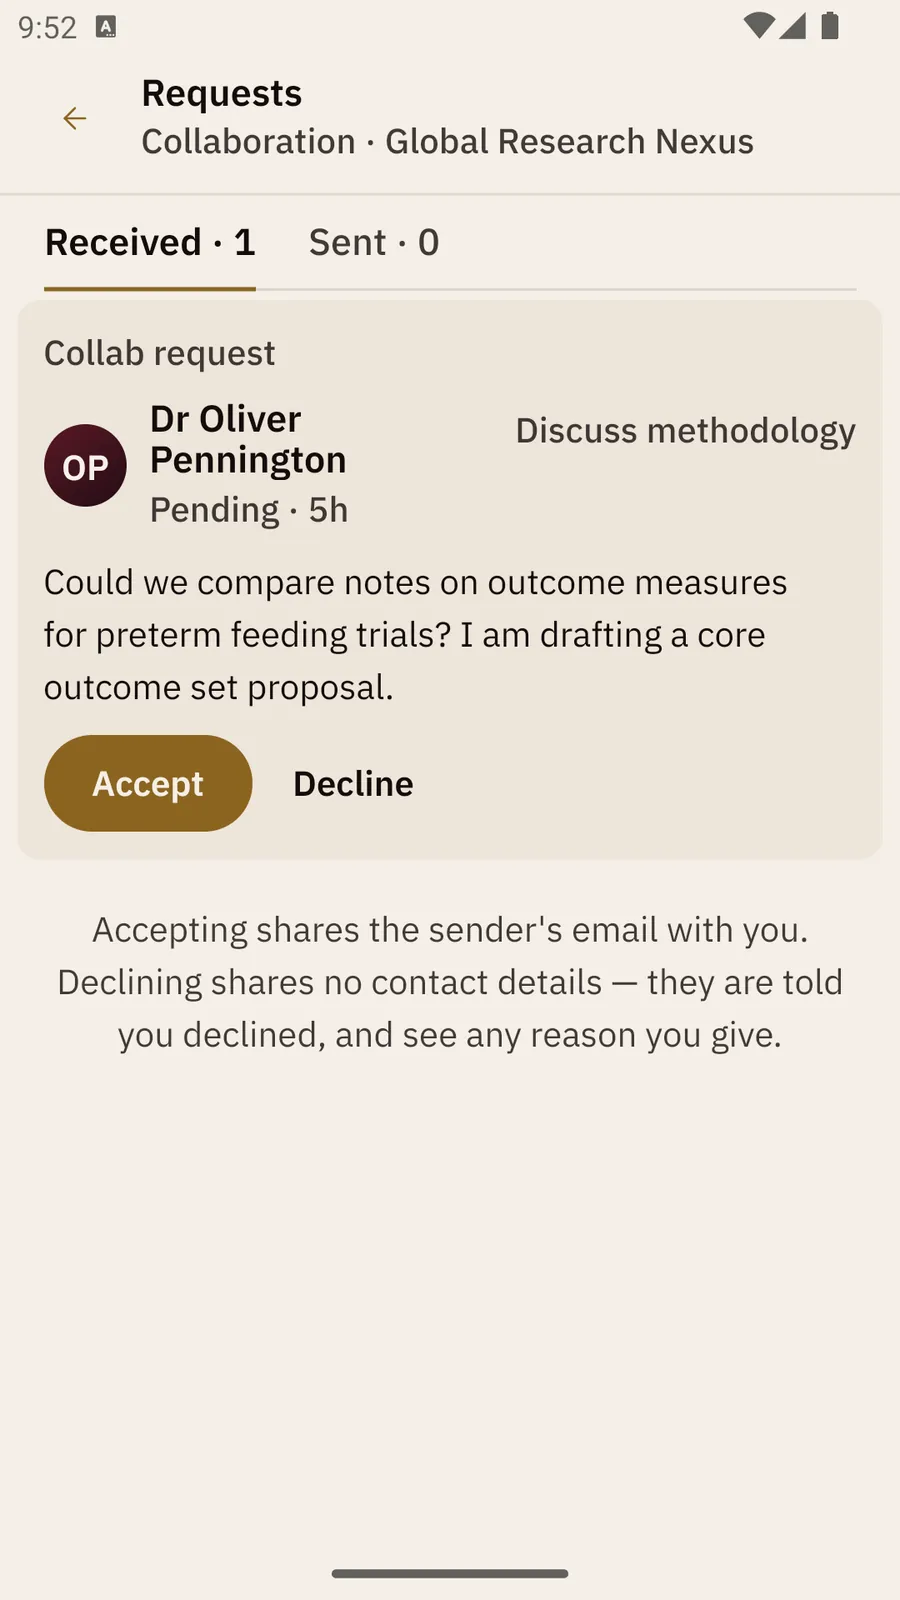
The Requests screen, Received tab: a pending request from Dr Oliver Pennington to discuss methodology, with his message and Accept and Decline buttons.
Requests: the reason is stated, and contact is shared only once you accept.
The Collaborate sheet: Reach out to Dr Eleanor Whitfield, the four reasons with Work together chosen, the Message · required box and the requests-left line.
The Collaborate sheet.
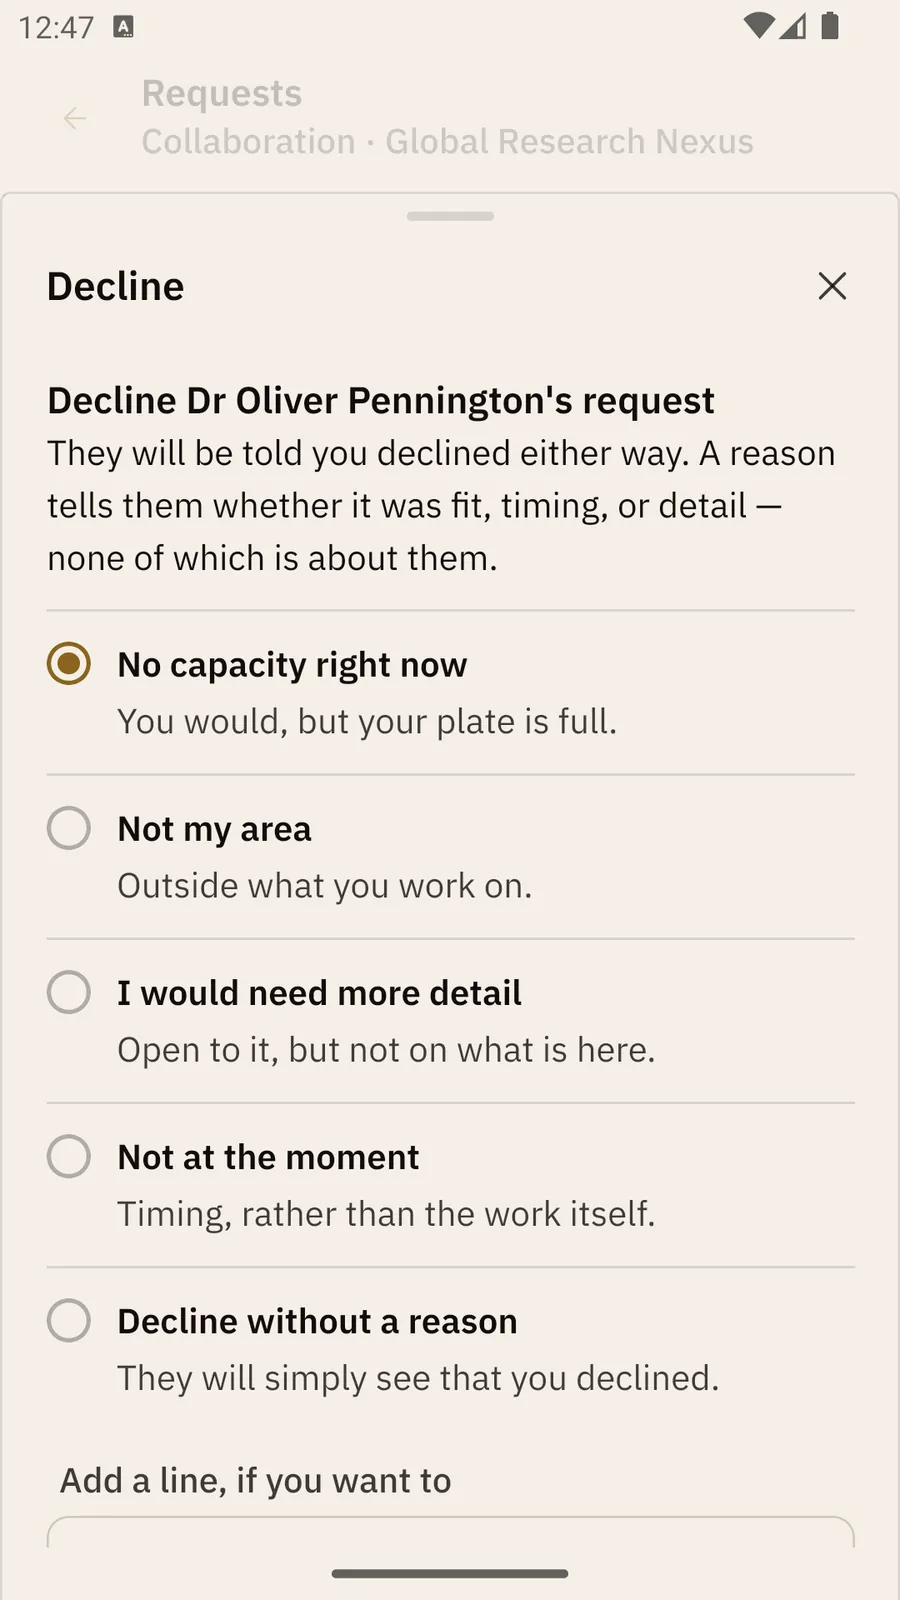
The Decline sheet: the five reasons with No capacity right now chosen, and Add a line, if you want to.
Declining, with a reason.

What happens when I decline?

You can pick a reason — No capacity right now, Not my area, I would need more detail, Not at the moment — or Decline without a reason. You can add one optional line. The sheet shows what they will see under They will see. No contact details are shared.

What happens when I accept?

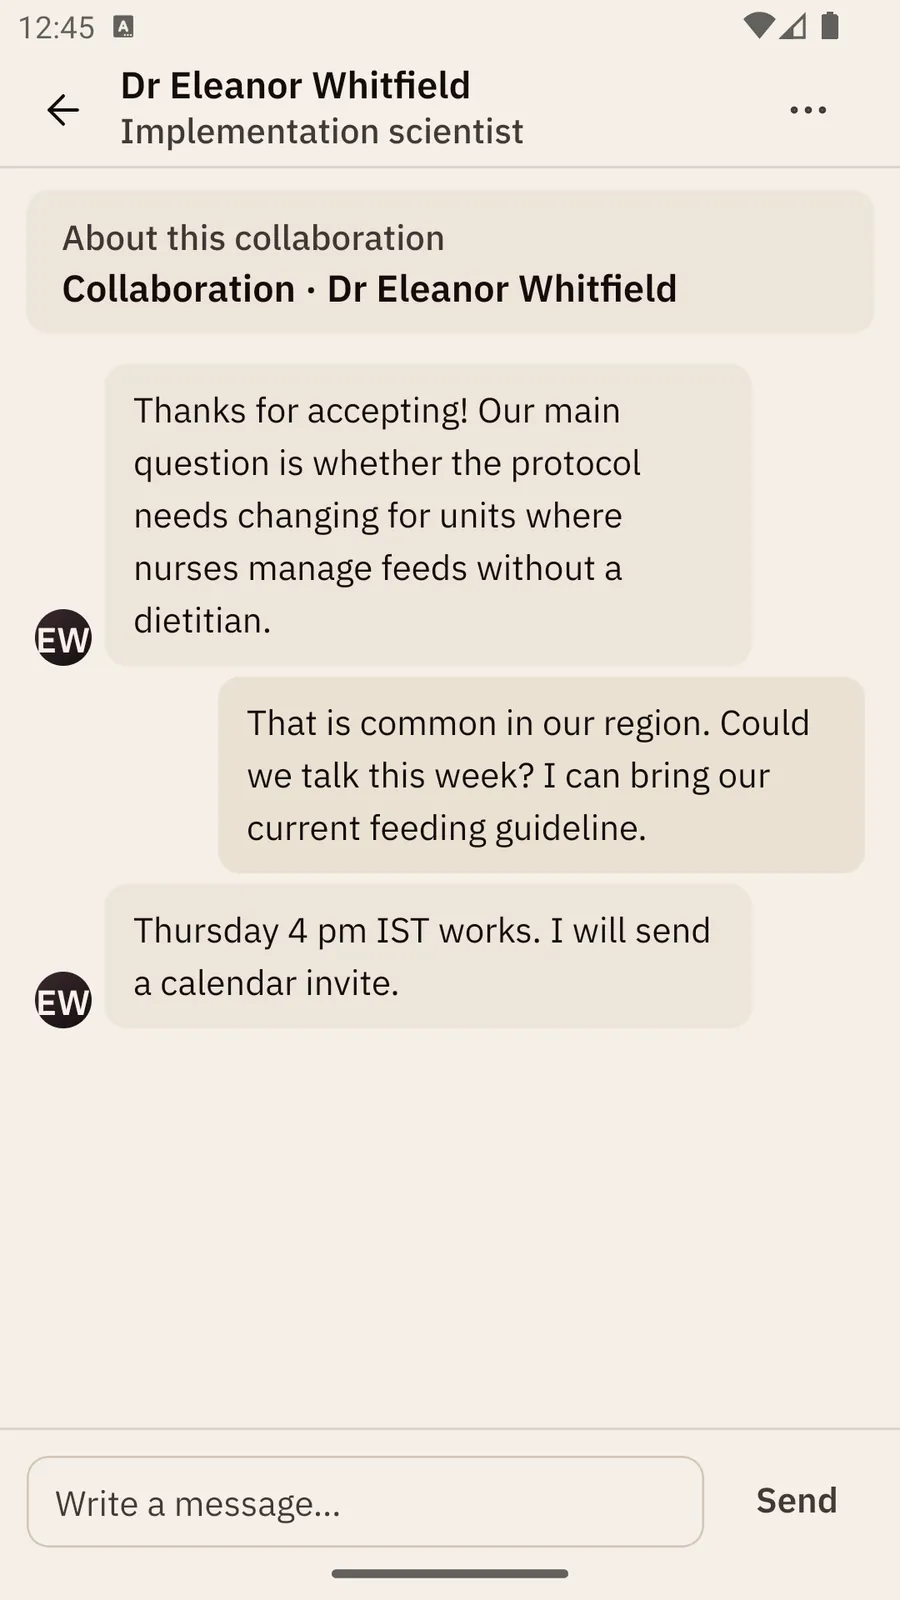
Accepting shares the sender's email with you, and a private conversation opens in Messages. At the top of it, a pinned card — About this collaboration — reminds you what the request was about. Tap it to go back to Requests.

Requests you sent are on the Sent tab, with their status: Pending, Accepted or Declined.

Part Two 2.6 Messages tab

Messages

The Messages tab opens your Inbox. The line above the title counts what is unread and any requests waiting. A gold dot marks an unread conversation.

Who can I message?

  • Anyone you share a circle with. Tap Message on their profile, or the message icon beside their name in the circle's member list.
  • Anyone whose collaboration request you accepted, or who accepted yours. The conversation opens by itself.
  • Everyone in a circle you belong to, through its Circle chat.

How do I send a message?

  1. Tap a conversation in your Inbox.
  2. Type in the box that says Write a message….
  3. Tap Send.

If the reason for a conversation ends — the collaboration stops, or you no longer share a circle — you can still read it, but you can't send new messages. The conversation tells you why.
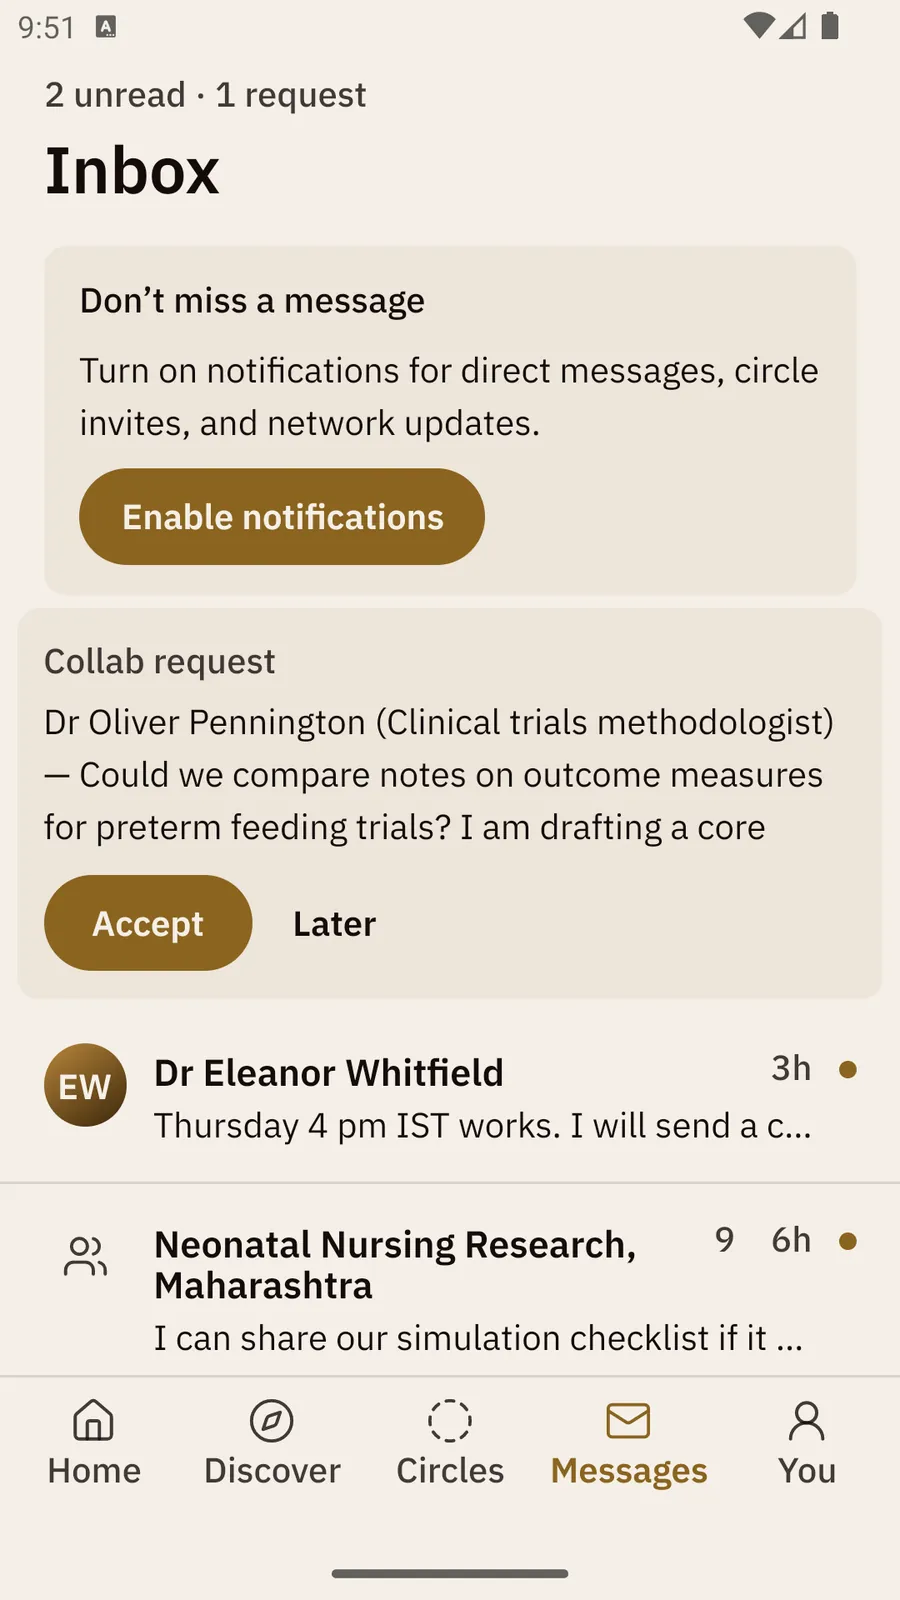
The Inbox: 2 unread · 1 request, a panel to enable notifications, a collaboration request from Dr Oliver Pennington with Accept and Later, then two conversations with gold unread dots.
The Inbox.
An open conversation with Dr Eleanor Whitfield: the pinned About this collaboration card, three messages, and a Write a message box with Send.
A collaboration conversation, with its About this collaboration card.

How do I ask the GRN team for help?

  1. In Messages, scroll to Help & support below your conversations.
  2. Tap Ask for help.
  3. Say what is happening and what you were trying to do, then tap Send.

A person from the team replies inside the app, in the same conversation, and you can keep chatting there. Use this for anything you'd rather not share in a group.

Part Two 2.7 Circles tab

Circles

A circle is a small group — a journal club, a study team, a department. People in the same circle can message each other, and each circle has its own Circle chat.

How do I join a circle?

  1. Tap Circles.
  2. Under Suggested, look through the list or type in Search circles.
  3. Tap Ask beside a circle. An admin of that circle approves or declines it.
  4. If someone invites you, the circle shows Join and Decline. Tap Join.

How do I start a circle?

  1. Tap Circles, then New at the top.
  2. Type a Circle name and, if you like, What is it for?
  3. Leave Let people find and request to join on if others may ask to join. Turn it off to keep the circle invite-only. Either way, you approve every request.
  4. Tap Create circle.

How do I invite people?

  1. Open your circle.
  2. Tap Invite people.
  3. Search for a researcher by name and tap Invite. It changes to Invited.

As an admin you also see Requests to join, with Approve and Decline, and Remove beside each member. To leave, tap Leave circle. The last admin must make someone else an admin first. If the last member leaves, the circle closes and its chat can still be read.
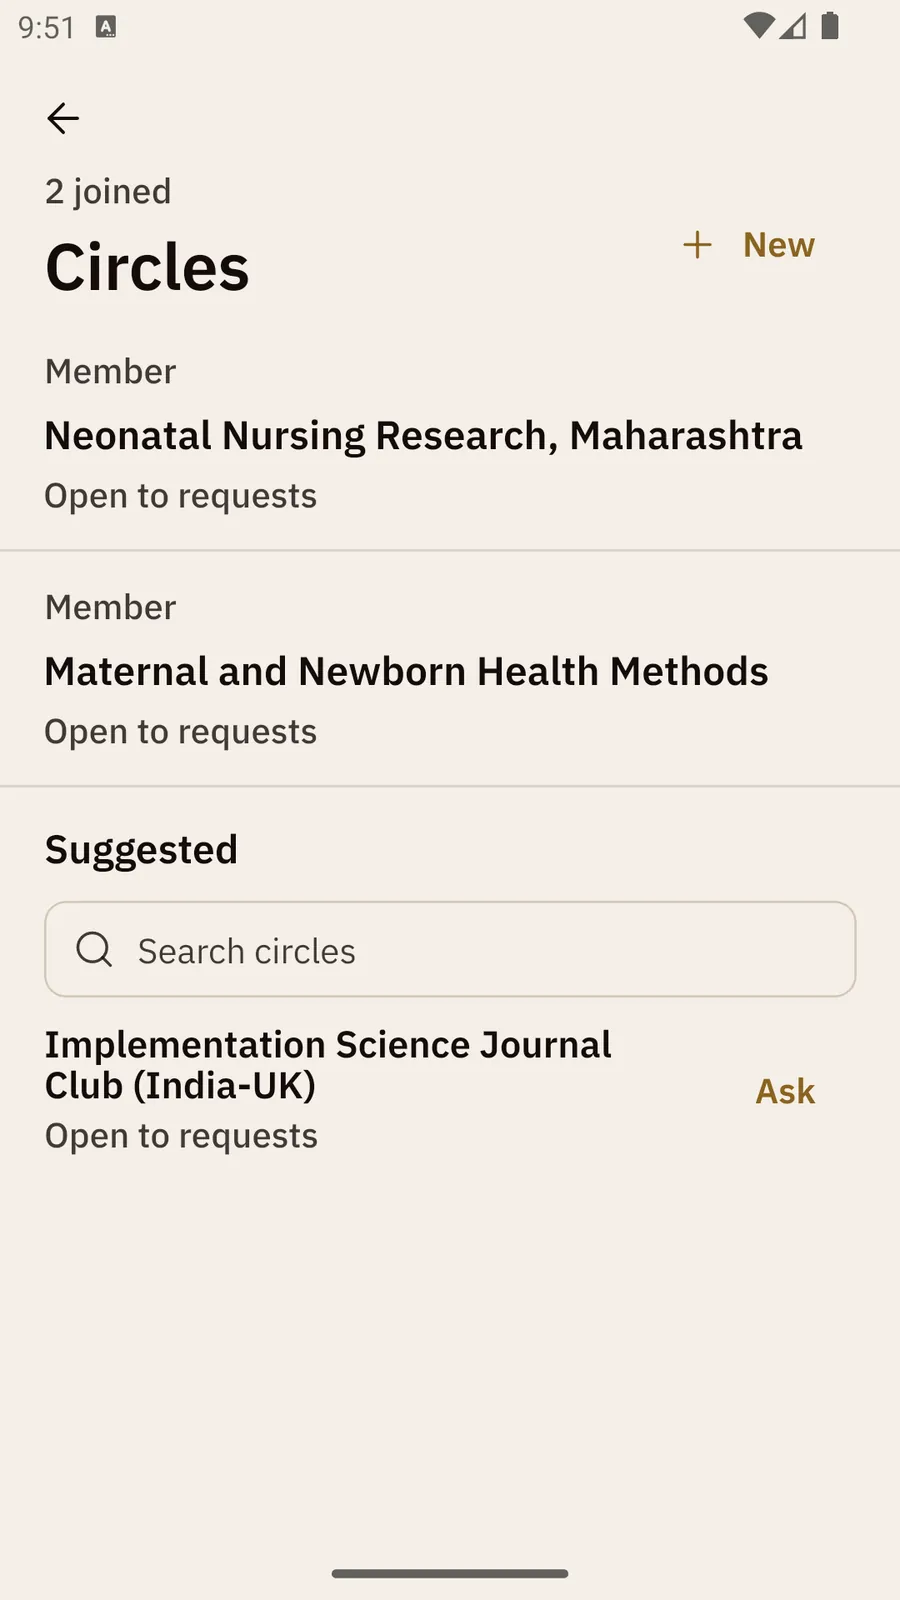
The Circles screen: 2 joined, two circles marked Member and Open to requests, a New button, then Suggested with a Search circles box and one circle with an Ask button.
Circles: the ones you have joined, then suggestions.
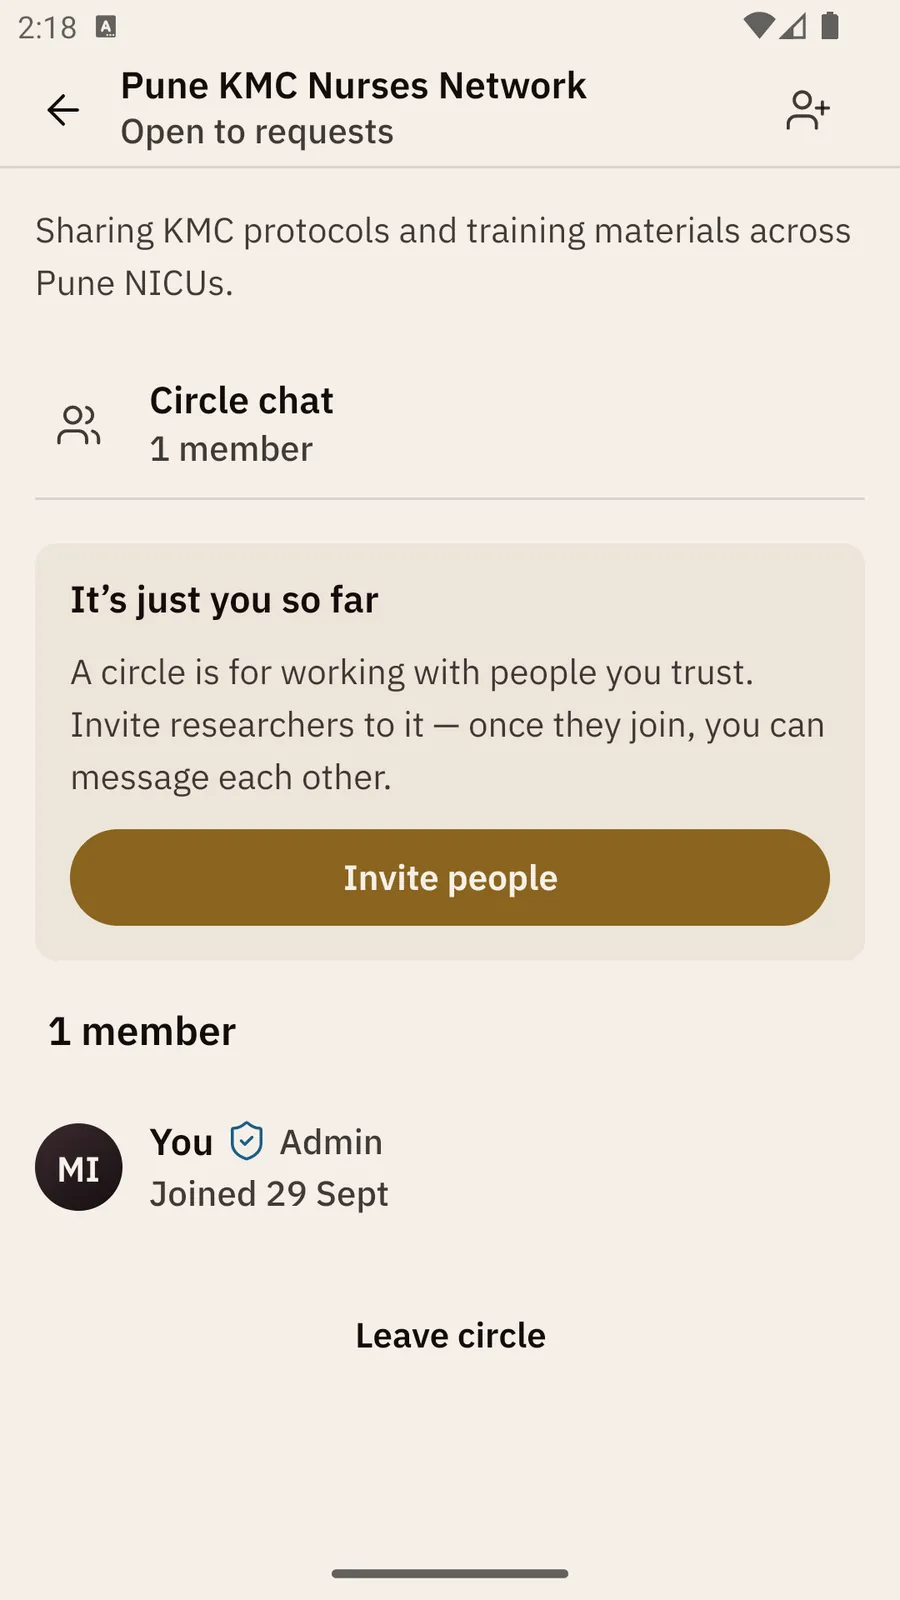
A new circle's page: Circle chat, It's just you so far with Invite people, the one member (you, Admin), and Leave circle.
Inside a new circle.
Part Two 2.8 Discover tab

Discover: searching and following people

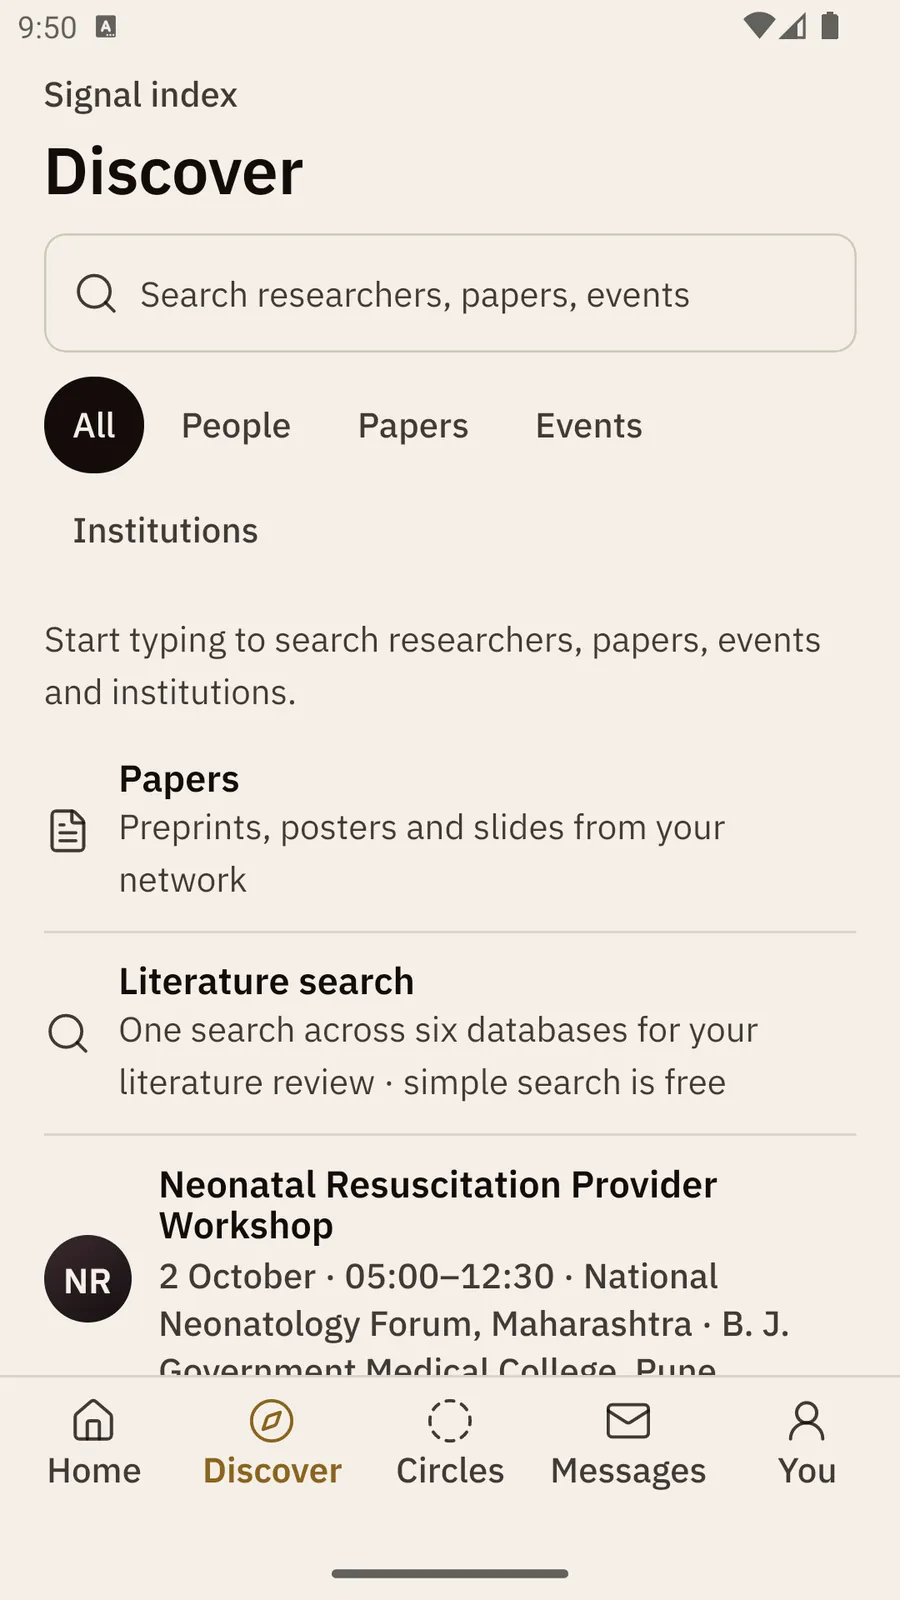
Discover searches people, papers, events and institutions in one box.

How do I search?

  1. Tap Discover.
  2. Type in Search researchers, papers, events.
  3. Use the pills to narrow the results: All, People, Papers, Events or Institutions.

Before you type, Discover shows shortcuts: Papers from your network, Literature search, Funding, events coming up, your Recent searches (with Clear history), and Suggested for you.

How do I follow someone?

  1. Search for them, or find them under Suggested for you.
  2. Tap Follow. It changes to Following.
  3. Their posts now appear under Following on Home.

Tap a person's name to open their profile. There you can follow them, send kudos, and see their record. A Message button appears if you share a circle.

What is Literature search?

One search across six databases, for a literature review: to scope what exists and write the background of a study. It is a preliminary search, not a systematic-review search. The simple search is free.

The Discover tab: a search box, the pills All, People, Papers, Events and Institutions, then shortcuts to Papers, Literature search and an upcoming workshop.
Discover before you type.
Part Two 2.9

Funding calls

The Funding radar lists open funding calls: the funder, the title, a short summary, the themes, the closing date and the days left. The days left turn red when a call closes soon.

How do I find funding calls?

  1. Tap the funding part of the line under the date on Home (for example “6 open funding calls”), or tap Discover → Funding.
  2. Use the pills at the top to show calls for one profession. The app starts on the profession in your profile; All shows everything.
  3. Tap a call to see Funding details, with Closes, Days left and Source website.

How do I track a call and get reminders?

  1. Tap Track on the call. It changes to Tracking.
  2. GRN sends a reminder one week before the call closes, and again the day before.

Reminders need the Funding and conferences switch on, in You → Account → Notification preferences. The notepad icon on a call saves a note about it to your capture inbox.
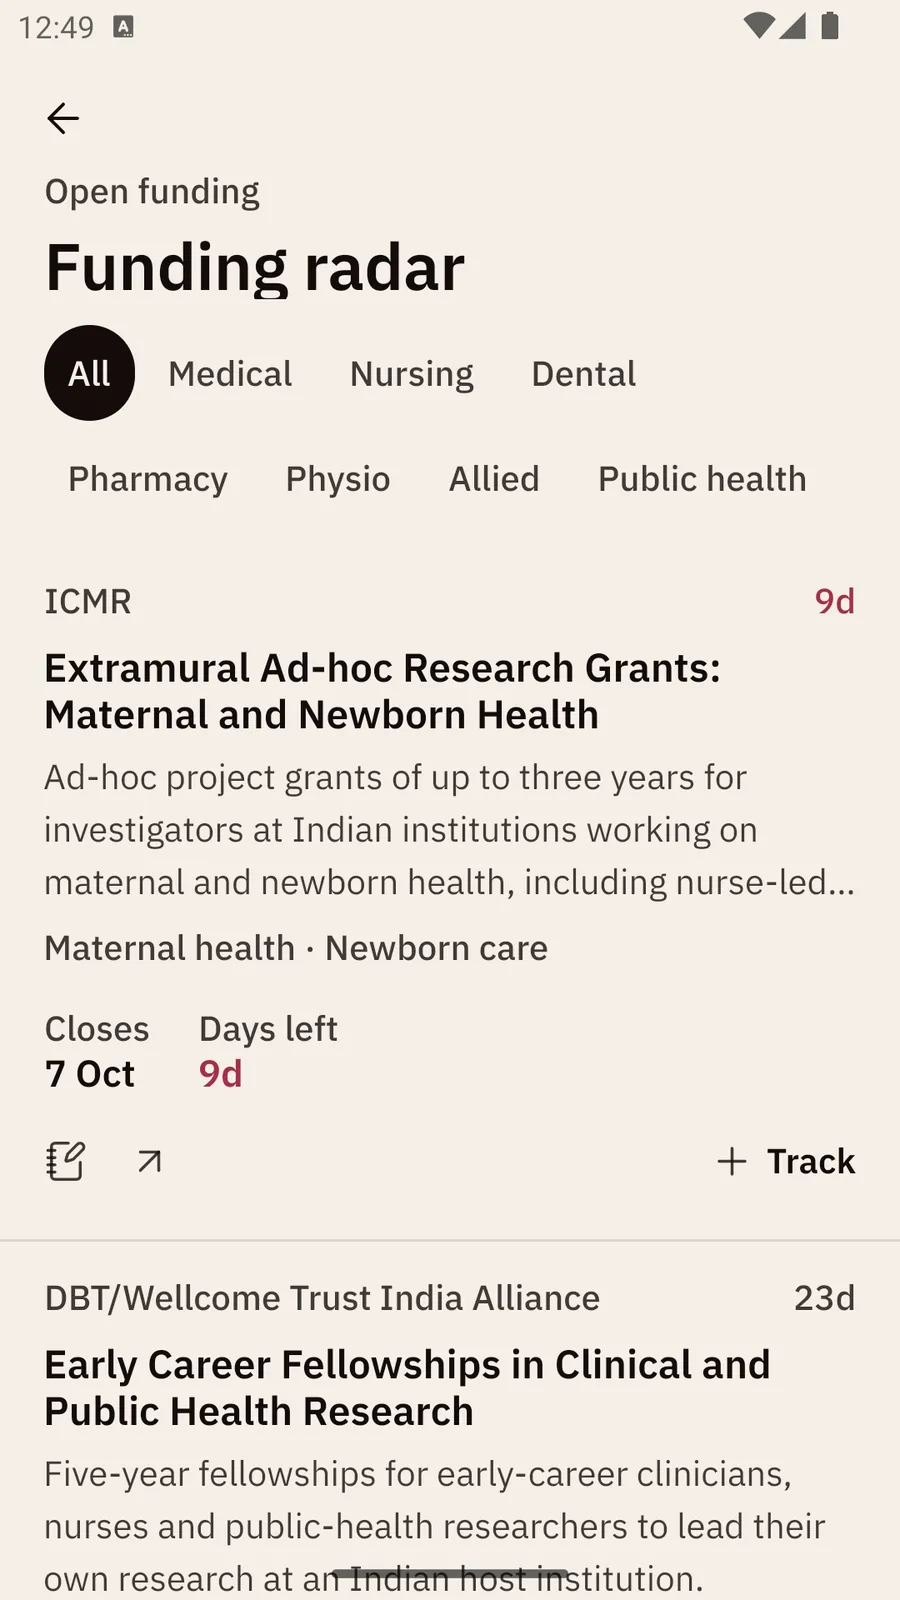
The Funding radar: profession pills from All to Public health on two rows, and two calls with funder, title, summary, themes, closing date and days left, each with a Track button.
Funding radar.
Part Two 2.10

Events and courses

Events and courses lists workshops, webinars, conferences and courses. The tabs are For you, Events, Courses, Online, Deadlines and Saved. For you starts with those matched to your profession.

How do I save an event and add it to my calendar?

  1. Open Events and courses from Discover (the events shortcut, or See all events and courses).
  2. Tap Save on an event. It changes to Saved and appears under the Saved tab.
  3. Tap Add to calendar. Your phone's own calendar opens with the event filled in. Check it and save it there.

How do I RSVP?

Tap RSVP on an event you plan to attend. It changes to Going. Courses don't have RSVP. GRN reminds you the day before an event you saved or RSVP'd to, if Event reminders is on.
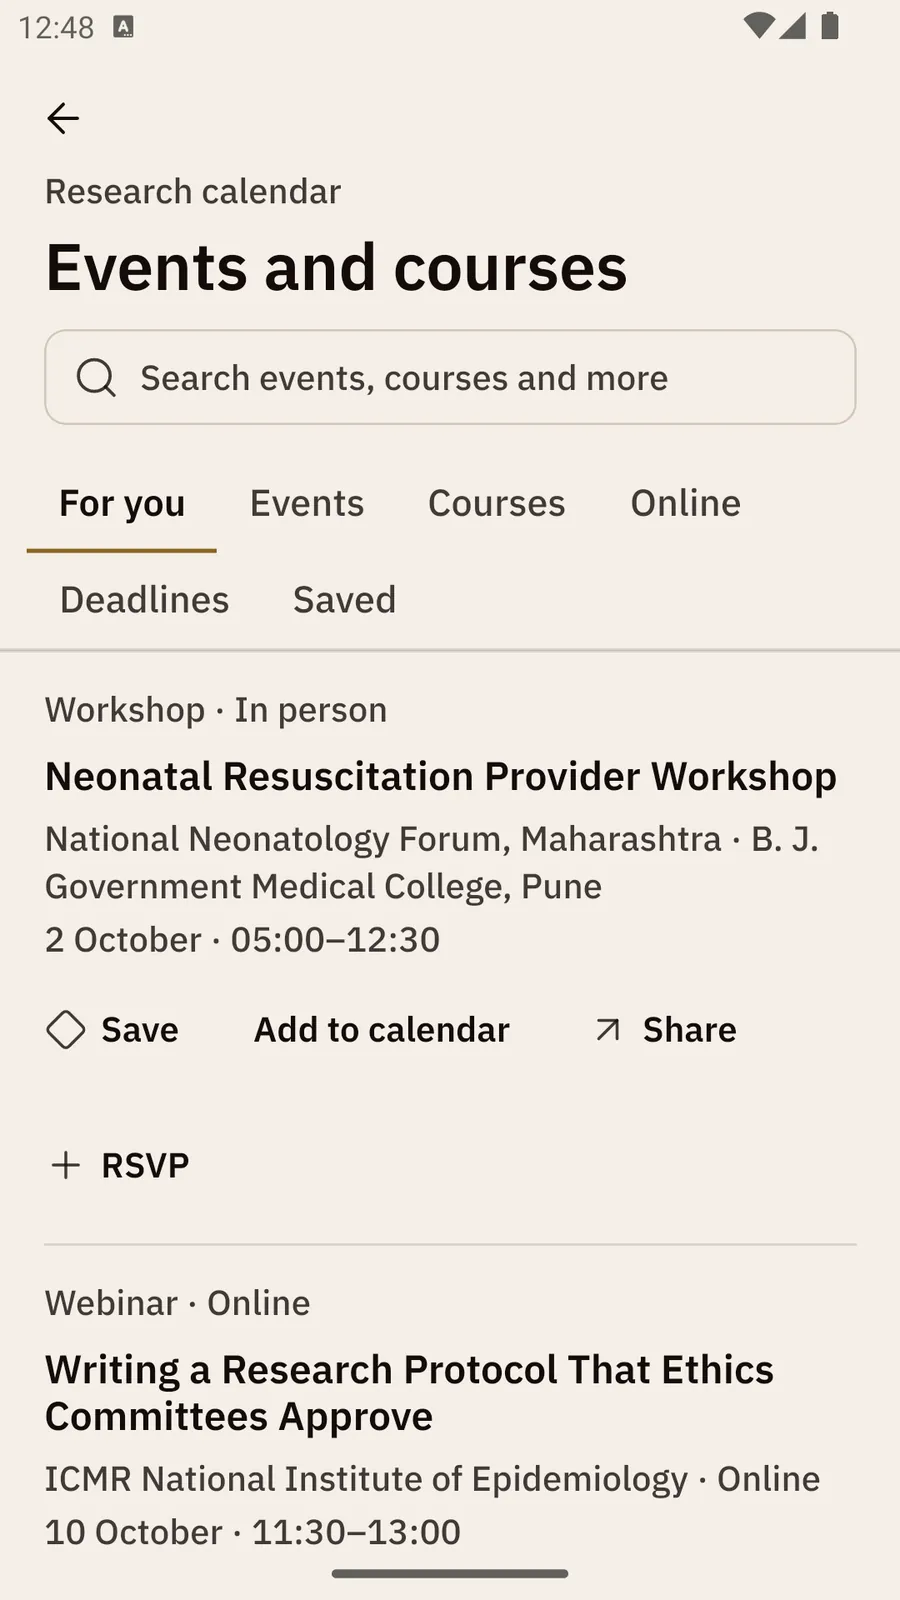
The Events and courses screen: a search box, the tabs For you, Events, Courses, Online, Deadlines and Saved on two rows, and a workshop and a webinar, each with Save, Add to calendar and Share, and RSVP on the workshop.
Events and courses.
Part Two 2.11

Scan a paper, and capture ideas

How do I scan a printed paper?

  1. On Home, tap your own circle at the start of the stories. The create sheet opens.
  2. Choose Capture, then Scan a paper.
  3. Tap Photograph a paper and take a photo of the first page, straight on. Or tap Choose an existing photo, or Type the DOI or title instead.
  4. Tap Look it up. GRN shows the paper as Identified, or asks Is this the paper?
  5. Tap Save to library. The paper goes into your reference library.

The photo is read on your phone and is not uploaded. If GRN finds the wrong paper, tap Not this paper or Try again.

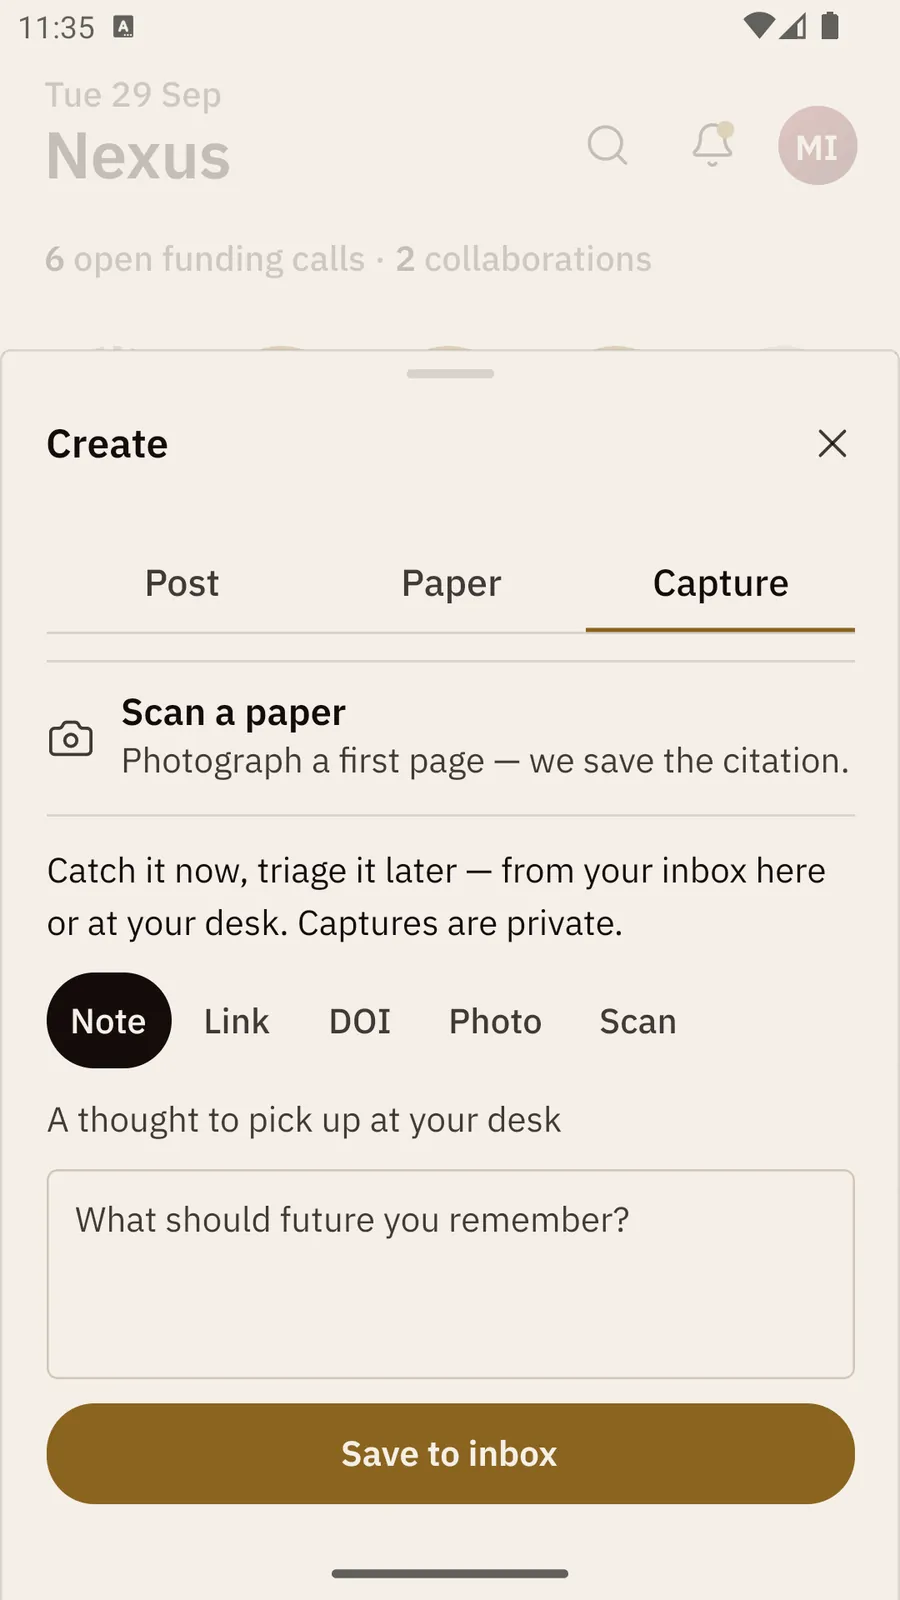
How do I save a quick thought, link or DOI?

  1. Tap your own circle on Home, then choose Capture.
  2. Pick a kind: Note, Link, DOI, Photo or Scan.
  3. Type or add what you want to keep.
  4. Tap Save to inbox.

Captures are private. They wait in your capture inbox, which you can open on the phone (You → Your Studio → Capture) or on the website. From there you can read, open, dismiss, or file them into your Research log.
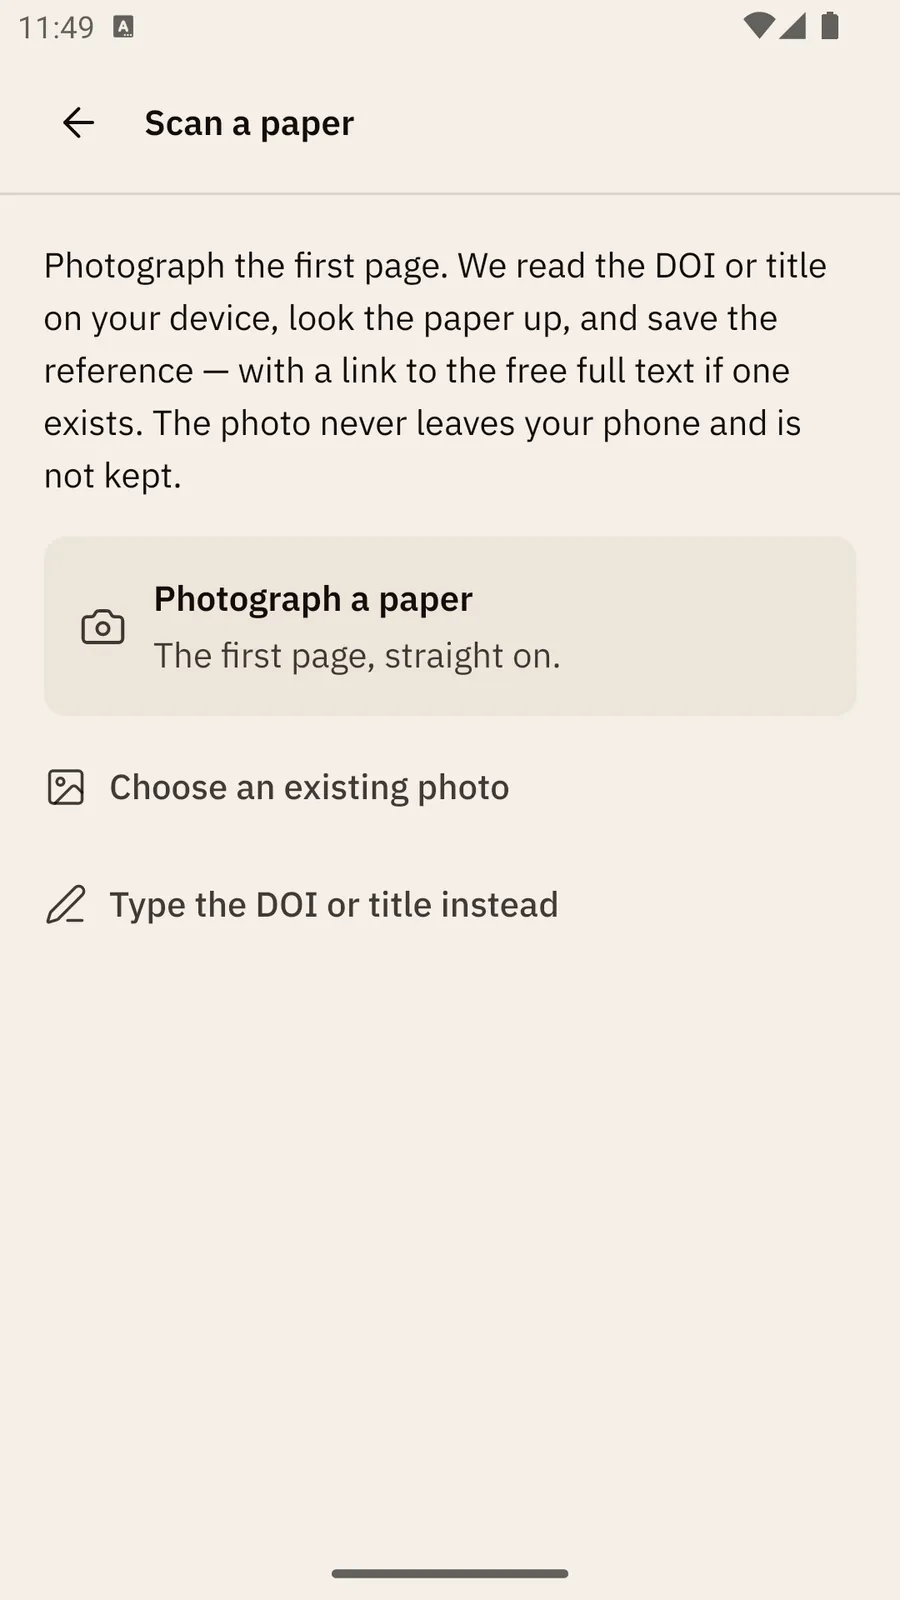
The Scan a paper screen: a note that the photo never leaves your phone, then Photograph a paper, Choose an existing photo and Type the DOI or title instead.
Scan a paper.
The create sheet on Capture with the kinds Note, Link, DOI, Photo and Scan, and Save to inbox.
The Capture sheet.
Part Two 2.12

Studio on the phone

The Studio is the research side of GRN: your manuscripts, journal matches, readiness checks and reviews. On a phone you open it from You → Your Studio.

What can I do in the Studio on a phone?

  • Search the literature — the simple search is free. Advanced search needs an institution-affiliated account or a plan.
  • Check a journal — type a journal name, ISSN or publisher.
  • Reference library — see your saved papers and Export them as PDF, RIS (Zotero, Mendeley, EndNote), BibTeX or CSV.
  • Research log — add an entry with Minutes and a Category (optional), and Share portfolio for your CPD record.
  • Review queue — Claim this review in your specialty.
  • Read your Manuscripts, Journal matches, Submission readiness and Submission outcomes, and open the Reading Desk and your Capture inbox.

What can't I do on a phone?

You can't write or edit a manuscript. The screen says “Full authoring opens on supported tablets.” Tap Open on the web to open the same draft in your browser on a computer. Nothing you have written is affected.

Part Two 2.13

Notifications and the daily briefing

Notifications opens from the bell at the top of Home. It lists every update that isn't a conversation: new posts from people you follow, new followers, reactions and comments, collaboration requests, funding calls and events. Items are grouped under Today and Earlier. A gold dot marks each one you haven't seen.

How do I use Notifications?

  • Tap an item to open it — the post, the event, the request or the person.
  • Answer a collaboration request right there with Accept or Decline.
  • Tap Mark all read to clear the dots.

How do I choose what I'm told about?

  1. Tap You, scroll to Account, then tap Notification preferences. (The gear at the top of You takes you there too.)
  2. If notifications are off for this phone, tap Enable notifications and allow them.
  3. Turn each switch on or off: Event reminders, Activity on your posts, Messages, Network, Internal review updates, Funding and conferences, Daily briefing and Away reminders.

What is the daily briefing?

Daily briefing is one morning summary of deadlines and things waiting on you. It is silent when there is nothing. On Home, Today's briefing shows the one thing that needs you most right now.
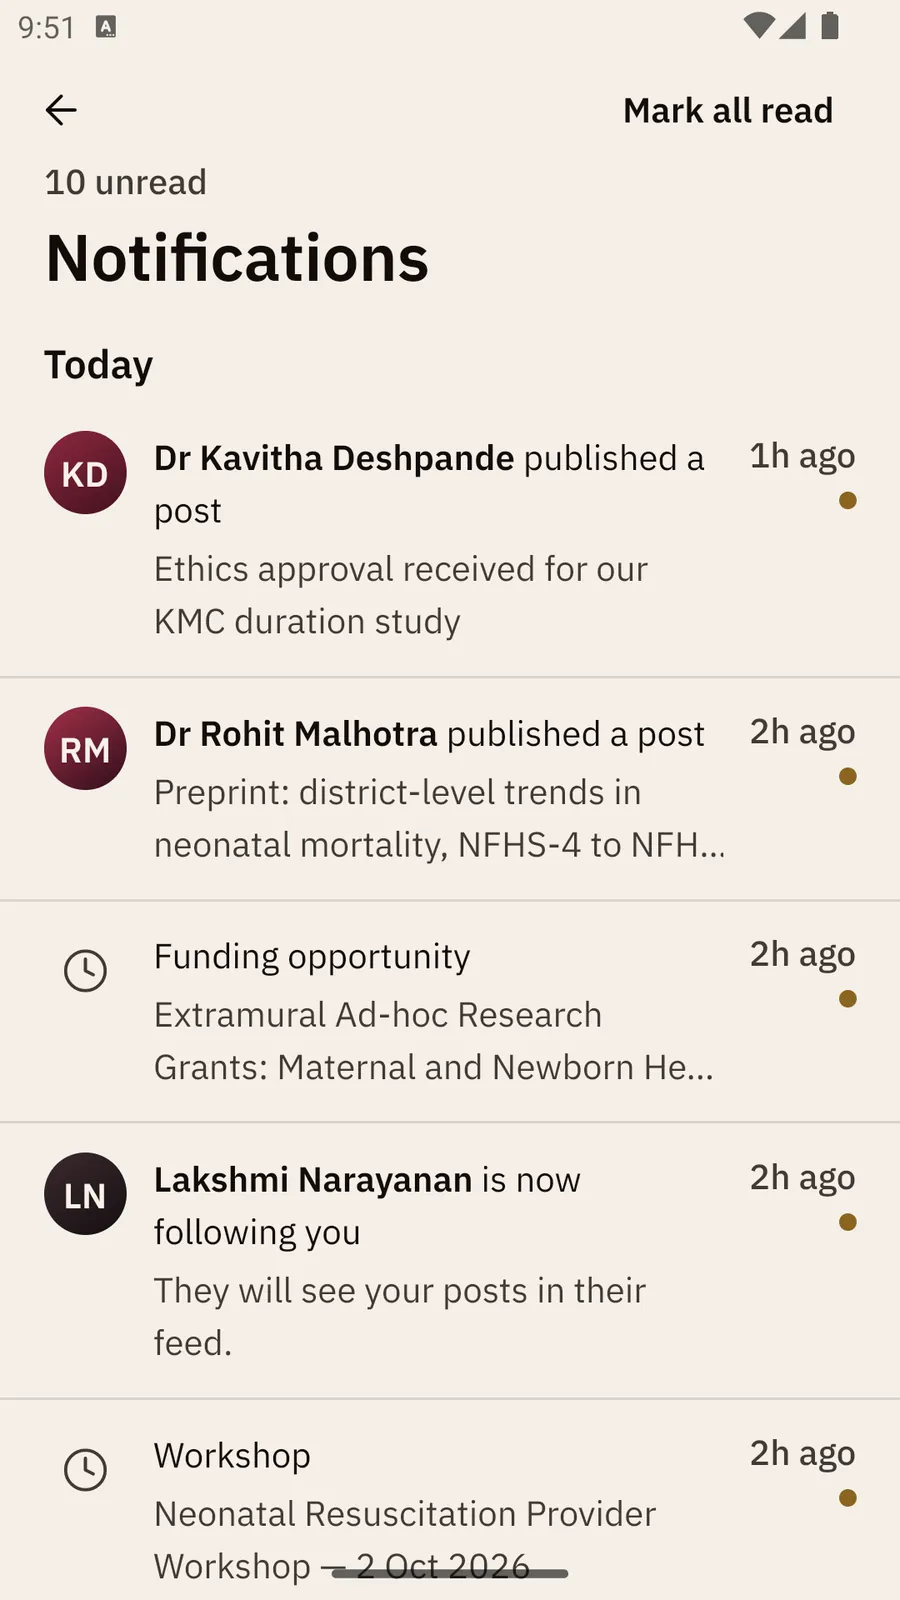
The Notifications screen: 10 unread, a Mark all read button, and under Today two new posts, a funding opportunity, a new follower and a workshop, each with a gold unread dot.
Notifications.
Part Two 2.14 You tab

Your profile: the You tab

You holds your profile and your settings. At the top are your name, Edit profile and Share profile (shown as Edit and Share on narrow phones), and your Collabs, Following, Followers and Saved counts.

How do I edit my details?

  1. Tap You, then Edit profile.
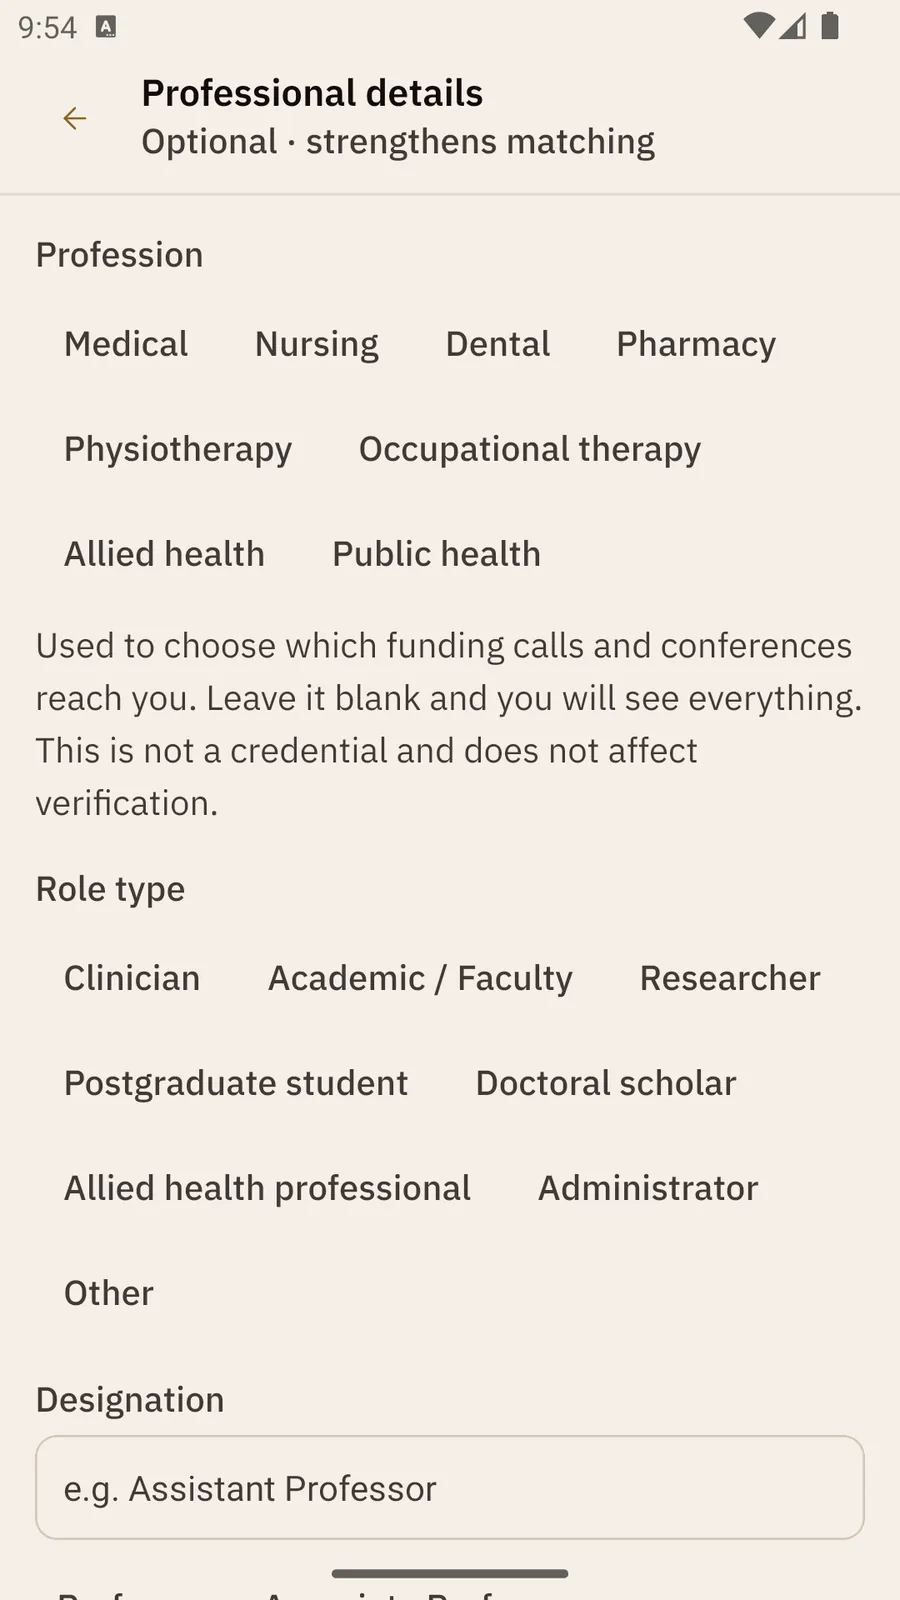
  2. Fill in what you want: Profession, Role type, Designation, Department, Specialization, Years of experience, Research interests, and links to Google Scholar, Scopus, LinkedIn or a Personal site.
  3. Tap Save details.

None of it is required. Your profession decides which funding calls and conferences reach you. It is not a credential and does not change your verification.

Where are my posts, saved things and papers?

  • Your work → My posts: every post you have written.
  • Saved posts: posts you bookmarked. Only you can see these.
  • My papers: preprints, posters and slides you share.
  • Saved funding & events, and Requests & collaborations.
  • Your Studio, the tour (What you can do here), the Feature video and this User guide.

How do I share my profile?

Tap Share profile and choose an app to send it with.
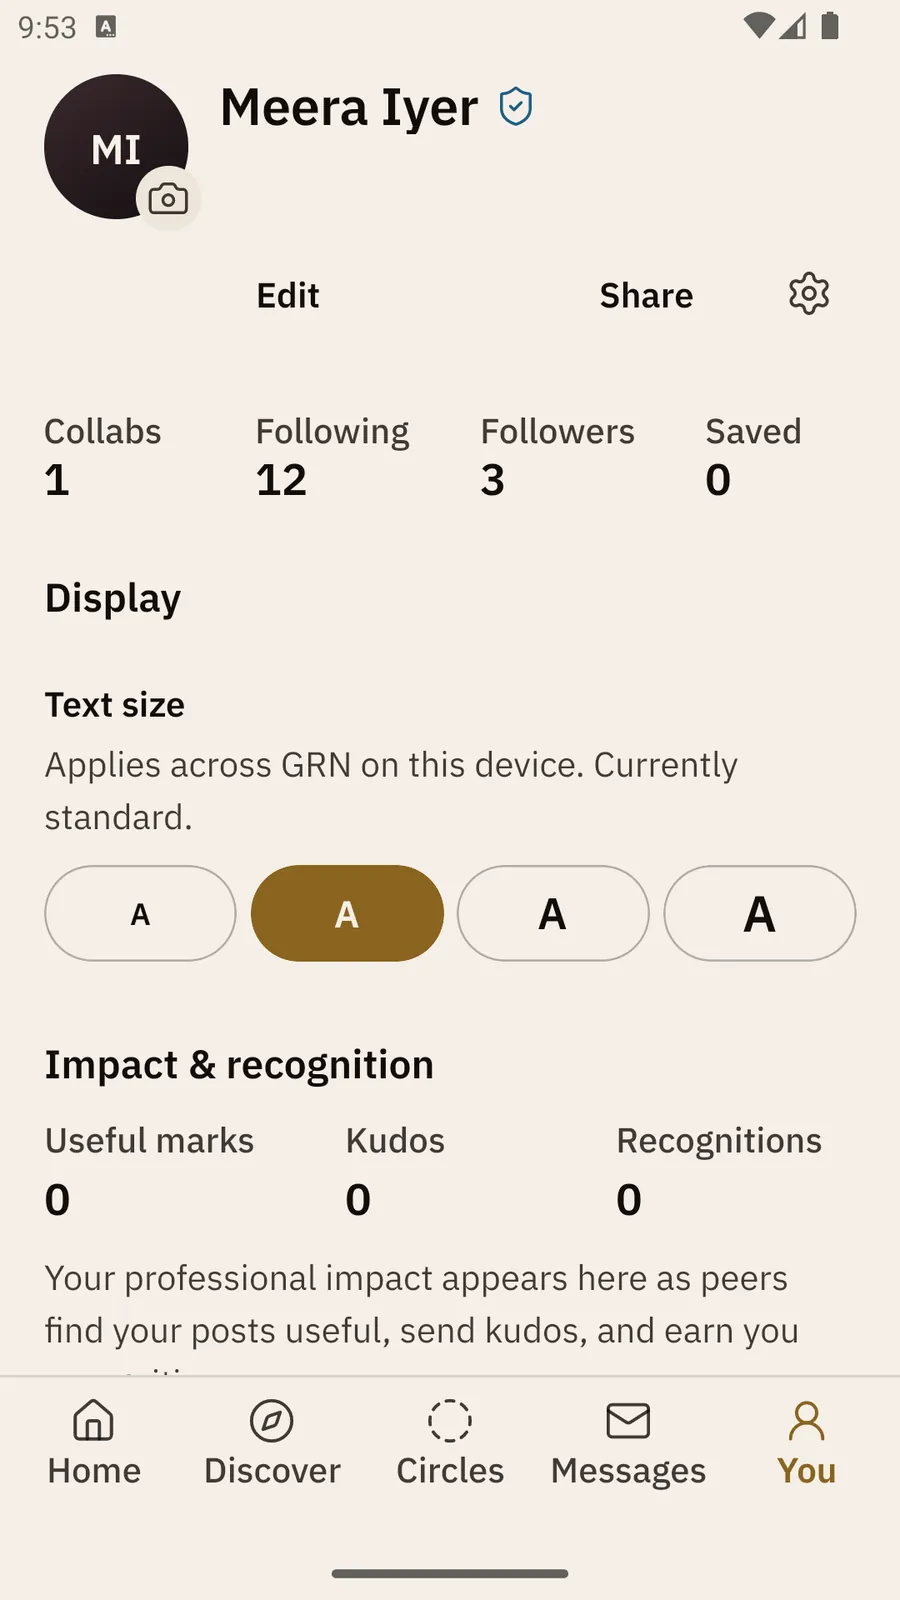
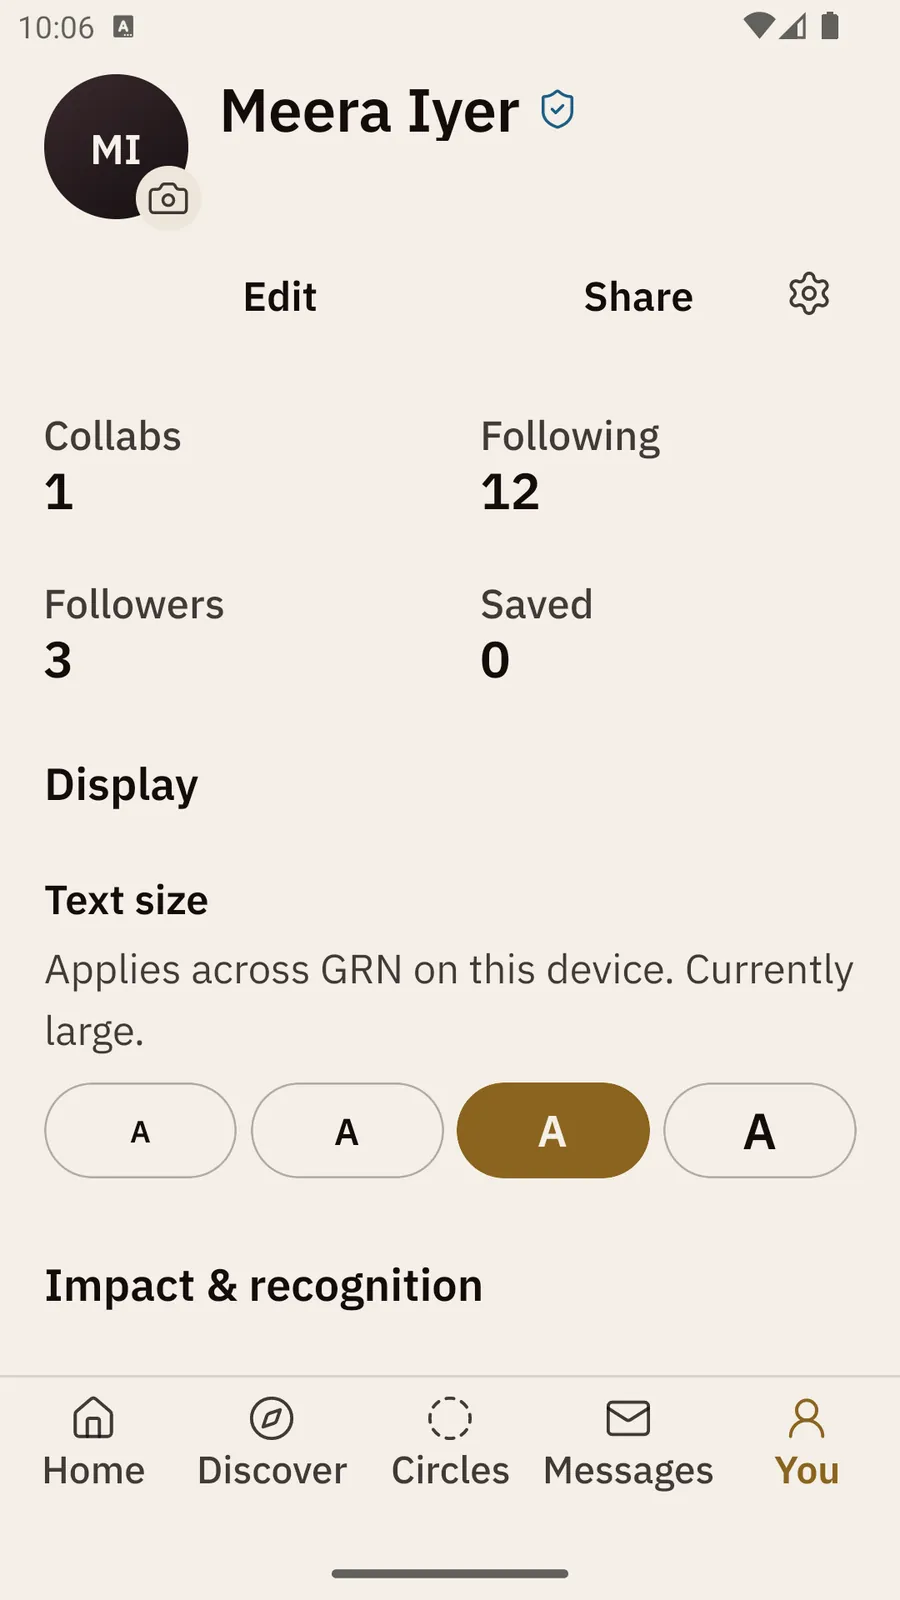
The You tab: the name Meera Iyer with a verified badge, Edit, Share and a settings gear, the counts Collabs, Following, Followers and Saved, the Display section with Text size, and Impact and recognition.
You: your profile, counts and Display.
The Professional details form, marked Optional · strengthens matching, with profession and role type choices and a Designation box.
Professional details.
Part Two 2.15

Getting verified from your phone

Verifying shows that you are a real health professional. It unlocks posting and collaboration. Any one route is enough, and it never costs money. Open You → Verification & credentials. Each route shows Available, Under review, Verified or Needs attention.

With your medical registration (doctors)

  1. Choose NMC registration.
  2. Enter your Registration number and your Name as on the register.
  3. Tap Check my registration. This is usually instant.

With your nursing council registration (nurses)

  1. Choose State nursing council.
  2. Pick your council, and enter your Registration number and your Name as on your registration.
  3. Tap Send for review. A person checks it, so expect a short wait.

With ORCID

Tap Connect ORCID and sign in to ORCID. This is the fastest route if you have an ORCID iD.

With your institution

  • Signed in with a work email your institution uses? Tap Confirm affiliation.
  • No institution email, or a personal one? Tap Claim with your ID or letter, upload a staff ID card or a letter, and tap Submit for review. A person reviews it. The affiliation lasts twelve months, and the document is deleted thirty days after the decision.
Part Two 2.16

Linking your computer

You can sign in on a computer with a short code from your phone, with no email. It also makes sure both use the same account.

How do I sign a computer in with my phone?

  1. On the computer, go to theresearchnexus.in/link. It shows a code like ABC-DEF-GHI.
  2. On your phone, tap You, scroll to Linked devices, and tap Link a browser.
  3. Type the code and tap Check code. Codes work with or without dashes and expire after 10 minutes.
  4. Check the browser named in Log this browser in?, then tap Confirm and sign it in. The computer signs in within a few seconds.

Only confirm a code that is on a screen in front of you. If someone else sends you a code, don't type it in.

How do I sign a browser out?

Under Linked devices, tap Revoke beside the browser, then Sign it out. It is signed out the next time it refreshes.

Part Two 2.17

Staying safe: mute, hide, block and report

On a post

  1. Tap ⋯ at the top right of someone else's post.
  2. Choose Report post, Mute the person, Hide that kind of post, or Block the person.
  • Mute hides their posts from your feed.
  • Hide … posts hides a whole kind, such as milestone posts.
  • Block means you stop seeing each other's posts.
  • Report sends the post to the GRN team. Pick a Reason, add details if you like, and tap Send report. The author is not notified.

On a person

On someone's profile, tap ⋯ for Report and Block. Blocking a person stops you seeing each other's posts and messages.

How do I undo a mute or a hidden kind?

  1. Tap You → Your work → Feed preferences.
  2. Under Muted researchers, tap Unmute. Under Hidden post types, tap Show again.

Block can't be undone in the app. If you blocked someone by mistake, ask us through Messages → Ask for help.

The ⋯ menu of a milestone post: Report post, Mute, Hide Milestone posts, Block and Cancel.
A post's ⋯ menu.
Part Two 2.18 Reading comfort

Making the text bigger or smaller

The app has four text sizes: Small, Standard, Large and Extra large. Standard is where everyone starts. Only the text changes size; buttons and spacing stay where they are.

How do I change the text size on a phone?

  1. Tap You at the bottom right.
  2. Scroll to Display. Under Text size you will see four buttons, each with the letter A.
  3. Tap the size you want. The bigger the A, the bigger the text. The line above the buttons says which size you are on, for example “Currently standard.”

How do I change it on a tablet?

  1. On a tablet with the side rail, tap You in the rail.
  2. Tap the settings gear next to Edit profile.
  3. Choose Display, then tap one of the four A buttons.

If your tablet shows the tabs along the bottom instead of a side rail, it works as on a phone. The first setup step also has the same Text size row (see 2.1).
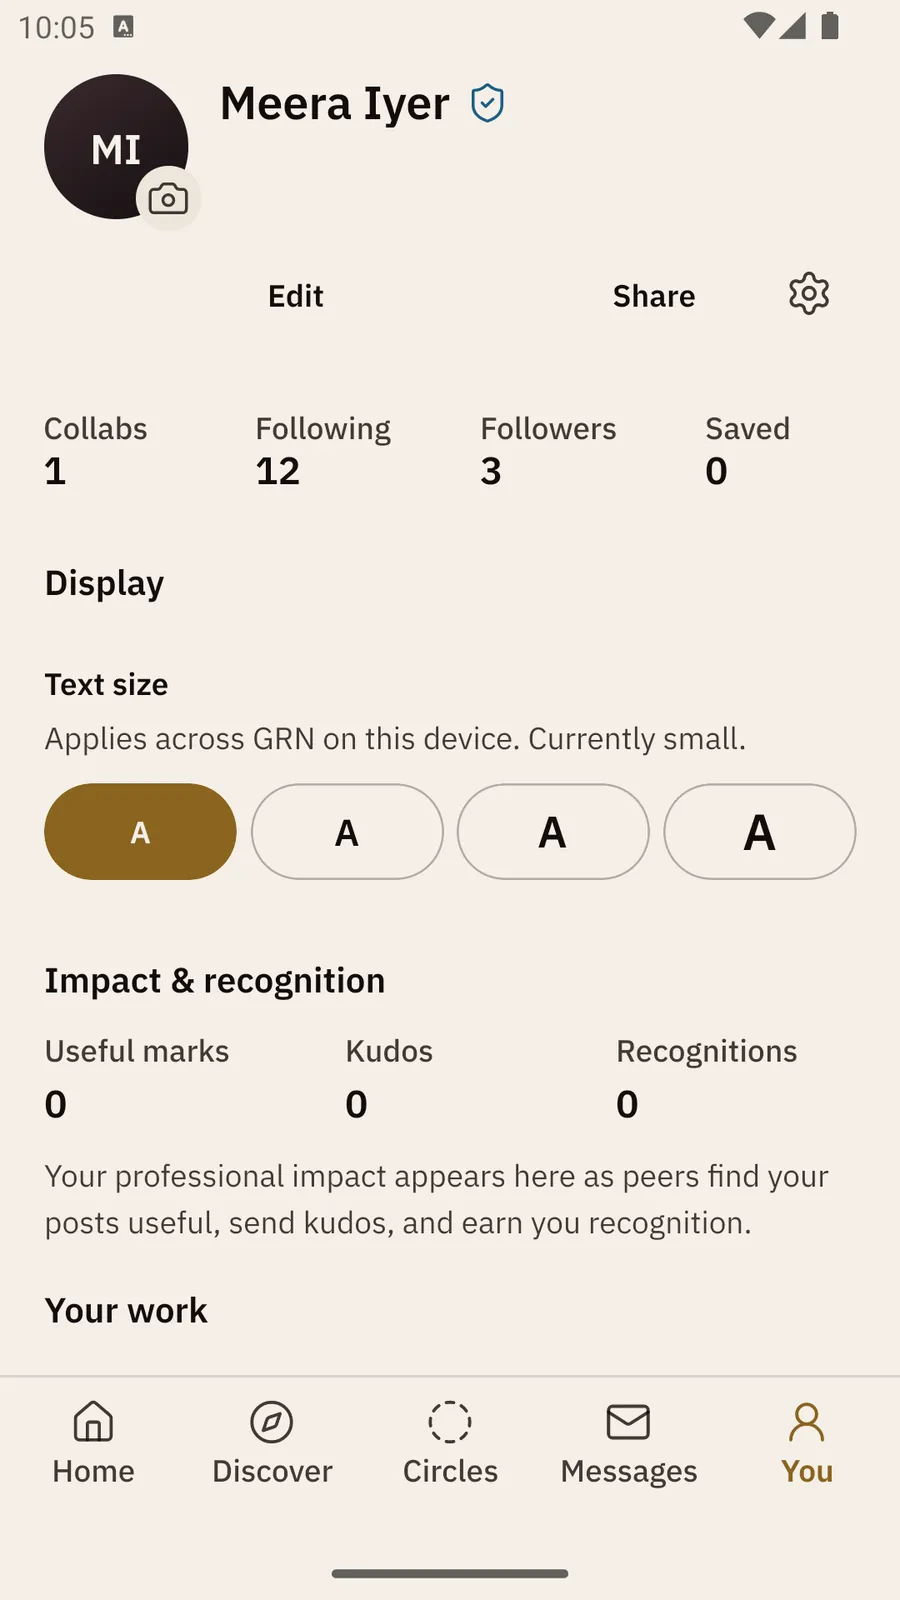
The Display section at Small: Text size, Applies across GRN on this device. Currently small, with the smallest A selected.
Small.
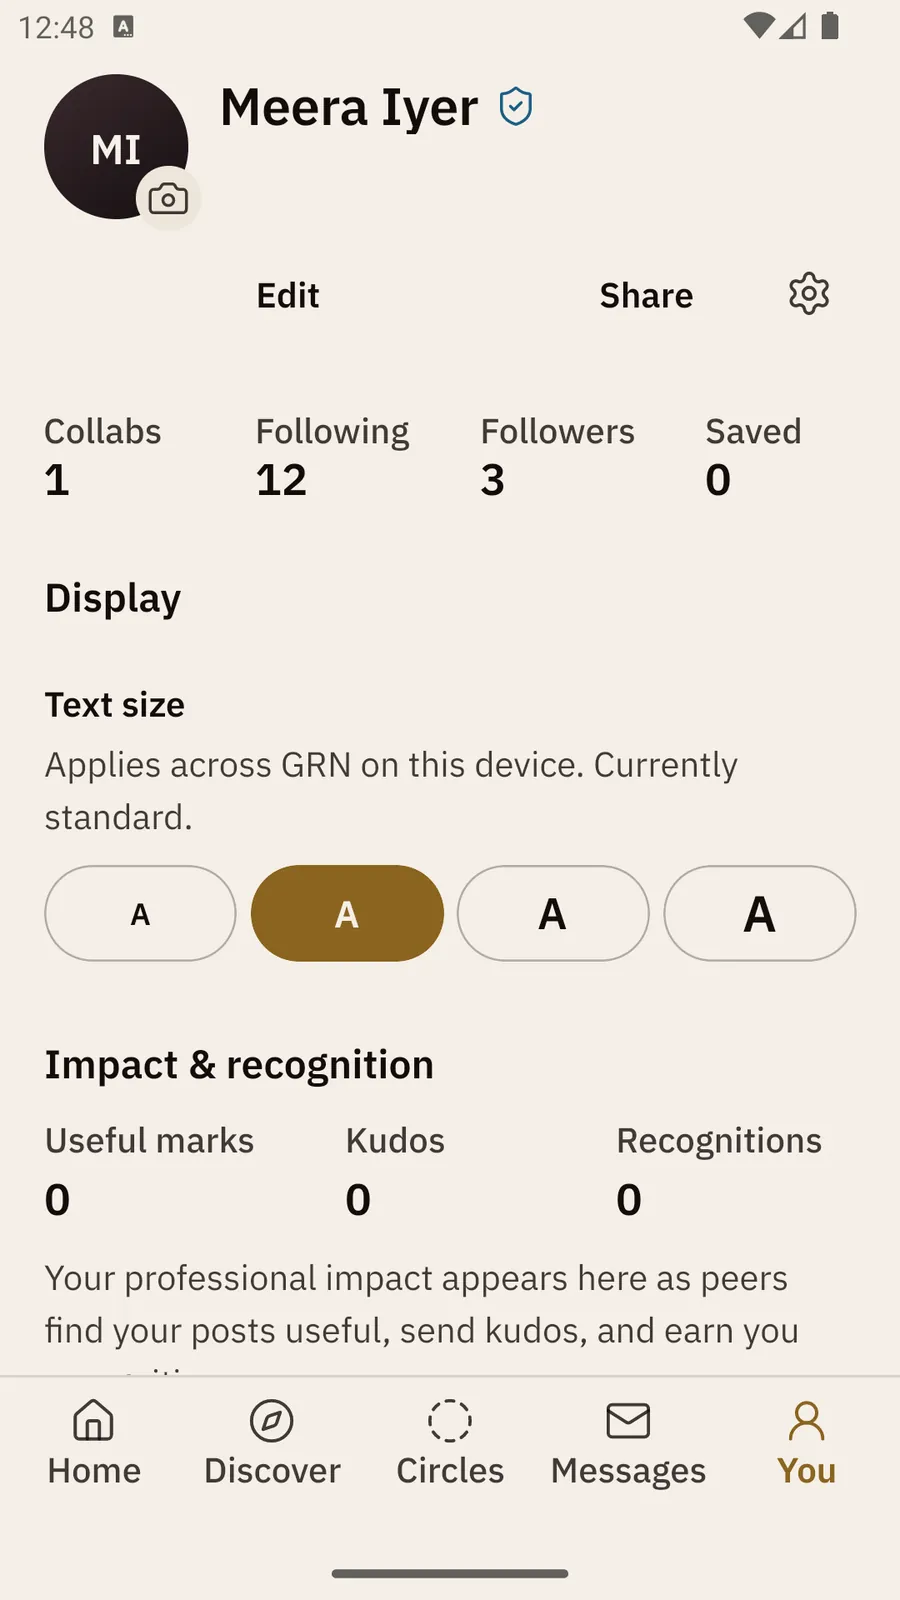
The Display section at Standard, with the second A selected.
Standard.
The Display section at Large, with the third A selected; the counts now sit two to a row.
Large.
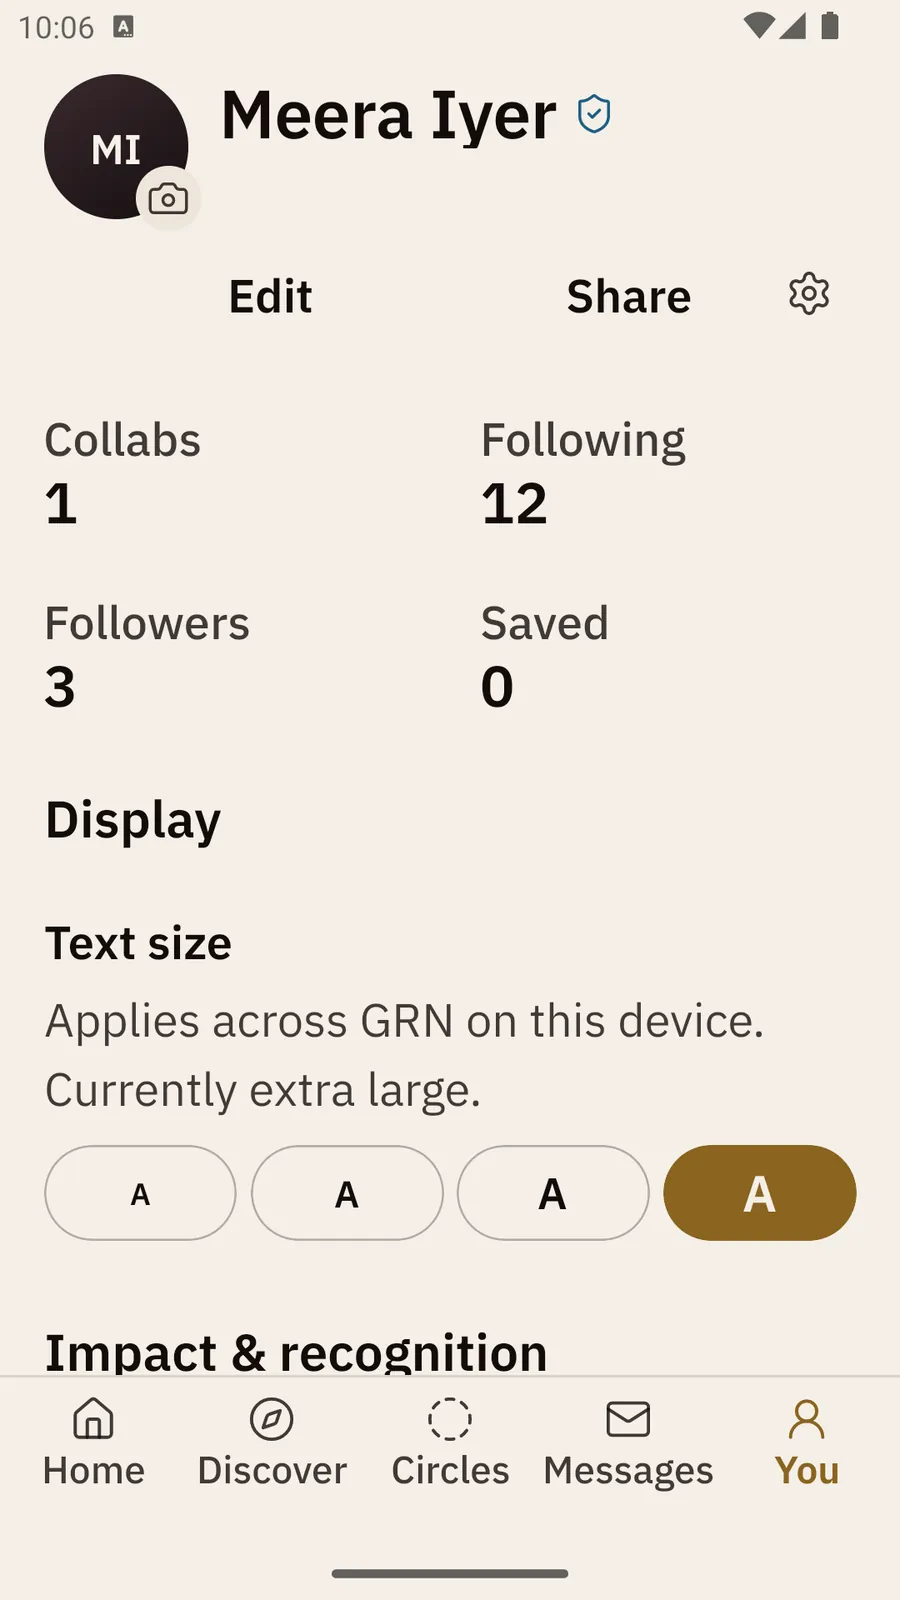
The Display section at Extra large, with the largest A selected and all the text bigger.
Extra large.

What about my phone's own font size?

GRN also follows the font size you set in your phone's own Settings, up to a limit, so nothing is cut off. If the text looks too big even at Small, your phone's own font size is probably turned up. Turn it down in the phone's Settings, or pick a smaller size in GRN.

Saved on this device only. Your choice stays on this phone or tablet. A second phone, a tablet or a web browser starts at Standard until you choose there too.

Part Two 2.19

Keeping the app up to date

GRN updates in two ways. Small fixes download by themselves. Bigger changes, like 2.3.0, come through the app store.

A notice says “An update is ready”

A small fix has already downloaded. Tap Restart now to use it straight away, or Later; it then applies the next time you open the app. Afterwards you may see “GRN was updated”. Tap Got it.

A notice says “Version … is ready”

A new version is in the app store. The notice sits near the top of Home and of You, with Update and a ✕.

  1. Tap Update. The app store opens on GRN's page.
  2. Tap the store's own update button.
  3. Open GRN again when it has finished.

Tap ✕ to hide the notice for now. It comes back the next time you open the app, until you update.

How do I check for an update myself?

  1. Tap You, then scroll to Account.
  2. Tap Check for updates. The row tells you whether you are up to date.

A notification about a new version opens the App update screen, which has Check again. On some phones updates are handled only by the app store; the screen then says so. The very bottom of You shows your version, for example “Global Research Nexus · v2.3.0”.

Part Two 2.20

Signing out, and deleting your account

How do I sign out?

Tap You, scroll to Account & safety, and tap Sign out. Your account and everything in it stay as they are; sign back in with your email link. On a tablet, Sign out of this tablet is in Settings.

How do I delete my account?

  1. Tap You and scroll to Delete account at the bottom.
  2. Read what will happen, then type DELETE in the box.
  3. Tap Delete account permanently.

This can't be undone. It permanently removes your account, profile, posts, follows and uploaded images. Anonymised moderation and security totals are kept for up to 90 days.

Part Two 2.21

On a tablet

Held sideways, a tablet shows a side rail on the left instead of tabs along the bottom: Home, Discover, Circles, Messages, Studio and You. Below them are New post (the gold +) and your picture.
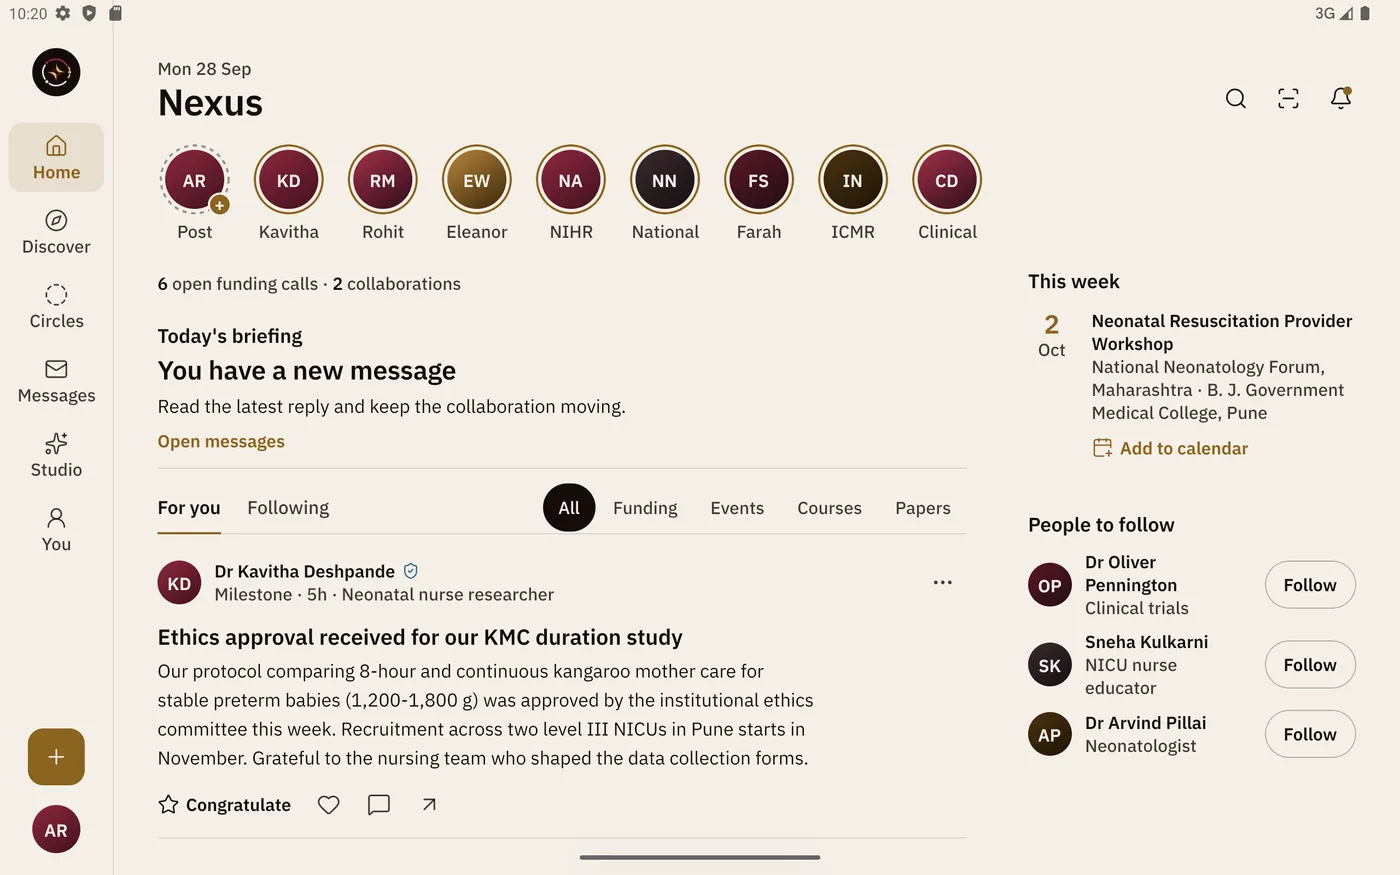
What is different on a tablet?

  • Home has a column beside the feed: This week (your next dated event, with Add to calendar) and People to follow, each with Follow. Search, Scan and Notifications sit at the top.
  • Messages shows two panes: your conversations on the left, the open one on the right. Until you pick one, the right side says “Choose a conversation to read it here.”
  • Settings (the gear on You) has two panes too: Display, Notifications, Account, Linked devices, About & updates, and Sign out & delete.
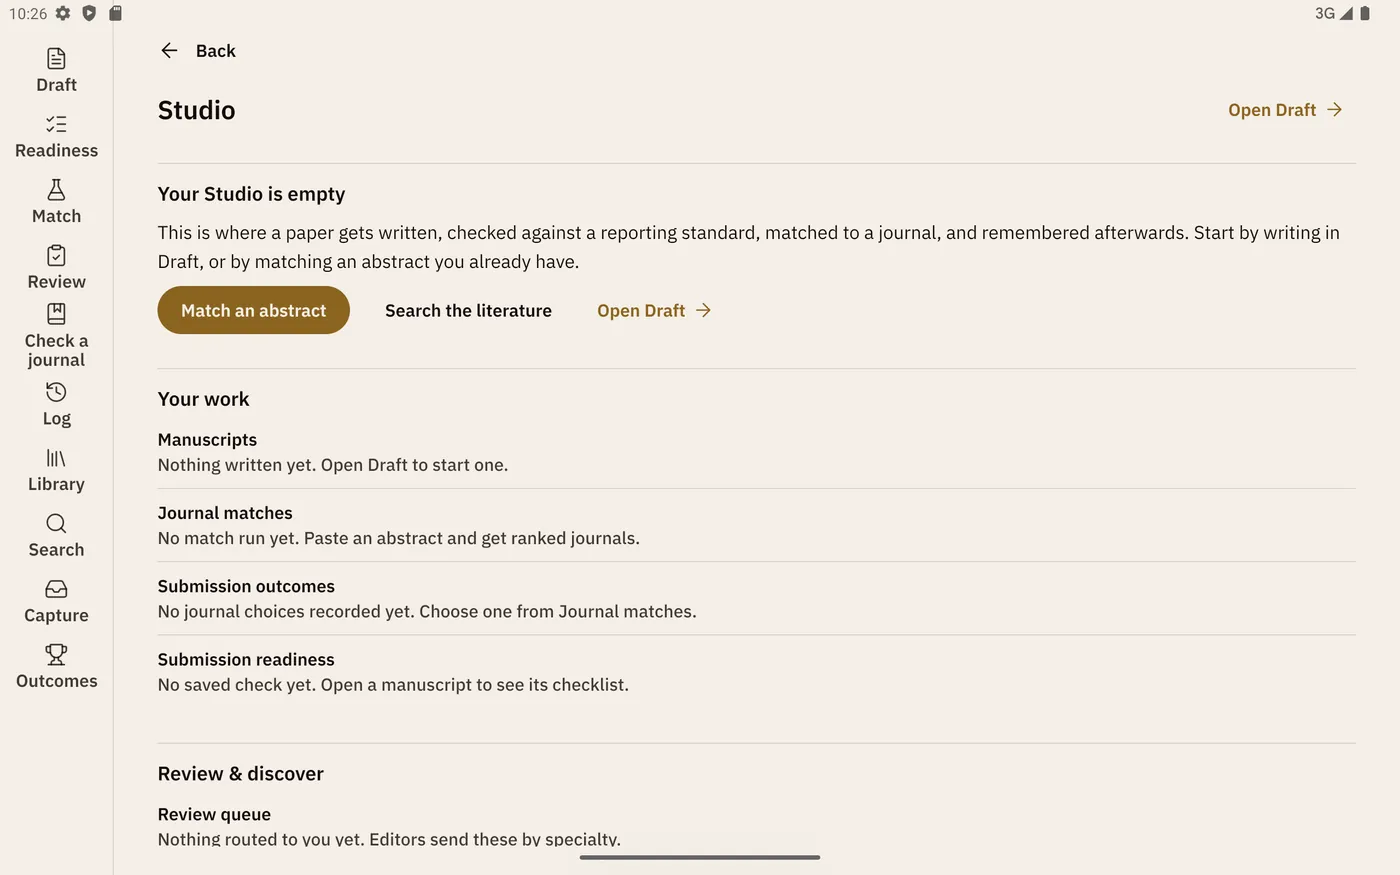
  • Studio becomes a full workspace with its own rail: Draft, Readiness, Match, Review, Check a journal, Log, Library, Search, Capture and Outcomes. You can write there. It needs the full workspace.
Tablet Home: the side rail with Home, Discover, Circles, Messages, Studio and You and a gold + button; the stories, the counts line, Today's briefing and a post in the middle; This week and People to follow on the right.
Home on a tablet, with the side rail and the This week column.
Tablet Studio with its own rail from Draft to Outcomes, showing Your Studio is empty, with Match an abstract, Search the literature and Open Draft.
Studio on a tablet, on a new account.
Tablet Messages. On the left, the Inbox with 1 unread · 1 request, the Don't miss a message panel, a collaboration request from Dr Oliver Pennington with Review, and Help & support. On the right, a conversation with Dr Rohit Malhotra with its About this collaboration card and a Write a message box with Send.
Messages on a tablet: your Inbox on the left, the open conversation on the right.
Part Two 2.22 Troubleshooting

When something goes wrong

The sign-in link opened in my web browser, not in the app

  • Open the email on the same phone that has the app. A link opened on a computer or another phone cannot sign the app in.
  • If a web page says Sign in to the app, tap Open in the GRN app on that page.
  • A browser may flash open for a second and hand you back to GRN. That is normal; don't close it.
  • If the app says “This sign-in link has already been used or has expired. Please start sign-in again.”, ask for a new link. Each link works once. Some work email systems open links to scan them, which uses them up.

The app shows an update notice

Tap Update and install the new version from the app store (see “Keeping the app up to date”). Some fixes only arrive that way.

The text looks too big, or words look squashed

  • Check your phone's own font size in its Settings. GRN follows it, up to a limit.
  • Then pick a smaller size under You → Display.
  • If a word is still cut off or shown with “…”, send us a screenshot. That is a bug.

A screen didn't load

You may see “Could not load …” or “Check your connection, then open this screen again.” Check your phone has signal or Wi-Fi, then pull down to refresh or tap Try again.

I have two accounts

This happens when you sign in once with ORCID and once with email. Pick one way and keep to it. If you need the two joined, contact us through Messages → Ask for help.

Reference

Quick glossary of terms

Every term used anywhere in GRN, in one place — so if a word above wasn't familiar, it's here.
APC
The fee some journals charge you to publish your article. "No APC" means publishing there is free.
ISSN
A journal's ID number. It helps confirm a journal is real and not a copy.
Indexing
Which trusted databases list this journal. Being listed in MEDLINE or Scopus is a good sign.
MEDLINE
A trusted medical database run by the US National Library of Medicine. Journals listed here are checked.
Scopus
A large database of checked journals. Being listed here is a good sign.
UGC-CARE
India's official list of approved journals. Many Indian universities require publishing in these.
PubMed
A free search engine for medical research papers. Most doctors use it to find studies.
DOI
A permanent web link for a published paper. It never breaks, even if the journal's website changes.
ORCID
A free ID number that identifies you as a researcher, so your work is never mixed up with someone else's.
Abstract
The short summary at the start of a paper: what you studied, how, and what you found.
Manuscript
Your paper before it is published.
Peer review
Other researchers read your paper and point out problems before it is published.
Predatory journal
A fake or dishonest journal that takes your money but does no real checking. Publishing there can harm your career.
Due diligence
Checking that a journal is real and honest before you send your paper to it.
Turnaround
How long the journal usually takes to give you a decision.
Reporting guideline
A checklist (like STROBE or CONSORT) of what your type of study must report. Most editors require it.
IMRaD
The standard paper structure: Introduction, Methods, Results, and Discussion.
Conflict of interest
Anything that could bias your work, like funding from a company. Journals require you to state this.
Ethics approval
Written permission from your hospital's ethics committee to do the study. Journals ask for the approval number.
Open call
A funding call still accepting applications. Not the same as a call for papers, which asks for articles, not money.
Open access
Anyone can read the paper for free. Sometimes the author pays a fee (APC) for this.
Quartile
A rough rank of how often a journal's papers are cited. Q1 is the top quarter.
Corresponding author
The author who talks to the journal and answers readers' questions. Usually you, if you submit.
Preprint
A version of your paper shared online before peer review. Useful, but not yet checked.
Waiver
The journal agrees to reduce or cancel its fee if you ask, often for authors from India and similar countries.
Submission
Sending your finished paper to a journal to be considered.
Account menu open, showing Open profile, Watch feature video, User guide, and Sign out.

You're already here

This guide, and the short feature-walkthrough video, are always one click away — open your account menu on the web workspace, or find "Feature video" and "User guide" under Your work on the You tab of the phone app.